The most popular advice on 4K or HD is simple: always shoot, export, and deliver in the highest resolution you can. It's also expensive advice to follow blindly. 4K isn't a free quality upgrade. It's a commitment to move, store, and process far more data for every second of video, whether or not anyone can see the difference on the screen they're using.
That doesn't make 4K a mistake. It makes it a cost decision. On a large television watched up close, with a bitrate that supports the detail, 4K earns its bytes. In a small phone player, on a capped connection, or across thousands of ad variants, a well-encoded HD file often delivers almost the same perceived result for far less. The right question isn't which format is better in the abstract. It's where your extra pixels stop being visible and start being overhead.
Table of Contents
- 4K and HD Side by Side
- How the Standards Differ Beyond Pixel Count
- Viewing Distance Decides If 4K Is Visible
- Bitrate Targets for Each Resolution
- Storage, Transfer and Encoding Cost Compared
- Choosing the Right Resolution for Each Use Case
- Choosing Transcode, Deliver or Downscale Per Stage
- Set Your Default 4K and HD Ladder Today
4K and HD Side by Side
The resolution label describes the size of the frame, not whether viewers will see the extra detail. Consumer 4K UHD measures 3840 × 2160, or 8,294,400 pixels per frame. 1080p Full HD measures 1920 × 1080, or 2,073,600 pixels. At the same 16:9 aspect ratio, 4K carries exactly four times the pixels of 1080p, as shown in the display resolution standards reference.
HD and 4K UHD Specifications at a Glance
| Attribute | HD (1080p) | 4K UHD (2160p) |
|---|---|---|
| Resolution | 1920 × 1080 | 3840 × 2160 |
| Pixels per frame | 2,073,600 | 8,294,400 |
| Pixel multiple relative to 1080p | 1x | 4x |
| Aspect ratio | 16:9 | 16:9 |
| Governing standard | ITU-R BT.709 | ITU-R BT.2020 (UHDTV-1) |
| Cinema equivalent | Not applicable | 4096 × 2160 (digital cinema) |
720p contains 921,600 pixels per frame, so a 4K frame has nine times as many. Because 1080p and 4K UHD share a 16:9 aspect ratio, downscaling from 4K to 1080p preserves the framing while reducing detail.
Match the dimensions to the delivery target. Digital cinema commonly uses 4096 × 2160, while televisions and streaming services generally use 3840 × 2160. Viewers can compare IPTV subscriptions in Canada to see how providers present HD and 4K options.
First filter: Match the output to the delivery target. Pixel count measures the size of the processing job; it does not establish whether the added detail will be visible.
How the Standards Differ Beyond Pixel Count
4K alone is an incomplete quality specification. Two files can both be labeled 4K and look very different, and a strong HD file can beat a weak 4K file outright.
Resolution is only one attribute. Codec, bit depth, chroma subsampling, HDR transfer function, and frame rate each change output quality independently. A 1080p file with 10-bit HDR can show smoother gradients and better highlights than an 8-bit standard-dynamic-range 4K file, even though the 4K file wins on pixel count. If you compare resolution alone, you'll make the wrong call.
That's why a pipeline should record each attribute for every source before choosing a target. Our guide to video codec support is a useful reference when you're checking which codec and profile combinations your workflow needs to handle.
Why One Output Profile Is Not Enough
HD itself was never a single format. The history of high-definition television notes that ITU-R Recommendation BT.709 uses a 16:9 aspect ratio and defines 1080-line interlaced and progressive scanning formats, while 720p contains 1280 × 720, or 921,600 pixels per frame.
Modern distribution still reflects that split. Social platforms, connected-TV services, archives, and enterprise applications may require 720p, 1080p, and 2160p versions simultaneously, each with different bitrate, storage, thumbnail, and processing requirements. Treating HD as one bucket guarantees you'll overserve some channels and underserve others.
Before you choose a target, fill in this checklist for every source file:
- Resolution: Record the exact width and height, not just the marketing label.
- Codec: Note H.264, H.265, VP9, AV1, or whatever the source uses.
- Bit depth: Distinguish 8-bit from 10-bit, since it affects banding and HDR handling.
- Chroma subsampling: Check whether color detail is already reduced before you encode.
- HDR: Identify whether the file is SDR or carries an HDR transfer function.
- Frame rate: Confirm the rate you'll preserve, convert, or drop.
Once those six fields are known, the 4K or HD choice becomes a decision about a complete signal, not a guess based on a label.
Viewing Distance Decides If 4K Is Visible
4K doesn't automatically look sharper. If the viewer sits too far from a screen that's too small, the eye can't resolve the extra detail, and you're paying to deliver pixels nobody perceives.
The image below shows the ordinary setup where this decision is usually made, a person on a sofa at a normal living-room distance.
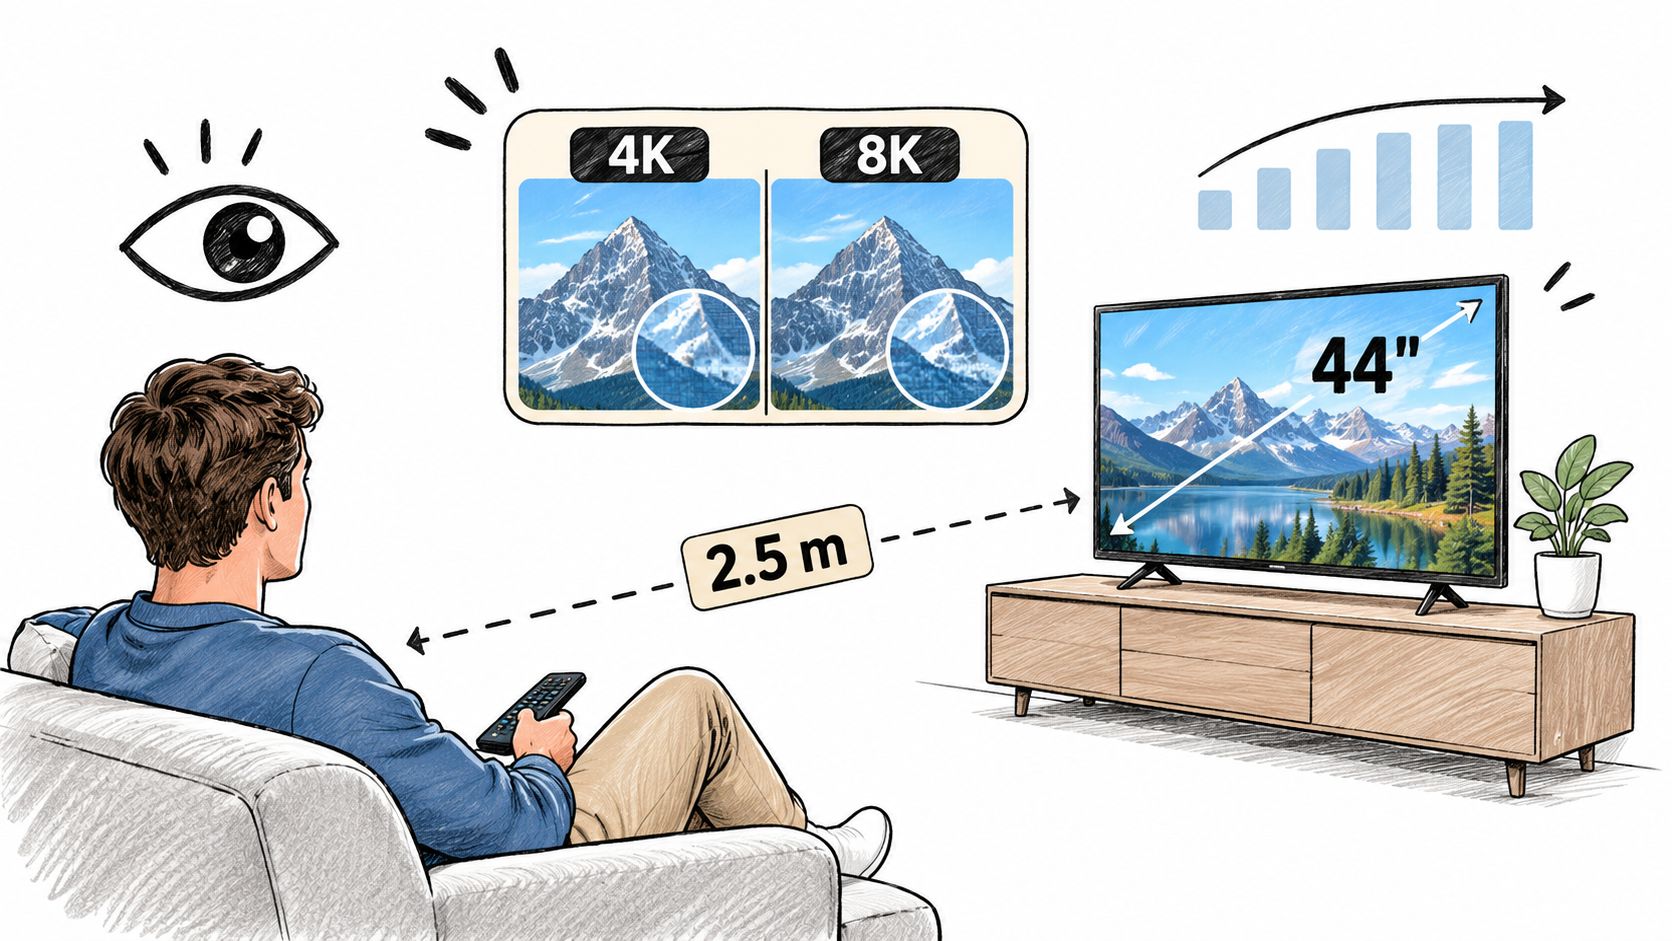
Research summarized by the University of Cambridge found that for a typical 44-inch television viewed from about 2.5 metres, researchers found no noticeable benefit from 4K or 8K over QHD because QHD already reaches the visual resolution threshold in that setup. On a larger 65-inch screen, viewers may distinguish 4K from 1080p at roughly 4 to 8.5 feet, while sitting farther away can make the two look effectively identical.
Measure Three Inputs Before You Decide
- Screen size: Measure the diagonal of the device your audience uses, not the monitor on your desk.
- Viewing distance: Measure from the viewer's eyes to the screen in the setting.
- Eyesight: Account for the viewer, since visual acuity changes the threshold.
Lighting and content type modify the result. Fine detail such as on-screen text, foliage, or dense graphics reveals a resolution gap earlier than soft, slow footage does. A talking head against a plain wall gives 4K very little to prove.
The video below works through how distance changes what resolution you can perceive.
Say your audience watches on a 65-inch screen at 10 feet. That distance sits beyond the range where 4K separates itself from 1080p, so a 4K rendition mainly adds file size and processing cost. Move that same audience closer, or put the content on a larger screen, and the calculation flips.
At my actual screen size and distance, will 4K be visibly better, or will it only increase file size and processing cost?
Ask that before you build any 4K rendition. If you can't answer it with a screen size and a distance, you aren't ready to choose.
Bitrate Targets for Each Resolution
A 4K file encoded at an HD bitrate is the most common way to make 4K look bad. You've spread a limited budget of bits across far more pixels, so the encoder starves detail, and high-motion scenes break into visible blocks. Changing resolution without changing bitrate isn't an upgrade. It's a quality cut wearing a bigger label.
The chart below summarizes why bitrate has to move with resolution.
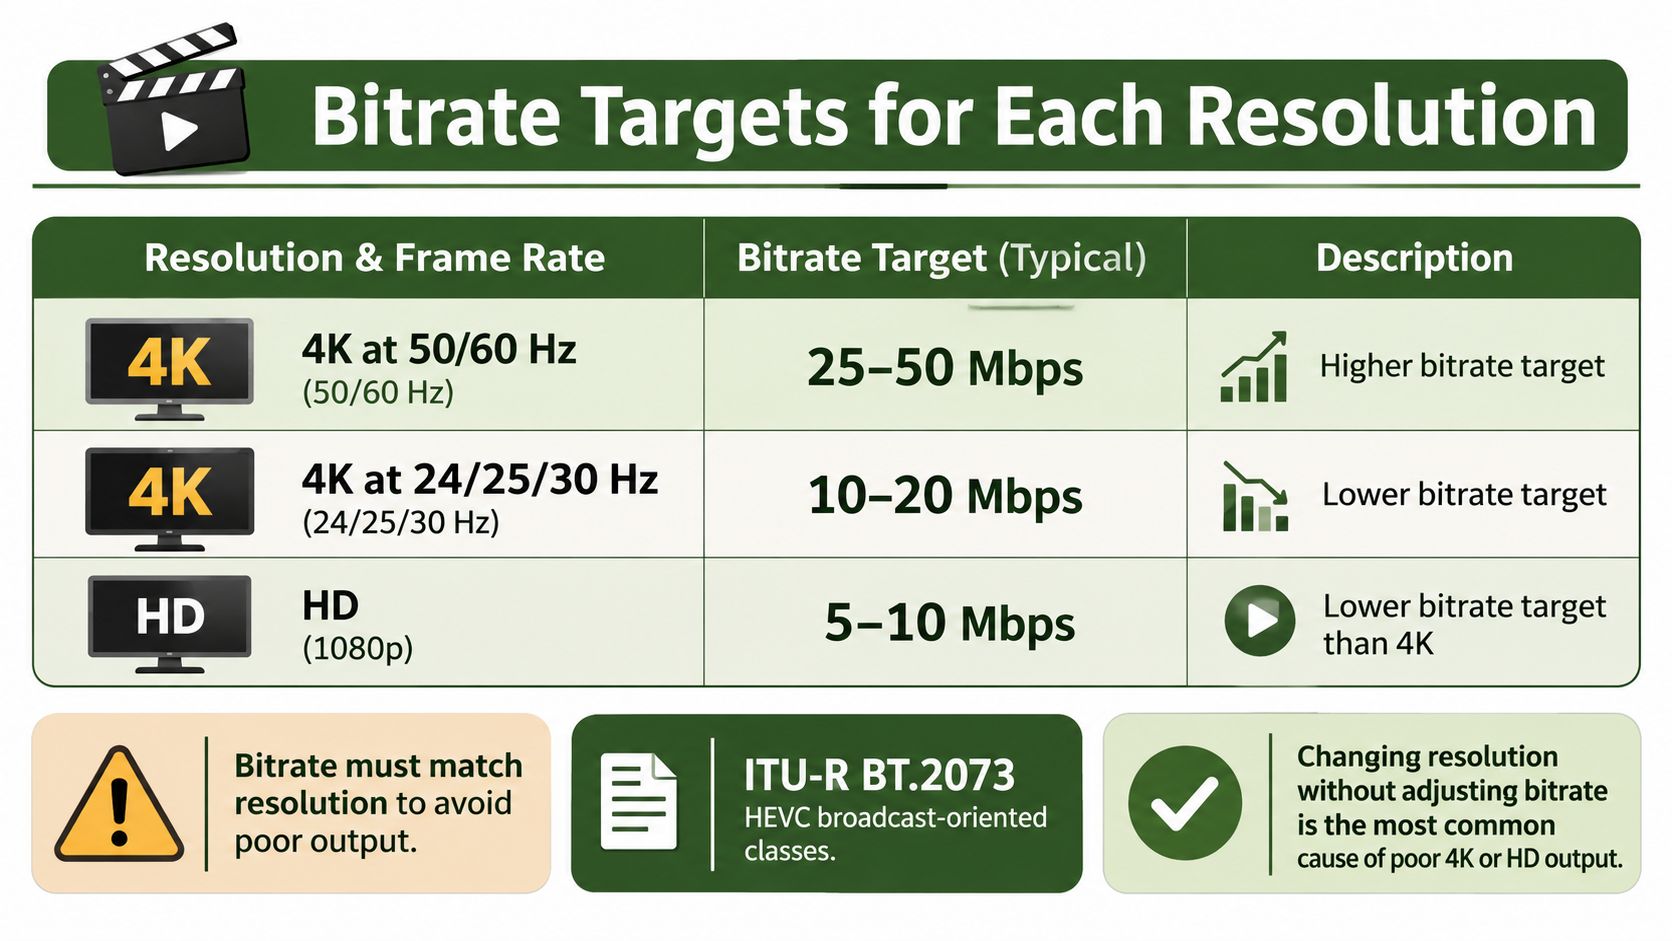
For HEVC broadcast-oriented encoding, the ITU transmission report states that ITU-R BT.2073 specifies 3840 × 2160 at 50/60 Hz at approximately 30 to 40 Mbit/s, whereas 1920 × 1080 at 50/60 Hz is approximately 10 to 15 Mbit/s. Separately, ITU transmission guidance gives a broader operational range of roughly 20 to 50 Mbit/s for 4K and 5 to 14 Mbit/s for HD, depending on codec, frame rate, motion, detail, and tolerated distortion.
Bitrate Ranges for HD and 4K by Reference Context
| Reference context | HD 1080p | 4K 2160p | What changes the number |
|---|---|---|---|
| ITU-R BT.2073 HEVC profile, 50/60 Hz | 10 to 15 Mbit/s | 30 to 40 Mbit/s | Codec profile and frame rate |
| ITU transmission guidance, operational range | 5 to 14 Mbit/s | 20 to 50 Mbit/s | Motion, detail and tolerated distortion |
| High-motion sports or action footage | Upper end of range | Upper end of range | Motion raises the bitrate needed to avoid blocking |
| Static talking-head or slide content | Lower end of range | Lower end of range | Low motion allows lower bitrate at equal quality |
| 4K rendition encoded at HD bitrate | Correctly matched at HD rates | Visible blocking in high motion | Failure case to test for |
The opposite error wastes money. Preserving 4K at a generous bitrate for a target that's really 1080p multiplies storage and transfer without a proportional viewing benefit. When delivery bitrate and connection quality don't match, viewers feel it as stalling playback, which is why practical troubleshooting advice to stop IPTV streams from freezing starts with the relationship between stream demands and available bandwidth.
Treat the table as a starting point, then test. Our guide to video compression for the web covers how these choices play out for browser delivery.
- Choose a quality-driven setting: Use codec-aware CRF or constrained VBR rather than a fixed bitrate chosen from resolution alone.
- Encode two samples: Pick one high-motion clip and one low-motion clip that represent your real content.
- Inspect every output: Check output dimensions and read the FFmpeg log for each rendition before you trust it.
- Set the ladder from samples: Lock your defaults based on what the samples show, not what a spec sheet promises.
Starting point, not verdict: Spec ranges tell you where to begin testing. Your own high-motion sample tells you where blocking actually starts.
Storage, Transfer and Encoding Cost Compared
Start with a film night. Typical estimates cited by Optimum's household data guide put HD streaming at about 3 GB per hour and 4K at about 7 GB per hour, with 4K requiring roughly 25 Mbps for smooth playback. That means a two-hour 4K film can consume approximately 14 GB, compared with about 6 GB in HD.
That gap matters well beyond one viewer. It lands on capped broadband plans, mobile viewing, audiences in remote regions, download sizes, and your own CDN bill. Multiply a few extra gigabytes by thousands of plays and resolution becomes a line item, not a preference.
Encoding Cost Starts Before Delivery
A 4K frame carries four times the samples of a 1080p frame at the same frame rate. Decode time, scaling work, and memory bandwidth all rise with that load. Downscaling doesn't dodge the cost either. When you convert a 4K source to 1080p, your pipeline still decodes and processes the full 4K raster before it produces the smaller output.
Uploading a 2 GB raw video file over a 100 Mbps connection takes about 2.5 minutes before processing starts. A 4K master therefore costs time before any encoding begins, and that transfer penalty repeats for every source you ingest. If your team is still sorting out containers and codecs at ingest, a practical guide to file formats can help you standardize what you accept.
Scale changes the infrastructure answer too. Dedicated infrastructure will be cheaper per unit for teams that process tens of thousands of hours of video per month. Below that volume, you're usually paying for idle capacity if you build for peak 4K load.
Now apply the contrarian check. If your audience watches on phones, on constrained connections, or in small social-media players, a well-encoded HD file may deliver nearly the same perceived experience at substantially lower transfer and storage cost. In that setting, 4K delivery isn't higher quality in any sense the viewer can confirm. It's just heavier.
Count delivered gigabytes and encode hours per 1,000 videos for each resolution before you choose a default.
That per-thousand view is where the 4K or HD decision stops being abstract. It shows you exactly what the extra pixels cost at your volume, for your audience, on your channels.
Choosing the Right Resolution for Each Use Case
Different channels answer the 4K or HD question differently, because the screen, the network, and the reuse value change each time. Use this table as your starting map.
Recommended Master and Delivery Resolution by Use Case
| Use case | Typical viewing context | Keep as master | Deliver at |
|---|---|---|---|
| Social shorts (TikTok, Reels, Shorts) | Phone, small vertical player | 4K if shot in 4K | 1080p vertical |
| Connected-TV streaming | Large living-room screen, viewed at a distance | 4K | 4K adaptive ladder with 1080p fallback |
| Mobile and capped-data viewing | Phone on cellular or limited plan | 4K | 720p or 1080p |
| Ad creative variations at scale | Feed placements, many test versions | 1080p | 1080p variants |
| Archive and future redelivery | Editing, later re-export | 4K | 4K archive plus 1080p proxy |
Social shorts play in small vertical players where viewers rarely see a 4K advantage, so 1080p delivery protects watch time without wasting bytes. Connected TV is the opposite case. Large screens can justify 4K, but only inside an adaptive ladder with a 1080p fallback for weaker connections and longer viewing distances.
Mobile and capped-data viewing turns on the hourly data gap between HD and 4K. When your viewer is counting gigabytes, 720p or 1080p isn't a downgrade they resent. It's the version that finishes playing. Ad creative at scale follows similar logic, since a 1080p master cuts the bytes attached to every test variant you generate.
Masters and Renditions Answer Different Questions
The master exists to keep your options open. The delivery rendition exists to fit the screen and network your viewer has. Confusing those two jobs is how teams end up either deleting future value or shipping needless weight.
So don't delete a 4K master just because today's audience is on phones. That master still earns its keep when you recut for connected TV, crop vertical versions from a wider frame, or redeliver next year. Keep the master at the highest quality you captured. Be ruthless only about what you deliver.
- Keep for reuse: Archive the best source you have, with its full attribute checklist recorded.
- Deliver for context: Match each rendition to screen size, distance, and connection, not to your master's specifications.
That split lets you say yes to 4K once, at capture and archive, and then make a sober HD decision for every channel where HD is enough.
Choosing Transcode, Deliver or Downscale Per Stage
Every source file should pass through the same decision sequence. The flowchart below shows the route from inspection to final output.
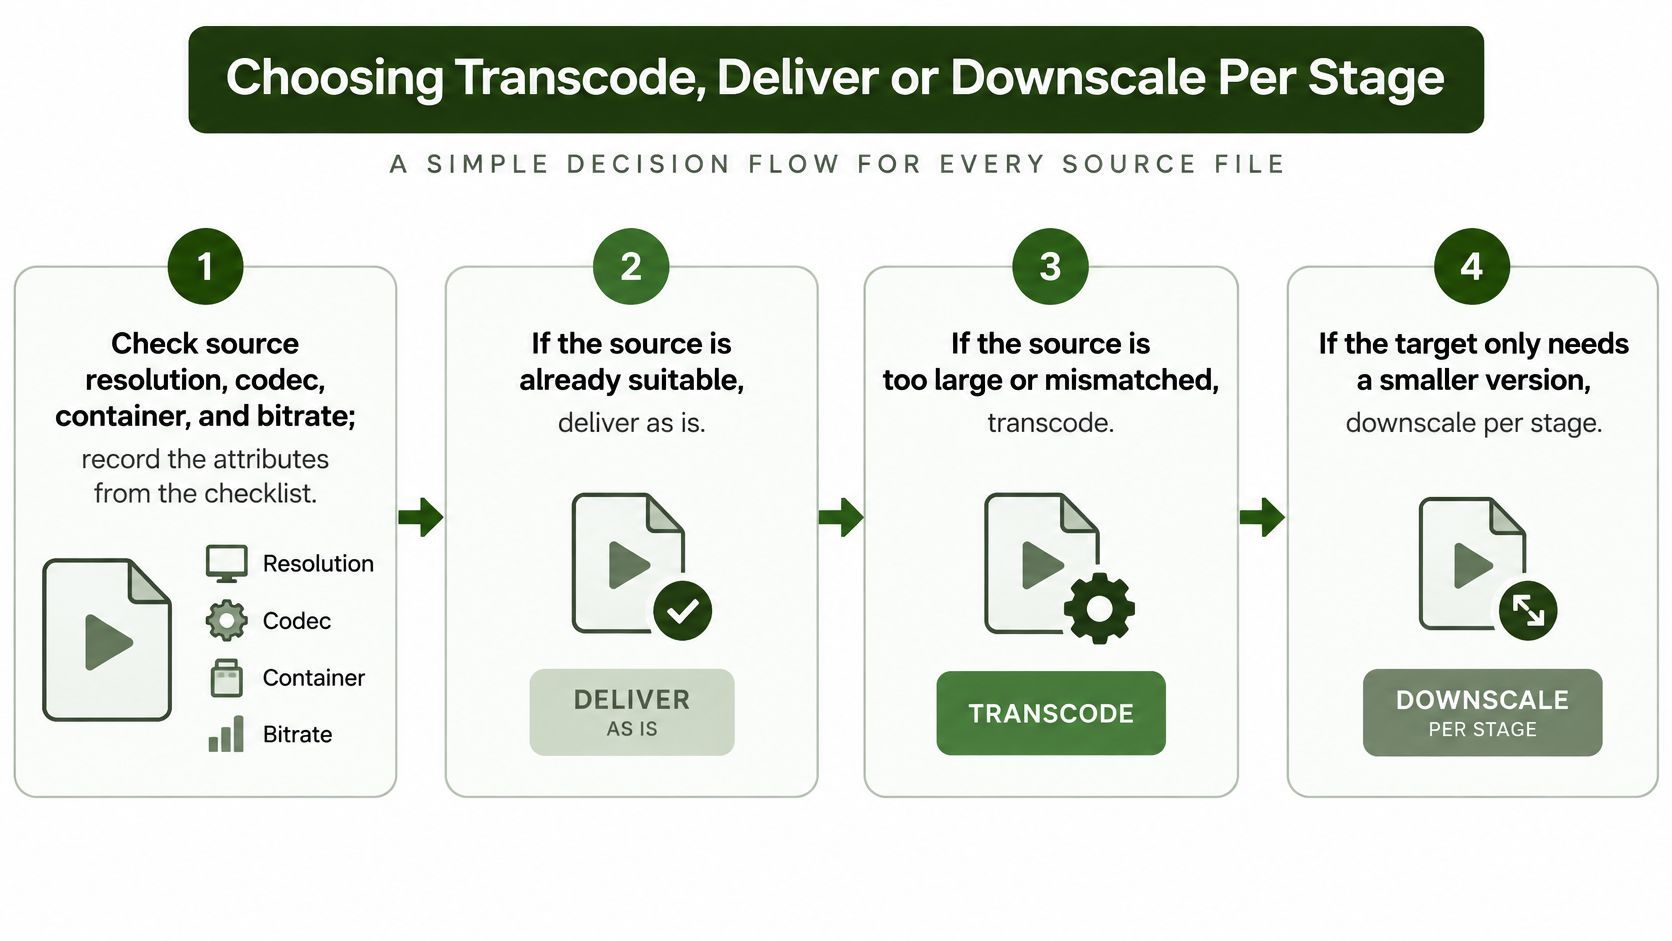
- Inspect the source: Check resolution, codec, container, and bitrate, and record them with bit depth, chroma subsampling, HDR status, and frame rate.
- Remux when only the container differs: If the codec already matches your target, change the wrapper without re-encoding. It's fast and loses nothing.
- Transcode when the signal must change: Re-encode when codec, bit depth, or bitrate has to change for the target platform, starting from the bitrate ranges you tested.
- Downscale to the delivery size: Convert a 4K source to 1080p or 720p when the target is that size, and keep the 4K master untouched for reuse.
- Generate renditions in parallel: Build each delivery version as its own output rather than producing one 4K file and reducing it later.
If you're unsure where remuxing ends and re-encoding begins, our comparison of transcoding and encoding explains the distinction in pipeline terms.
Triggers That Push You Toward Downscaling
- Small target: A 1080p or smaller placement can't display what 4K delivery costs you.
- Constrained network: Capped or cellular audiences lose more to buffering than they gain from resolution.
- Mobile-first channel: Phone players shrink the visible gap between HD and 4K.
- Variant volume: Ad testing multiplies every extra megabyte across each version.
Upscaling HD to 4K adds pixels, not detail. It raises file size without improving the picture, so treat any request for it as a red flag.
Decide the rendition set from the target channel before the job starts, not after the file is produced. A pipeline that picks its outputs up front avoids orphan 4K files, surprise storage bills, and emergency re-encodes when a platform rejects what you made.
Set Your Default 4K and HD Ladder Today
You don't need a perfect ladder. You need a defensible default you can test and adjust.
Start with three tiers. Keep the 4K master, generate a 1080p distribution rendition, and add a 720p rendition for constrained or mobile delivery. That structure covers large screens, ordinary broadband, and weak connections without forcing one file to serve every context badly.
Set each rendition's bitrate from your high-motion and low-motion samples, using the ITU ranges as your starting range rather than your final answer. A sports catalogue and a catalogue of recorded lectures shouldn't share the same defaults just because they share a resolution. Motion, not marketing, decides where in the range you land.
Verify Before the Ladder Goes Live
Before you adopt any ladder, check the output dimensions, codec, and file size of every rendition. In our workflow, each result includes duration, codec, resolution, and file size metadata, so you can confirm an output matches the rung you intended before it reaches a viewer. A file that is the wrong size will cost you more than the test that would have caught it.
You can run the ladder as a chained job, a 4K to 1080p resize followed by a 720p rendition, with each result verified in turn. Supported operations include transcoding, resizing, watermarking, chaining filters, extracting audio and generating thumbnails, so the full ladder can be built and tested on real footage before you commit to it. During a free trial, video downloads are fully available so the customer can test the complete workflow, which means you can validate the entire chain, not just a truncated preview.
- This week: Pick the three renditions for your top channel.
- Next: Run one high-motion and one low-motion sample through each rung.
- Then: Compare file size and visible quality at your audience's real viewing distance.
That single test settles most of the 4K or HD argument for your catalogue. You'll know which rungs your viewers can see, what each one costs to deliver, and where HD does the job for less.
Build your 4K master, 1080p, and 720p ladder as chained FFmpeg jobs and verify every rendition's codec, resolution, and file size before you ship it. Visit RenderIO to run your high-motion and low-motion samples through the complete workflow and set defaults based on your own footage, not a generic spec sheet.