1080 x 1920 pixels at 9:16 is the recommended TikTok video resolution, with 720 x 1280 as the minimum accepted for organic feed video. The best export also needs to match your upload route, because organic publishing, ads and API submissions don't share one universal specification.
The format isn't arbitrary: in a 2021 analysis of top-performing TikTok videos, 98.63% used 9:16, according to YouGov. That historical finding supports vertical composition, but it doesn't mean every technically accepted file is worth publishing.
For production, separate three questions: will TikTok accept the file, does the composition work on a phone, and does the export preserve useful detail? An automated pipeline should answer all three before submitting a batch.
Table of Contents
- TikTok Video Resolution and Aspect Ratio at a Glance
- Recommended Export Settings for TikTok Uploads
- Upload File Size, Duration and Frame Limits
- When Higher Resolution Stops Helping Viewers
- Crop, Pad or Keep the Frame for Non-Vertical Footage
- How to Resize Horizontal Footage to 9:16 with FFmpeg
- Fixing Blurry, Stretched or Rejected TikTok Uploads
- Confirm Your TikTok Export Preset Before Each Upload
TikTok Video Resolution and Aspect Ratio at a Glance
Start with the placement, not the export menu. Sprout Social's video specifications guide recommends 1080 x 1920 pixels at 9:16 for TikTok, while DocumentaryTube's TikTok Studio guidance reports an organic upload floor of 720 x 1280 pixels.
Recommended and minimum TikTok video sizes by placement
| Placement | Aspect Ratio | Recommended Size | Minimum Size |
|---|---|---|---|
| Organic feed video | 9:16 | 1080 x 1920 | 720 x 1280 |
| Vertical ad | 9:16 | 1080 x 1920 | 540 x 960 |
| Horizontal ad | 16:9 | 1920 x 1080 production preset | 1280 x 720 |
| Square ad | 1:1 | 1080 x 1080 production preset | 640 x 640 |
| Content Posting API upload | Flexible | Vertical master matching the intended placement | 360 px per side, maximum 4096 px per side |
The horizontal and square recommendations above are production presets, not additional acceptance requirements. For the distinction between vertical advertising and API eligibility, Bukcil's specification summary lists 540 x 960 pixels as the vertical ad minimum and 360 to 4096 pixels per side for Content Posting API uploads.
Accepted pixels aren't a quality target
A vertical master uses the phone's portrait canvas without automatically introducing bars around a mismatched image. TikTok's advertising analysis found that videos shot at 720p or higher produced a 312% conversion lift compared with lower-resolution video, according to TikTok's creative-performance guidance. That's an advertising finding, not a promise about organic reach.
Treat the dimensions in the table as separate decisions. The minimum determines eligibility for the route; the recommended production size gives you a consistent editing canvas for captions, graphics and framing.
Practical rule: Build a vertical master for full-screen delivery, then validate the actual placement before uploading. Don't use an API's smallest accepted dimensions as your creative-quality standard.
Also check orientation explicitly. An export preset labeled HD can produce horizontal output even when the project looked vertical in the editor. Inspect the encoded width and height rather than trusting the preset name or filename.
Recommended Export Settings for TikTok Uploads
Use MP4 with H.264 video and AAC audio, a vertical master and a constant frame rate as the default. TikTok's Media Transfer Guide recommends H.264, supports H.265, VP8 and VP9, accepts MP4, WebM and MOV containers, and permits 23 to 60 fps.
H.264 and AAC are a practical interoperability choice, not a claim that every supported alternative is inferior. They're straightforward to inspect, widely supported by editing tools, and convenient when the same master feeds several publishing workflows.
For an ordinary talking-head or product clip, I would start with constant 30 fps. Preserve deliberate high-frame-rate motion when it matters, but don't convert footage merely to make the frame-rate number larger.
Normalize timing and inspect the result
- Audio consistency: Use a conventional audio sample rate supported by your editing chain, and preserve timestamps correctly. Sample rate alone doesn't fix synchronization errors.
- Variable-frame-rate sources: Normalize phone footage and screen recordings to a constant output cadence when your pipeline needs predictable timing.
- Traceable filenames: Include the placement, framing method and preset identifier so you can reproduce a failed variant.
- Compression control: Adjust encoding quality deliberately rather than repeatedly exporting an already compressed file; the FFmpeg MP4 compression guide explains the relevant controls.
Inspect the output with:
ffprobe -v error -show_entries stream=codec_type,codec_name,width,height,r_frame_rate,avg_frame_rate,sample_aspect_ratio:format=duration,size -of json output.mp4
Check the video stream separately from the audio stream. Confirm dimensions, codec, frame-rate fields and duration, then watch the encoded file with sound. Matching metadata doesn't prove that motion is smooth or that speech remains synchronized through the end.
Upload File Size, Duration and Frame Limits
There is no single TikTok upload limit for every route. Organic uploads, ad submissions, and API publishing can apply different requirements to the same video, so validate against the route you plan to use.
| Upload Route | What to Check |
|---|---|
| Organic upload | Check the current limit in the TikTok app or upload interface. |
| Paid ad creative | Check the current requirements for the selected ad placement in TikTok's advertising specifications. |
| Content Posting API | Check the current requirements in TikTok's Content Posting API documentation. |
Duration allowances can vary by account and route. For longer clips, consult the TikTok video maximum-length guide, then confirm the limits for the upload method you plan to use.
Estimate size before encoding the batch
For a bitrate-controlled export, estimate the payload as:
File size in bytes = combined video and audio bitrate in bits per second × duration in seconds ÷ eight.
For example, a hypothetical thirty-second clip with video at eight megabits per second and audio at one hundred twenty-eight kilobits per second would be about thirty and a half megabytes. This is an estimate: variable bitrate and container overhead can change the final file size.
If the estimate is too large for the route, reduce video bitrate if the quality setting allows it. Shorten the clip only if the edit can lose material without weakening its message, and check the route's duration requirements separately.
Find the binding limit, the requirement the file fails first. Changing resolution will not fix an unsupported container, and trimming will not fix invalid dimensions.
Measure the encoded file before submission. Leave headroom rather than targeting the limit exactly.
When Higher Resolution Stops Helping Viewers
Uploading a larger master doesn't guarantee equally high-resolution playback. TikTok re-encodes uploads, and Track Media's resolution guidance distinguishes the platform's accepted dimensions from the resolution that's useful to export.
That's why export at the highest possible resolution is a poor default for automated publishing. More pixels can increase processing work and transfer size without preserving more visible detail in the delivered result.
A clean source matters more than a large output label. If the original already contains smeared texture, clipped highlights or compression blocks, resizing won't reconstruct what the camera or an earlier encoder discarded.
Keep detail where the edit needs it
Higher-resolution source footage is useful when you're reframing a product, following a moving face or extracting a vertical composition from a wider shot. It gives the editor more source detail to work with before the final downscale.
Text needs a different approach. Small lettering can become unreadable after compression even when the master looks sharp on a desktop, so enlarge essential labels and simplify fine graphics rather than relying on additional export pixels.
Ask three questions before choosing a larger intermediate:
- Source quality: Is the footage sharp at the intended delivery size?
- Editing requirements: Will cropping, stabilization or graphic compositing consume useful detail?
- Reuse: Will the master feed multiple platform variants that need different framing?
Keep the high-quality source or mezzanine for future edits, but publish a right-sized derivative. The 4K or HD comparison can help separate acquisition needs from delivery needs.
Measure processing time and output size on representative clips before changing a batch preset. A detailed product demonstration and a static talking head don't justify the same encoding decisions because they share an upload destination.
Crop, Pad or Keep the Frame for Non-Vertical Footage
Choose the framing method before selecting encoding quality. These treatments preserve different parts of the source:
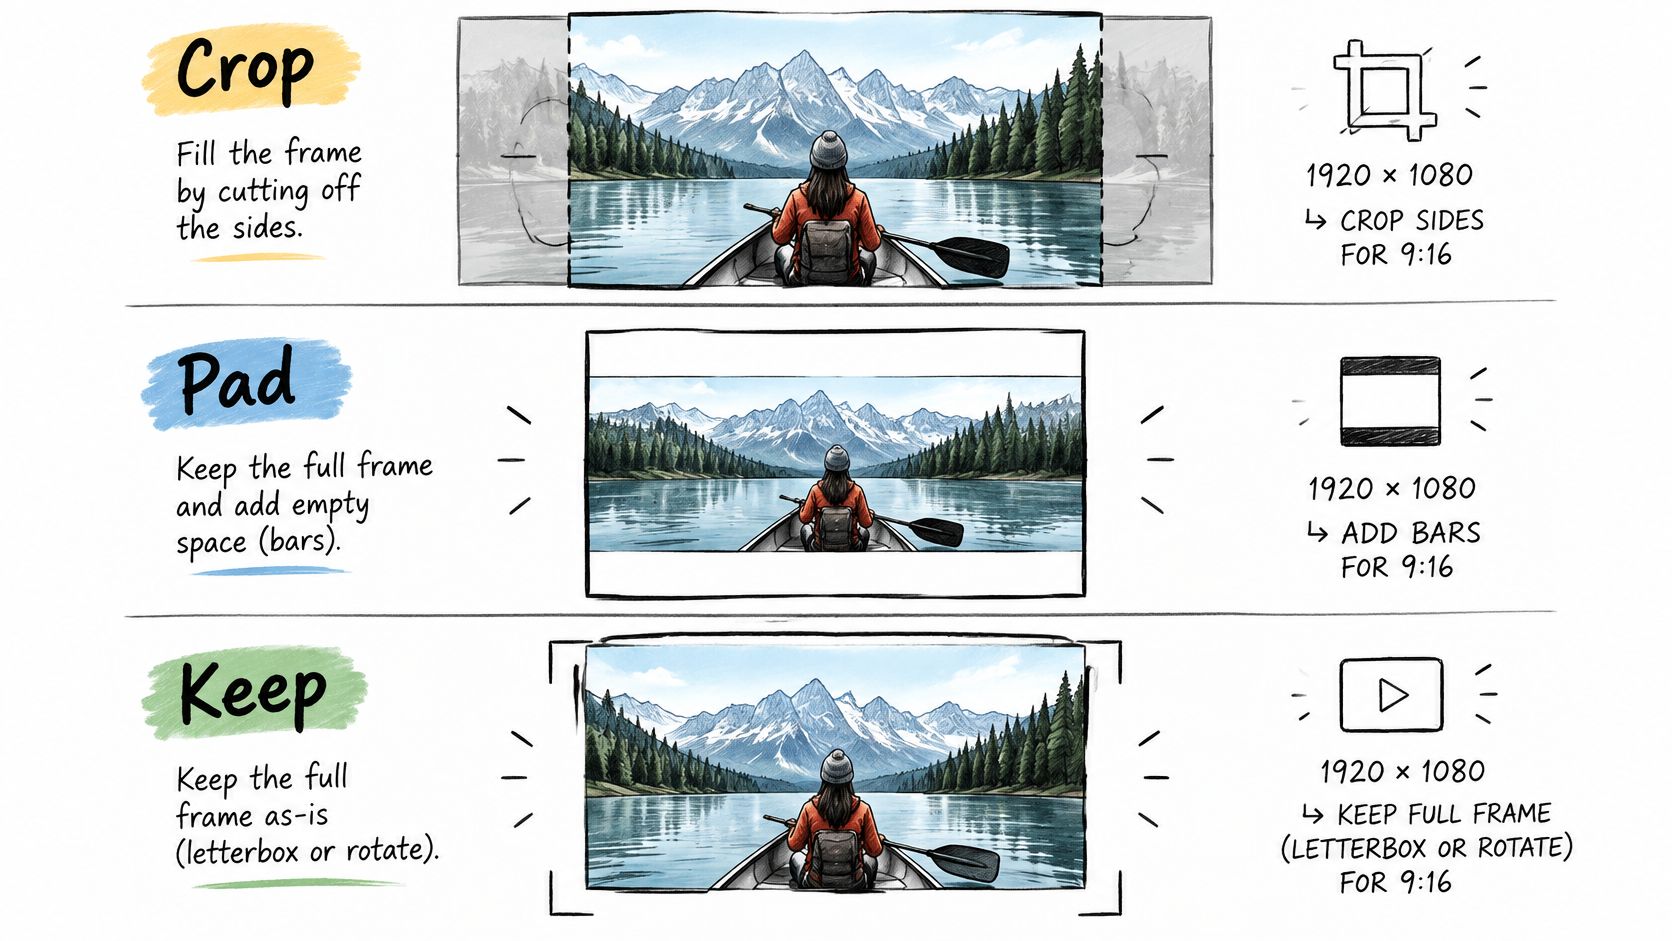
Cropping fills the canvas but removes the sides. For a hypothetical widescreen interview, a centered crop might retain the speaker while cutting off a second person, a presentation screen or burned-in subtitles.
Blurred-background padding preserves the complete foreground image over an enlarged, blurred copy. It works when retaining the scene matters more than making the subject large, but don't let a bright or busy background compete with the foreground.
Safe-zone framing preserves the original image against a deliberate background and reserves space for graphics. Bars alone don't guarantee safe text placement; captions and logos still need an interface-aware preview.
Three ways to fit non-vertical footage into 9:16
| Method | What Stays on Screen | What Is Lost or Changed | Best For |
|---|---|---|---|
| Crop to 9:16 | Central vertical slice of the source | Side content is removed; subject becomes larger | Centered subject with motion kept in the middle |
| Blurred background pad | Full frame over a blurred copy of itself | Subject appears smaller on screen | Talking heads and centered landscapes |
| Safe-zone framing | Full frame scaled to the canvas width with bars above and below | Bars added; room reserved for overlays | Footage with essential text, logos or edge action |
For a visual demonstration of reframing, watch the example below.
Don't crop automatically when essential content sits near the edges. Review representative frames through the clip, not just the opening thumbnail. If framing confidence is low, create placement-specific alternatives and route uncertain clips for review.
A mismatched composition is a framing problem, not a resolution problem. Raising the export dimensions won't bring a cropped-out person back into view.
How to Resize Horizontal Footage to 9:16 with FFmpeg
Use a deterministic filter chain so identical inputs receive identical treatment. TikTok's advertising specifications prefer 9:16, also accept horizontal 16:9 and square 1:1, and list minimum dimensions of 1280 x 720 and 640 x 640 for those respective alternatives.
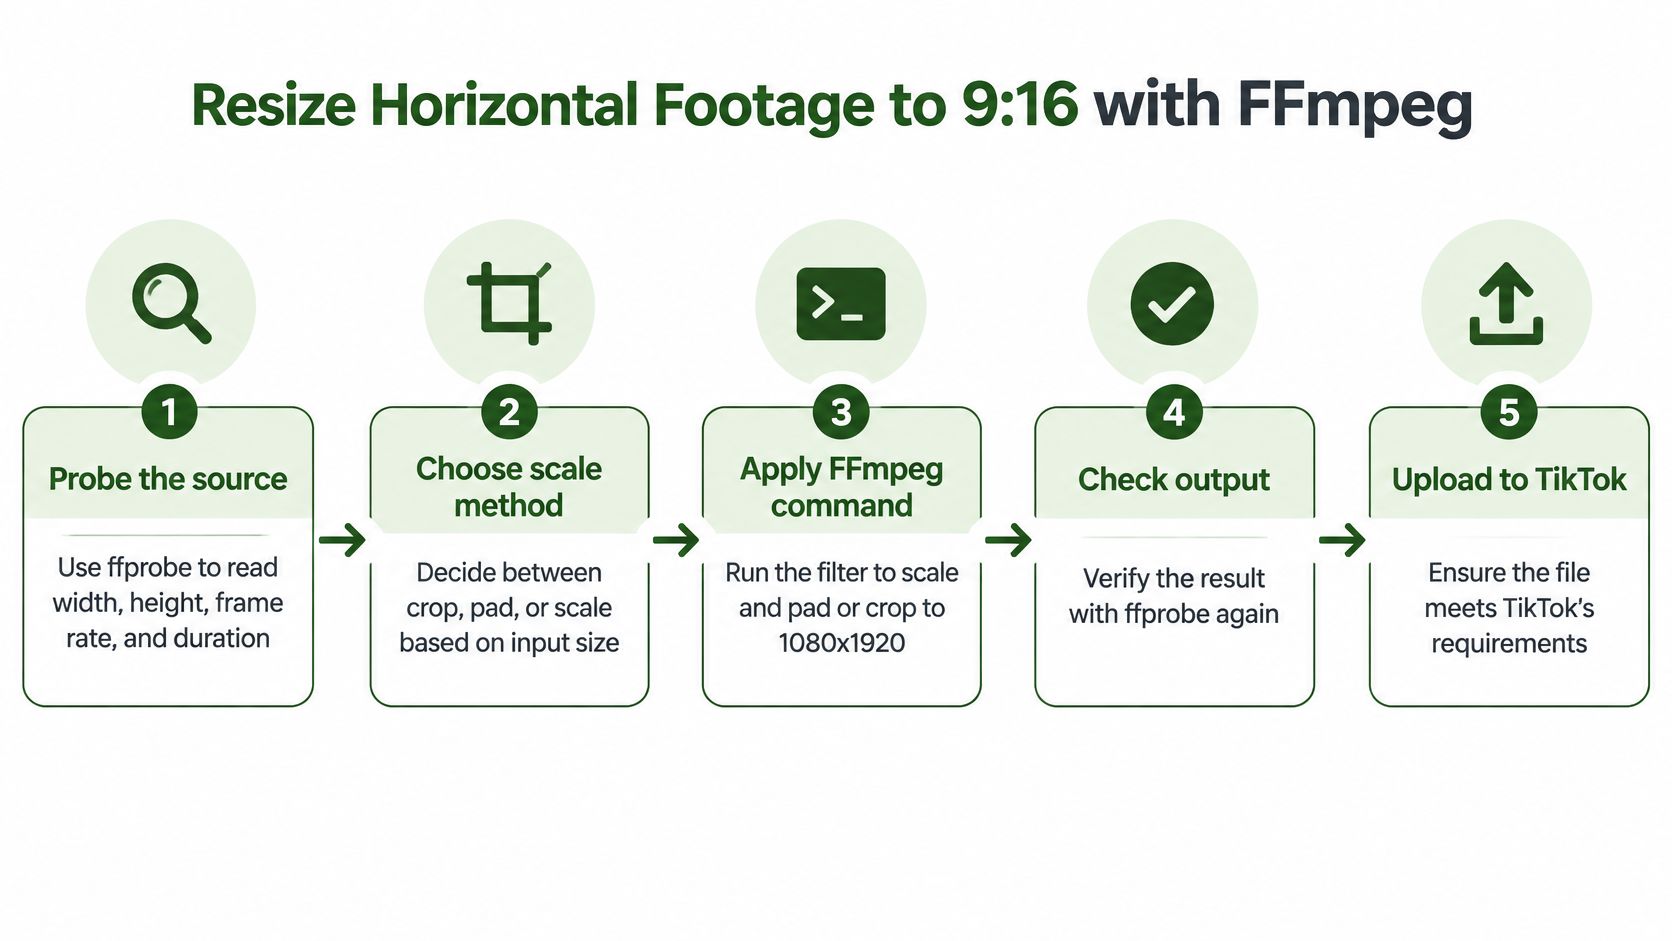
The workflow below separates inspection, composition and encoding.
Normalize without stretching
Probe the source. Run the ffprobe inspection command on the input and read dimensions, frame rate and duration. Check rotation metadata too, because a phone file's stored dimensions may not describe its displayed orientation.
Choose the canvas and framing policy. Use the vertical production preset for a full-screen deliverable, then decide whether preserving the complete image or filling the screen matters more. Make that choice explicit in the job configuration rather than leaving it to an export template.
Scale proportionally and pad. For a concrete production preset, run
ffmpeg -i input.mp4 -vf "scale=1080:1920:force_original_aspect_ratio=decrease:force_divisible_by=2,pad=1080:1920:(ow-iw)/2:(oh-ih)/2,setsar=1" -r 30 -c:v libx264 -pix_fmt yuv420p -c:a aac -movflags +faststart output.mp4. This preserves the full frame and adds bars where necessary; the divisibility option helps avoid incompatible odd dimensions during intermediate scaling.Make encoding decisions explicit. The command selects H.264 video, AAC audio and a constant output cadence in an MP4 container. Add your tested quality or bitrate controls instead of assuming the encoder's defaults will meet every route's file-size cap.
Inspect the encoded output. Probe the result again and confirm the expected dimensions, square pixels, codec and frame rate. Decode or play the complete output too, because a valid header doesn't guarantee an intact file.
Use cropping only when approved. For edge-to-edge framing, replace the scale-and-pad portion with
scale=1080:1920:force_original_aspect_ratio=increase:force_divisible_by=2,crop=1080:1920,setsar=1. This centers the crop, so it isn't suitable when the important subject moves outside the retained region.
The common mistake is scaling directly to the canvas dimensions without preserving aspect ratio. That fills the frame by changing the subject's proportions, not by solving the composition.
Phone preview: Faces should retain their proportions, bars should be intentional, and essential text should remain clear of interface-covered edges.
Inspect a motion-heavy passage and a caption-heavy passage before approving the preset. A static opening frame won't expose every framing or timing failure.
Fixing Blurry, Stretched or Rejected TikTok Uploads
For a blurry upload, inspect the source first, then the crop, then the encoded derivative. If the local export is already soft, the upload process isn't the first problem to solve.
Use this diagnostic sequence to avoid changing unrelated settings:
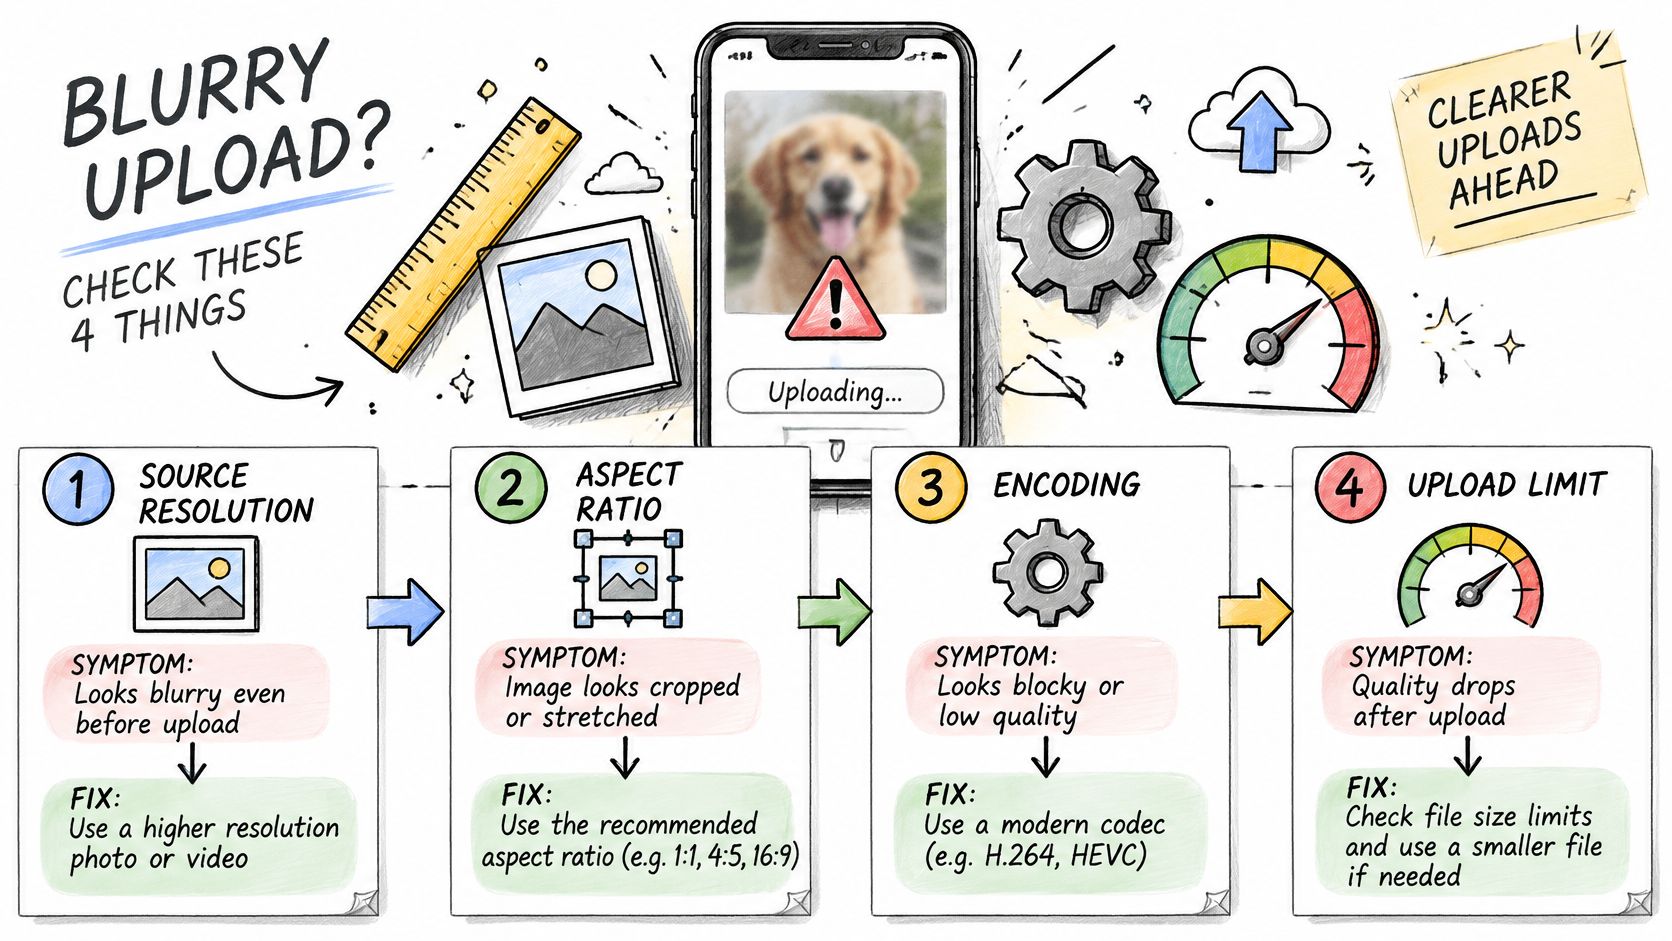
TikTok upload symptoms, causes and fixes
| Symptom | Likely Cause | Fix |
|---|---|---|
| Blurry after upload | Low-detail source, heavy compression or an aggressive crop | Re-export from the clean master with less compression; avoid unnecessary enlargement |
| Stretched people or objects | Scaling without preserving aspect ratio | Use force_original_aspect_ratio=decrease, then pad |
| Black bars on the sides | A narrower image fitted inside a wider canvas | Check rotation and canvas dimensions, then choose crop, blurred pad or safe zones |
| Rejected for file size | File exceeds the selected route's cap | Lower video bitrate or shorten the edit |
| Rejected for duration | Clip falls outside the route's duration window | Trim an overlong clip; restore content or choose another route for an underlength clip |
| Rejected for frame rate | Encoded timing is outside the endpoint's accepted range | Re-encode to the approved constant-frame-rate preset |
| Rejected for format | Container or codec isn't supported by that route | Remux compatible streams, or transcode to the MP4 interoperability preset |
Match the fix to the failure
A horizontal source fitted inside a vertical canvas normally creates bars above and below, not at the sides. Side bars suggest a different geometry mismatch, an embedded border, or incorrect rotation handling.
For sharpness, compare the same frame in the original and derivative at their displayed size. If the derivative loses detail, reduce compression or revise the crop; if both are soft, return to a better source rather than increasing the export dimensions.
For rejections, record the endpoint, error response and probed metadata together. An error that names the failing property is more useful than a generic upload failed message.
Don't repeatedly transcode a damaged derivative. Apply the corrected framing, timing and encoding settings directly to the clean master, then validate that new output before retrying the batch.
Confirm Your TikTok Export Preset Before Each Upload
Lock one master specification and one route-specific fallback, then test them before processing the queue. Keep this checklist beside the submission step:
- Composition: Confirm the intended vertical aspect ratio and approved master dimensions.
- Encoding: Verify MP4, H.264 and AAC for the interoperability preset.
- Timing: Confirm the chosen constant frame rate and synchronized audio.
- Route eligibility: Check actual file size, duration and dimensions against the destination's rules.
- Safe zones: Preview captions, logos and calls to action with interface overlays in mind.
- Reproducibility: Save the preset identifier and inspection results with the output.
RenderIO runs FFmpeg commands via API to resize videos for TikTok, convert formats and batch-process variations from a master.
Keep publishing operations separate from media validation. Creators Toolbox's guidance on how to plan, publish and measure social posts helps connect an approved asset to scheduling and performance review.
Export a test clip, inspect it with ffprobe, and watch it on a phone. Only scale the batch after that file passes both technical and visual checks.
RenderIO lets you run your TikTok resizing and conversion commands through an API, then produce consistent variations from the same master. Visit RenderIO to test your FFmpeg preset on a clip before applying it across your publishing batch.