An uncompressed HDTV signal requires approximately 1 Gbps, while a conventional television channel can reliably carry only about 19 Mbps, according to the ATSC Guide to the Use of the Digital Television Standard. That gap is why you encode HD video at all. You're not trying to preserve raw frames, you're trying to represent a 720-line or 1,080-line image at a bitrate that storage, networks and phones can handle, without breaking playback or shifting the color.
Table of Contents
- HD Settings Every Encode Should Start From
- Choosing Between H.264, HEVC, VP9 and AV1
- How to Encode HD Video with FFmpeg Step by Step
- Why Your HD Encode Looks Washed Out
- Hardware Encoders Versus Software Encoding
- Running HD Encodes at Scale Through an API
- Confirm Your Settings Before You Ship
HD Settings Every Encode Should Start From
Bitrate follows frame rate and motion, not resolution alone. Double the frames per second and the encoder has roughly twice as much new picture information to describe, even if the frame size doesn't change. Start from the row closest to your source, encode a short test, then adjust.
| Resolution and frame rate | H.264 target bitrate (SDR) | Notes |
|---|---|---|
| 720p at 24-30 fps | 5 Mbps | Fits mobile and short social clips |
| 720p at 50-60 fps | 7.5 Mbps | Sports and fast motion need the higher end |
| 1080p at 24-30 fps | 8 Mbps | Safe default for web and streaming delivery |
| 1080p at 50-60 fps | 12 Mbps | Use CRF for file-size targets, bitrate for streaming caps |
These are SDR targets for H.264, paired with a starting CRF of 21 to 23 when you're encoding for quality rather than a hard cap. HEVC or AV1 can reach a similar look at lower bitrates, but don't change codec and bitrate in the same test. You'll never know which change caused a problem.
Why the math forces your hand
The compression ratio implied by broadcast HD is roughly 50:1 or higher. That's achieved with chroma subsampling, frame prediction, transform coding and quantization, all of which throw away information your eye is least likely to miss. Even after that work, a nominal 10 Mbps stream is about 4.5 GB for one hour before audio and container overhead. Storage and egress scale with every megabit you add, which is why "just raise the bitrate" gets expensive fast in a library or a batch pipeline.
If you're deciding whether a project even needs a higher resolution ladder, it's worth checking the trade-off in our comparison of 4K and HD delivery before you multiply your storage bill. For most web delivery, a clean 1080p encode beats a starved 4K one.
Three things that move a row
- Motion: Sports, handheld footage and fast pans need the top of the range. A locked-off interview can sit comfortably below it.
- Grain and dark scenes: Film grain, sensor noise and low-light detail cost more bits at the same CRF because the encoder treats noise as detail worth keeping.
- Output purpose: A streaming platform with a cap favours a bitrate target. An archive or master file favours CRF, where size floats and quality stays consistent.
Quick diagnostic: If a 1080p30 talking-head clip lands far above 8 Mbps at CRF 22, your source is probably noisy. Denoise lightly or accept the size. Raising the bitrate ceiling won't fix the underlying cost.
Real estate walkthroughs are a good example of motion driving the choice, since a slow gimbal move through a bright interior behaves nothing like a static exterior shot. The video marketing insights for Florida agents from Pinnacle Property Media make that production case well, and the encoding implication is simple. Pick the row closest to your source frame rate, encode a 30-second test clip with your hardest scene in it, and only then commit to the full file.
Choosing Between H.264, HEVC, VP9 and AV1
Codec choice is a compatibility decision before it is a compression decision. These are the trade-offs at HD resolutions:
| Codec | Size versus H.264 | Playback reach | Encode cost | Best use |
|---|---|---|---|---|
| H.264 (libx264) | Baseline | Near-universal, including older devices | Low | Default delivery and fallback |
| HEVC (libx265) | Roughly a quarter to half smaller | Strong on recent phones, TVs and Apple devices; uneven in some browsers | Medium to high | Premium mobile and Apple-heavy audiences |
| VP9 (libvpx-vp9) | Similar to HEVC | Strong in Chrome, Firefox and YouTube | High | Web delivery paired with Opus audio |
| AV1 (libsvtav1 or libaom-av1) | About 10-15% smaller than HEVC | Growing; limited on older hardware | High | Bandwidth-sensitive platforms with tested devices |
The rule is simple. Reach beats savings unless you control the playback devices. A file that's 30% smaller but refuses to play on a viewer's older laptop costs more in support time than it saves in bandwidth.
How much AV1 actually saves
A Cambridge-published compression efficiency analysis of AV1, VVC and HEVC found AV1 can reduce bitrate by roughly 10 to 15% versus HEVC in random-access testing at similar subjective quality. That gain is real, and it is also incremental. It has to pay for meaningfully slower encodes and thinner hardware decoding on older devices.
H.264 remains the only codec you can assume everywhere, which is why it anchors the table above. If your masters carry HDR or wide color, add a second check: a codec that decodes on paper can still mishandle color metadata in a given player, so verify the full path on real devices.
Before you add a codec to a ladder, confirm what your audience's browsers and devices decode. Our guide to video codec support across platforms is a useful reality check against assumptions.
The hidden costs nobody charts
Failed playback is the obvious cost. The quieter ones add up too. Software decoding on a low-end phone drains battery and drops frames. Longer encode times raise the compute bill per asset. Every extra rendition is another file to store, cache, validate and keep in sync when a source gets replaced.
The codec with the best compression can still be the most expensive production choice. Duplicate renditions and failed playback can outweigh delivery savings.
A verdict by situation
For universal reach, ship H.264 only and spend the effort on a clean encode. For a premium mobile audience on recent hardware, add HEVC alongside H.264 and let the player choose. For a bandwidth-sensitive platform where you have tested the actual devices, add AV1 or VP9 as an extra rung. Keep an H.264 rendition as the fallback in every ladder. I would remove it only when your own playback analytics, rather than a codec announcement, show it going unused.
How to Encode HD Video with FFmpeg Step by Step
Start with a command you can paste and adapt. This produces a broadly compatible 1080p-ready MP4 from a typical master file:
ffmpeg -i input.mov -c:v libx264 -crf 22 -preset medium -pix_fmt yuv420p -c:a aac -b:a 160k -movflags +faststart output.mp4
The flow below breaks that command into its working parts.
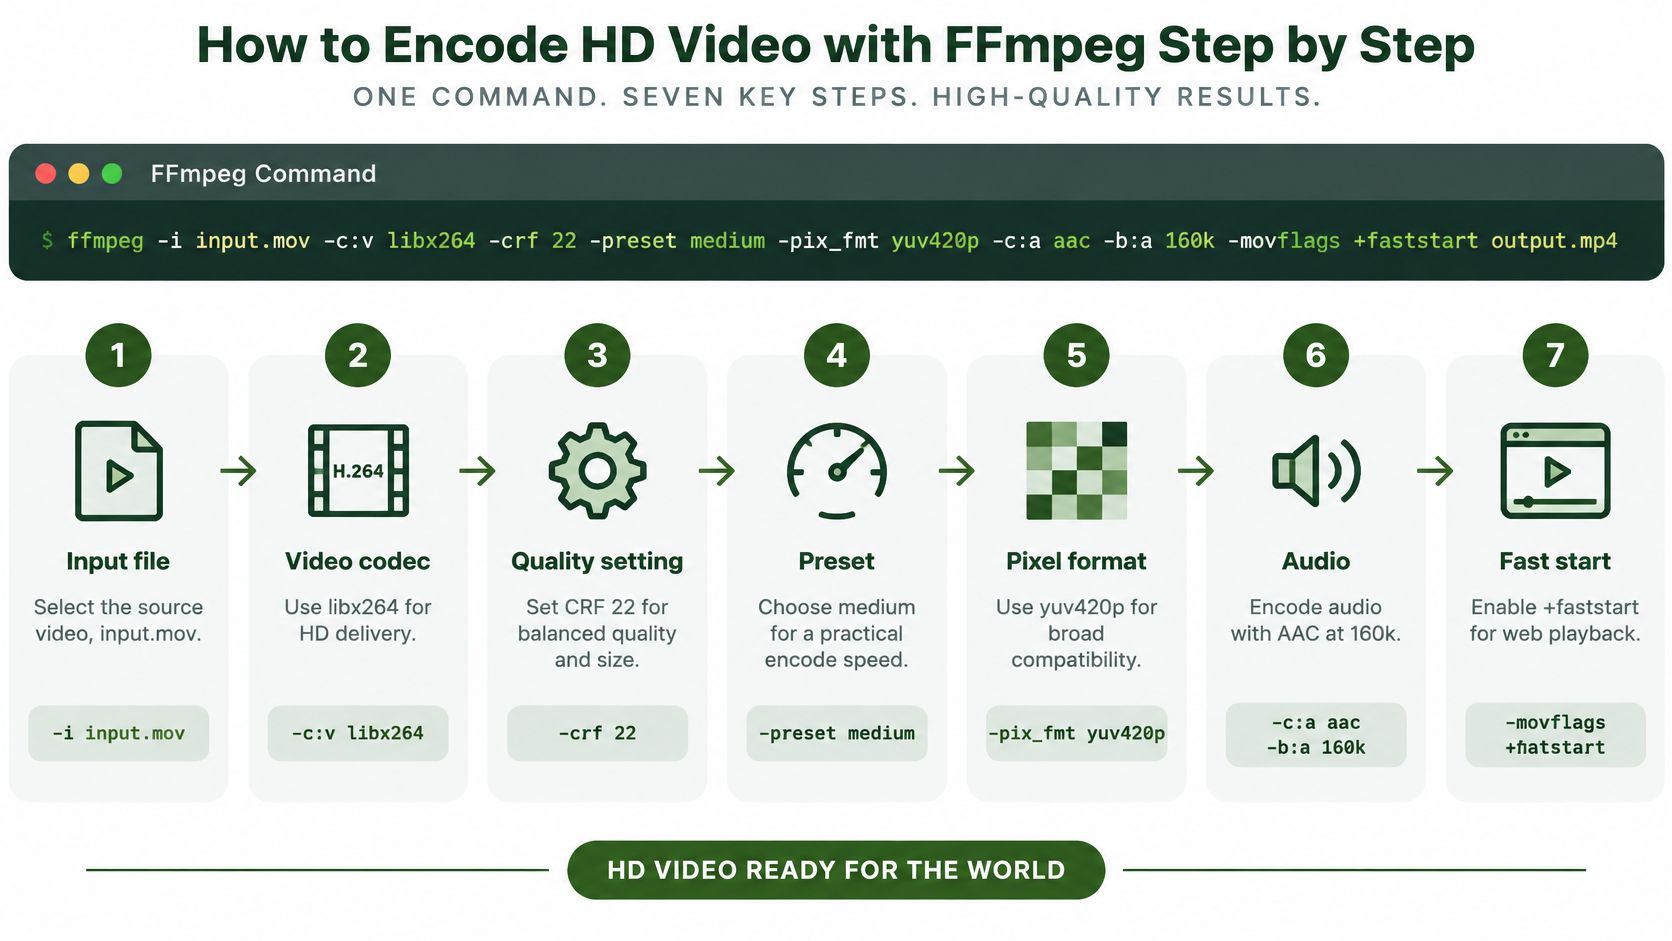
The seven steps
- Probe the source first: Run ffprobe and note resolution, frame rate, pixel format and field order. The probe decides everything downstream, and guessing here is how interlaced footage ends up encoded as progressive mush.
- Deinterlace or denoise only when needed: If the probe shows interlacing, deinterlace. If a quick look shows heavy grain that's inflating your bitrate, denoise lightly. Both cost time and can soften real detail, so don't apply them by habit.
- Encode with libx264 at CRF 22, preset medium: This is the balanced starting point for HD delivery. Slower presets compress better but take longer, so benchmark a representative clip before going slower across a whole library.
- Force yuv420p: Many browsers and players reject other pixel formats outright, especially 10-bit or 4:2:2 sources from cameras and editing exports. This one flag prevents the most common "file won't play" failure.
- Encode audio to AAC at 128 to 192 kbps: The native AAC encoder is in standard builds. Proprietary options often aren't, and a missing encoder fails the whole job, not just the audio.
- Add faststart for MP4:
-movflags +faststartmoves the index to the front of the file so playback can begin before the download finishes. Without it, web players may wait for the entire file. - Verify before you trust it: Check dimensions, frame rate, duration and audio sync with ffprobe, then watch the scenes most likely to fail. Dark gradients, fast motion and fine text tell you more than a file size ever will.
Understanding CRF before you touch it
The FFmpeg H.264 encoding guide documents CRF from 0 to 51, with 0 lossless, 23 as the default, and 17 to 28 as the commonly sensible range, and notes that a six-point CRF change approximately doubles or halves bitrate and file size. Moving from 23 to 17 can roughly double your storage. That's not a small quality nudge, it's a budget decision.
Don't treat CRF as a bitrate guarantee. Complex motion, grain, animation and dark scenes produce very different sizes at the same setting because CRF holds perceived quality steady and lets size float. That's the point of it.
The walkthrough below shows the same probe, encode and verify rhythm applied to a real file.
Two variants you'll actually use
For a streaming bitrate cap, replace -crf 22 with -b:v 8M -maxrate 10M -bufsize 16M. This suits platforms that enforce a ceiling, since CRF alone can spike through it on a complex scene.
To scale a source, insert -vf scale=1920:-2 before the codec options for 1080p, or -vf scale=1280:-2 for 720p. The -2 keeps the other dimension even, which yuv420p requires. An odd height fails the encode.
Logging habit: Record codec, CRF, preset, frame rate, resolution and output bitrate for every job, and keep the FFmpeg stderr output. When quality regresses three weeks later, that log is the difference between a five-minute fix and a guessing game.
Why Your HD Encode Looks Washed Out
A dark scene looks right in your editor. You export, upload, open it on a phone, and the shadows have lifted, the contrast is gone and skin tones look grey. The instinct is to raise the bitrate. Don't. More bitrate cannot repair wrong color tags, and you'll produce a larger file that's still wrong.
The diagram below shows how a metadata mismatch, not a bitrate problem, produces that washed-out shift.
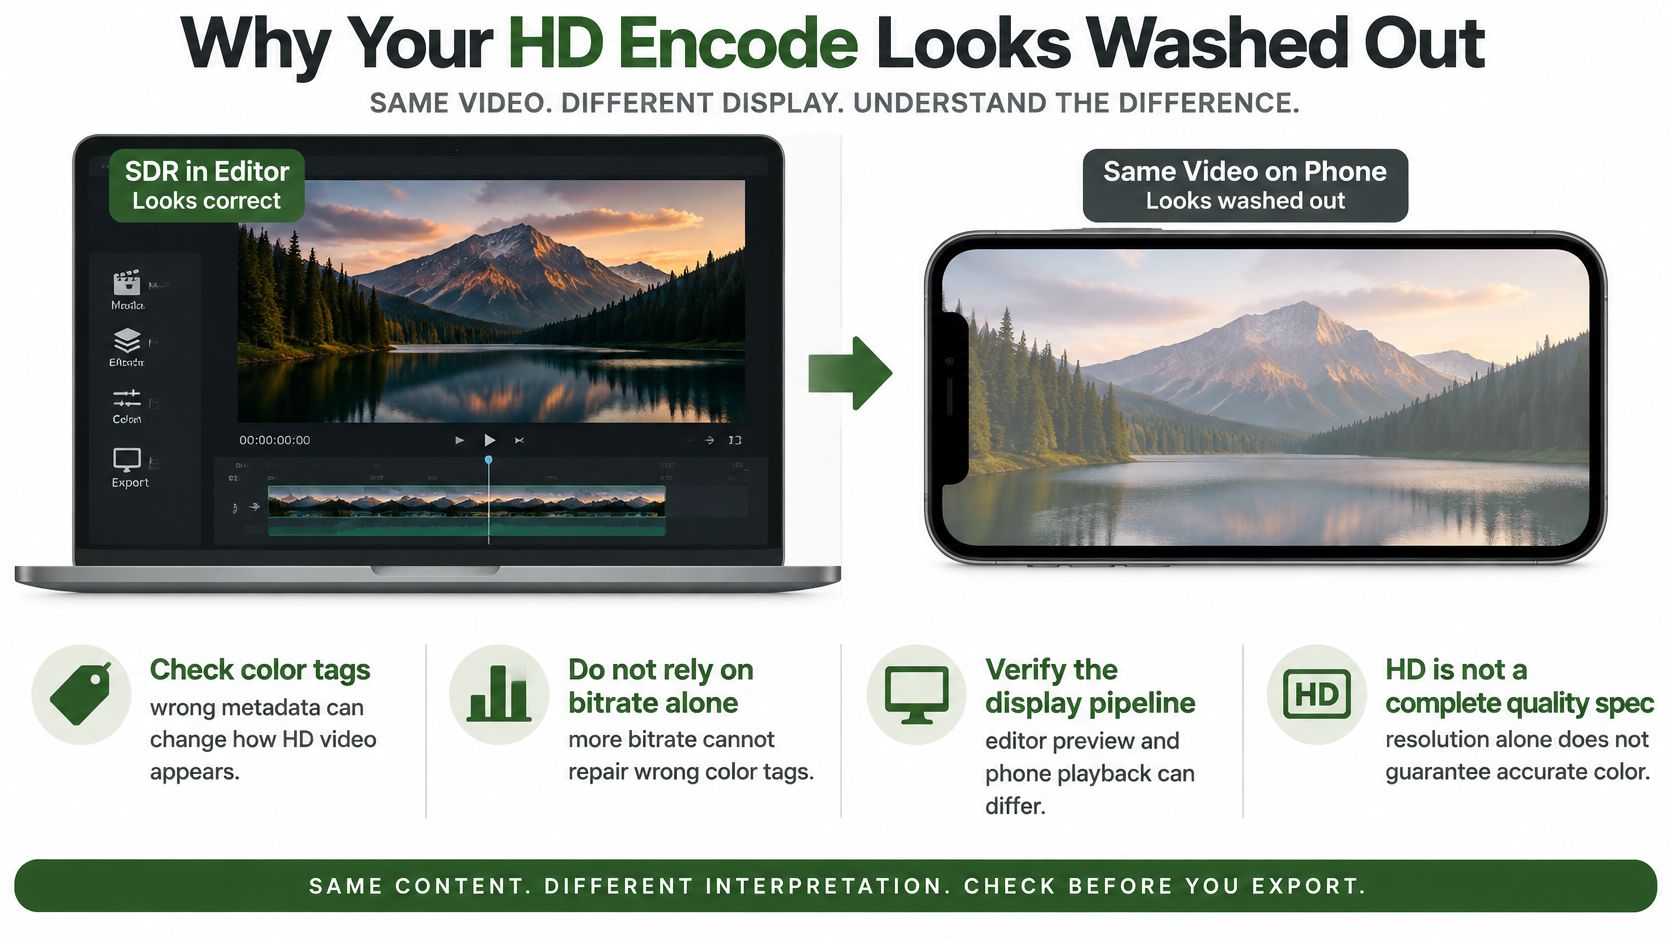
HD is not a complete quality specification when your source is 10-bit, HDR or wide-gamut. Resolution tells a player how many pixels to draw. It says nothing about how those pixel values map to light and color, which is what primaries, transfer characteristics and matrix coefficients describe. If those tags are missing or wrong, every player guesses, and they don't guess the same way.
YouTube's HDR upload documentation recommends VP9 Profile 2, AV1 and HEVC for HDR because they support 10-bit encoding and HDR metadata at reasonable bitrates, and it warns that mastering in P3 while tagging the output with Rec. 2020 primaries can produce oversaturation and shifted hues. That's a tagging error, not a compression error, and no CRF value fixes it.
The color checklist
- Inspect the source tags: Use ffprobe to read pixel format, color primaries, transfer characteristics, matrix coefficients and bit depth before you encode anything.
- Decide SDR or HDR explicitly: Pick the intended output signal up front. Drifting into a conversion by accident is how tone curves get applied twice or not at all.
- Tone-map, don't just retag: When converting HDR to SDR, convert the pixel values. Changing only the tags tells the player to interpret HDR values as if they were SDR, which is exactly the washed-out look.
- Test on two devices: Check dark, saturated and skin-tone scenes on at least a monitor and a phone. Skin tones expose hue shifts that test charts miss.
- Ship separate derivatives: When the source is HDR and both audiences matter, produce an explicit SDR version and an HDR version rather than one compromise file.
This matters most in batch pipelines, where each platform applies its own tone mapping and one silent color error repeats across every asset you publish. My go or no-go rule is blunt. If the color tags in the output don't match the intended signal, don't ship the batch, no matter how good the bitrate looks.
Hardware Encoders Versus Software Encoding
| Encoder | Hardware | Speed | Quality at equal bitrate | Best use |
|---|---|---|---|---|
| libx264 (software) | Any CPU | Slow to medium | Best at each bitrate | Final delivery masters |
| h264_nvenc | NVIDIA GPUs | Very fast | Good, usually below libx264 | High-volume drafts and live streams |
| h264_qsv | Intel CPUs with integrated graphics | Fast | Good for its class | Batch encodes on laptops and servers |
| h264_videotoolbox | Apple silicon and Intel Macs | Fast | Good | Mac-based editing workflows |
| h264_amf | AMD GPUs | Fast | Good | AMD workstations |
Hardware encoders finish much faster and cost less per hour of footage. At the same bitrate, software x264 usually looks better, because it can spend more compute searching for efficient ways to describe each frame. Hardware encoders trade some of that search depth for speed, and the gap shows up first in dark gradients, film grain and fast, detailed motion.
Which one should you run
Use software encoding for final masters where a few percent of size or quality matters, such as a paid course library or a streaming catalogue you'll serve for years. Use hardware encoding for drafts, previews, live streams and high-volume batches where turnaround is the constraint and a slightly larger file costs less than the wait.
One practical wrinkle shapes many pipelines. Plenty of cloud servers have no GPU at all, so CPU encoding is the default and your preset choice becomes a direct cost decision. A slower preset on a rented CPU is a line item, not just a longer coffee break.
Test it on your own footage
Don't settle this with a benchmark chart from someone else's content. Run the same representative clip through three paths:
- libx264 at preset medium: Your quality baseline.
- libx264 at a slower preset: Shows what extra CPU time buys on your footage.
- Your available hardware encoder: Shows the speed gain and the quality cost.
Compare encode seconds per minute of footage, output bitrate, and a visual check of motion and dark areas side by side. Numbers alone won't catch banding in a night sky.
Before you script any of this, list what your FFmpeg build supports with ffmpeg -encoders and grep for your target. A command that references h264_nvenc on a machine without an NVIDIA GPU fails immediately, and in an automated batch it fails at 3 a.m. Keep the hardware path for speed and the software path for the version that ships.
Running HD Encodes at Scale Through an API
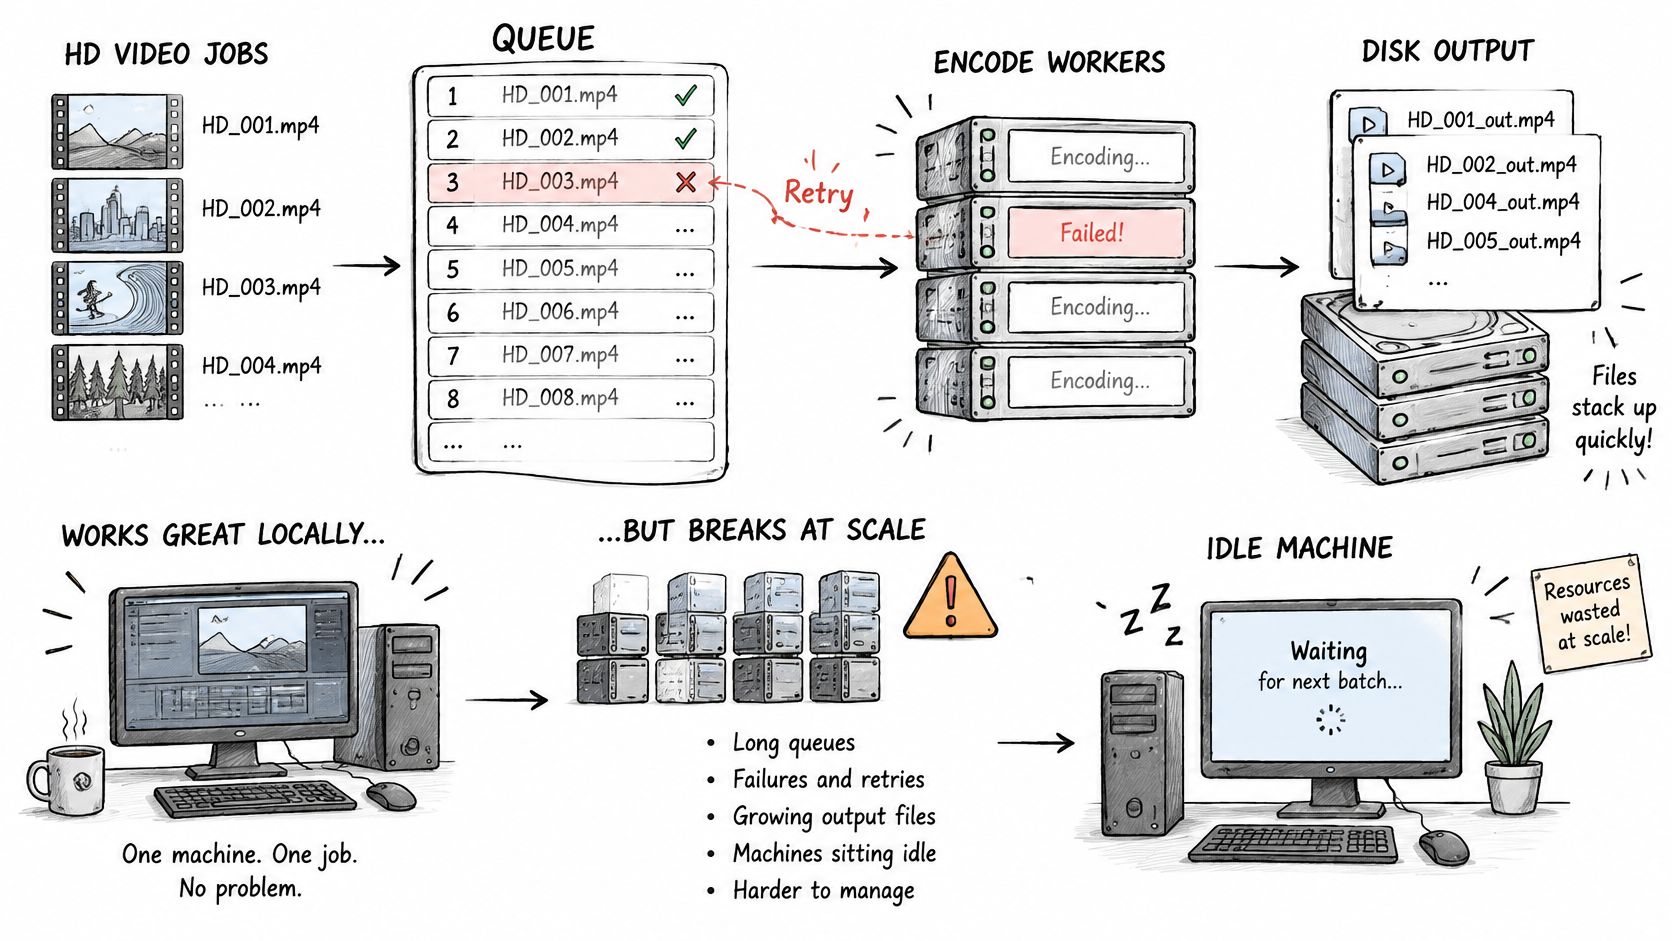
Local encoding breaks in predictable ways. Jobs queue behind each other on one machine. A failed encode sits unnoticed until someone asks for the file. Outputs pile up on a disk nobody monitors, and the workstation sits idle between batches after being saturated all afternoon. The fix isn't a bigger machine, it's submitting jobs to infrastructure built for parallel work.
The shift from a single local queue to distributed processing looks like this.
Teams producing creative variations hit the same wall from the other direction, and the discussion of scaling ad production with AI from Crank 11 covers that generation side well. Generation is only half the pipeline, though. Every variation still needs encoding, which is where a cloud video encoding workflow earns its place.
The five-step submission pattern
- Build one command template: Write the FFmpeg command once with placeholders for input and output. In our API, placeholders are written as {{double_brace}} or <> and map to input and output file keys, so the same template runs against every file in the batch.
- Submit one job per rendition: For each source, send the H.264 1080p delivery encode, an HEVC rung for premium devices and an optional AV1 rung. Three jobs, one source, no shared state between them.
- Store the job identifier: Our command endpoints return immediately with a command_id while the FFmpeg processing runs in the background. That ID is your handle for everything that follows, so persist it with the source filename.
- Track completion and verify: Poll for status or receive a webhook, then check each output's metadata against the settings you logged on your test clip. Resolution, codec and bitrate should match what you submitted.
- Retry failures safely: Make resubmission idempotent so a retried job doesn't create duplicate outputs. A network timeout on your side doesn't mean the encode failed on ours.
Three renditions from one source
- H.264 1080p:
libx264, CRF 22,yuv420p, AAC audio, faststart. Your universal delivery file. - HEVC 1080p:
libx265at a comparable quality setting for recent phones and TVs. - AV1 1080p: An AV1 encoder for the bandwidth-sensitive rung, only where you've tested playback.
Confirm the exact request format, authentication header and parameter syntax in the API documentation before you write production code. Guessing at a payload shape wastes more time than reading the docs.
Batch rule: Never run a batch with an untested color setup. Automation doesn't just scale your output, it scales your mistakes at the same rate.
Get one test clip through the full submit, track and verify loop first. Once that passes, the batch is the same code with a longer list.
Confirm Your Settings Before You Ship
Run this gate on your test clip. Every item is pass or fail, and a fail sends you back to fix the cause rather than raise the bitrate.
- File size: The output lands near the starting bitrate for its resolution and frame rate.
- Stream metadata: ffprobe reports the expected resolution, frame rate, pixel format and color tags.
- Plain playback: The H.264 rendition plays on a device with no special decoders installed.
- Color check: Dark and saturated scenes show no shift against the source on a second screen.
- Job log: Codec, CRF, preset and output bitrate are recorded for the encode.
For batch work, confirm the encoder you tested exists in the FFmpeg build that will run it. Proprietary codecs such as libfdk-aac and custom-compiled filters are typically not available on RenderIO, so a command that works on your laptop can fail in the cloud for that reason alone. When you submit through our API, commands go as a POST request to the run-ffmpeg-command endpoint, authenticated with an X-API-KEY header, using the same command you validated locally.
Your single next action is this. Pick the settings row closest to your source frame rate, encode one 30-second test clip containing your hardest scene, and run the gate above. If it passes, you have settings you can defend. If it doesn't, you've spent thirty seconds finding out instead of a full render.
When you're ready to run those validated commands without babysitting a local queue, RenderIO lets you post your FFmpeg command to a REST endpoint and get finished HD renditions back with metadata for every output. Bring the exact test command that passed your gate, submit it across your batch, and spend your time on the footage instead of the render farm.