You have a folder full of photos, a music track, and a place to post the finished video. Then the preview reveals the problems: a portrait gets stretched, a caption disappears behind the app's buttons, and the horizontal version doesn't work as a Reel.
If you searched for como hacer un video con fotos, the useful answer goes beyond putting pictures on a timeline. Build a reusable photo sequence, keep the original images, and export separate versions with deliberate framing. Whether you use a phone editor or FFmpeg, the difference between a rough slideshow and a publishable video comes down to timing, image handling, and a proper final check.
Table of Contents
- Default Settings and Platform Export Sizes
- How to Make the Video Step by Step
- Make a Photo Video Without Code
- Timing Captions and Music for Muted and Mobile Viewers
- Fixing Blurry, Stretched and Out-of-Sync Slideshows
- Choose Manual Editing or Scripted FFmpeg
Default Settings and Platform Export Sizes
For a straightforward slideshow, I'd start with H.264 video in an MP4 container, yuv420p pixel format, and AAC audio. Use a consistent frame rate, modest transitions, and a canvas that matches the destination. Treat these as production choices, not universal platform requirements.
The following is an example preset you can build in your editor or script. Adjust the timing when captions or detailed images need longer.
Default settings for a photo video
| Setting | Recommended value | Why it matters |
|---|---|---|
| Frame rate | 30 fps | Smooth pans and zooms without the processing cost of 60 fps |
| Photo duration | 3 to 5 seconds as a starting preset | Enough time to register a simple photo |
| Transition | 0.5 to 1 second crossfade | Hides cuts without eating much runtime |
| Landscape resolution | 1920 × 1080 | Practical landscape canvas for YouTube and presentations |
| Vertical resolution | 1080 × 1920 | Practical portrait canvas for TikTok, Reels, and Shorts |
| Video codec and pixel format | H.264 with yuv420p |
Broad playback compatibility |
| Audio | AAC, with music lowered under speech | Compatible audio delivery with intelligible narration |
Keep a high-resolution master project, not just a finished widescreen MP4. That project should retain the original photos, captions, focal points, and timing so you can change the canvas without rebuilding the story.
Choose the canvas before positioning subjects
For example, the same project could generate these deliverables:
| Target | Example export size | Aspect ratio |
|---|---|---|
| YouTube landscape and presentations | 1920 × 1080 | 16:9 |
| TikTok, Instagram Reels, and YouTube Shorts | 1080 × 1920 | 9:16 |
Use the vertical video dimensions guide when setting up portrait outputs. For placements that also involve advertising layouts, Rapid Ads' Stories and Reels creative dimensions provide useful framing context.
A centered crop from wide to portrait removes the sides. Save a focal point for each photo, then position the crop around the person, product, or detail that matters.
For a portrait inside a wide frame, choose deliberately:
- Crop to fill: Useful when you can lose part of the image without losing its meaning.
- Blurred background: Place a softened, enlarged copy behind the intact photo.
- Plain padding: Preserve the complete composition with a restrained background color.
Keep the story and timing shared across versions. Change the framing, not the entire edit.
Crossfades overlap neighboring clips. In a hypothetical album with 20 photos displayed for 4 seconds each, using 19 overlaps of 0.5 seconds produces 70.5 seconds, calculated as 20 × 4 − 19 × 0.5. Compare the rendered duration with that calculation before trimming the soundtrack.
How to Make the Video Step by Step
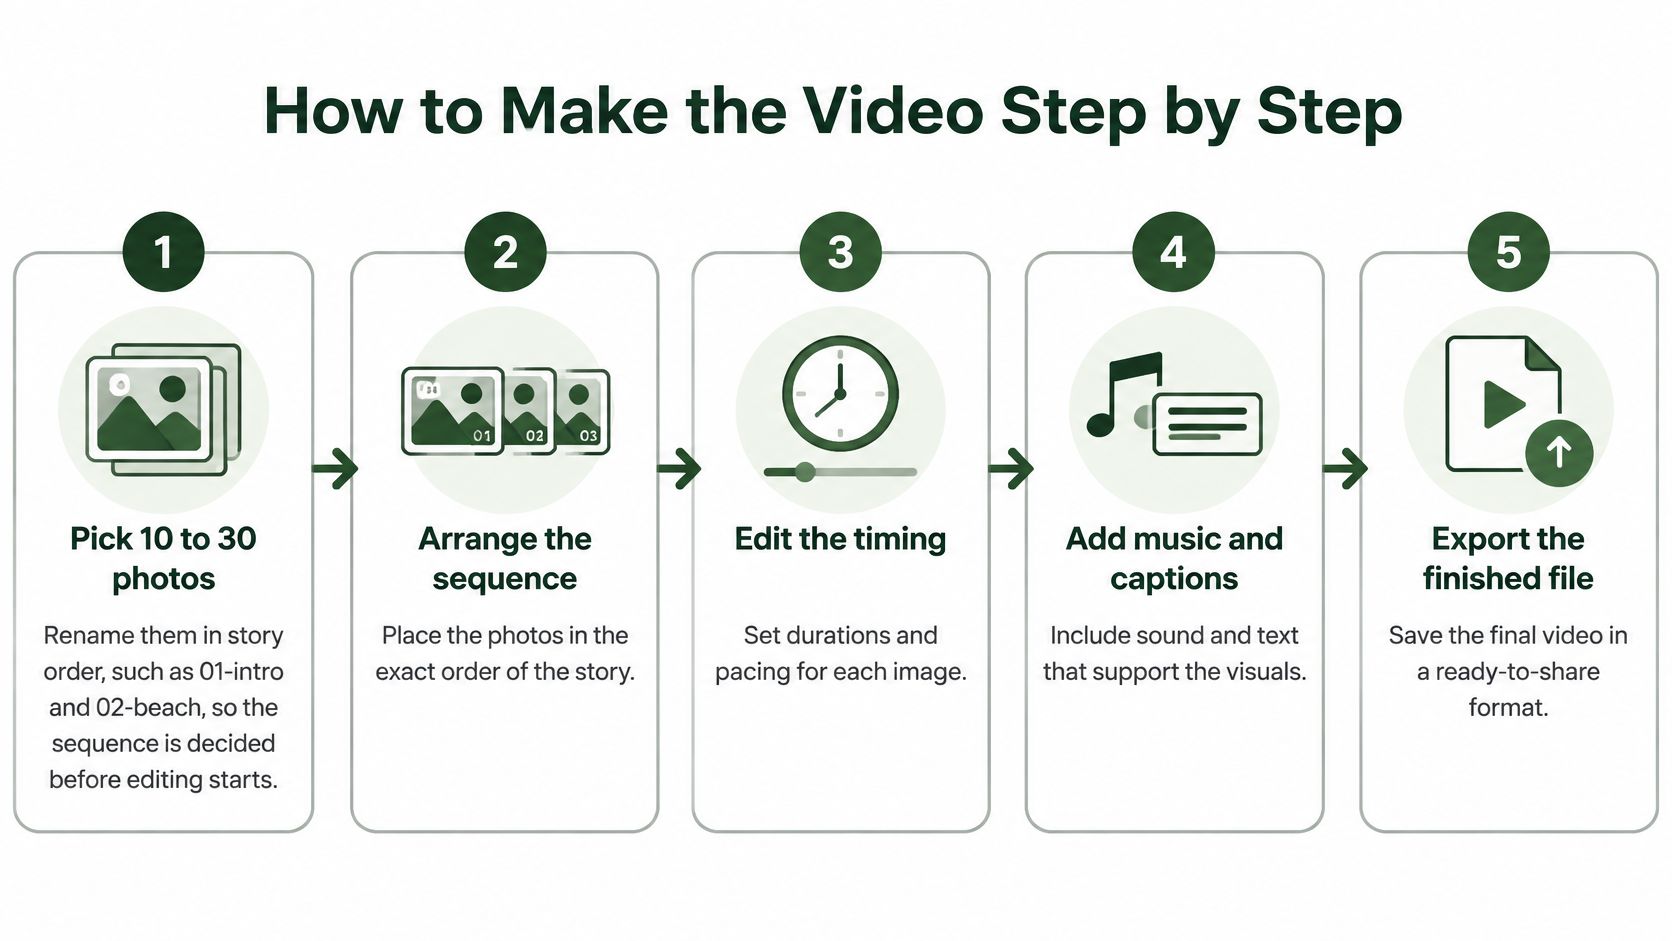
Standardize the photos before adding effects. A carefully prepared image sequence is easier to edit, easier to automate, and less likely to fail when you change the output shape.
Prepare the story and assets
Select photos that move the story forward. Open with context, develop the action, and finish with a clear ending rather than including every usable shot. For an event project, a shared place to collect guest photos through Wedding Studio can help gather contributions before you sort the sequence.
Rename the selected files in story order, using names such as
01-intro.jpgand02-beach.jpg. Keep originals in a separate folder so an automated rename or crop never destroys your source material.Correct orientation and appearance. Apply camera orientation metadata to the actual pixels, then balance exposure and color across the collection. A sideways photo or sudden jump from warm to cool color is more distracting than a simple transition.
Choose the crop or padding for each image. Preserve faces and essential details, and never force a portrait into a wide shape by independently stretching its width and height.
Build the timeline and export
Assign display durations and transitions. Start with a uniform example duration, then extend images that require reading or close inspection. Use a consistent motion style, since alternating aggressive zooms can make a calm story feel restless.
Add captions as editable text layers, then add music and any narration. Keep important text away from interface overlays, and lower the music whenever someone speaks instead of trying to make the voice compete.
Render a progressive, constant-frame-rate file and inspect it. The YouTube recommended upload encoding settings recommend uploading at the source frame rate and include 30 fps among accepted common rates. For a still-image project, choose that rate at the beginning and preserve it throughout.
For a concrete FFmpeg test, this command creates an example four-second padded horizontal clip from a single photo:
ffmpeg -loop 1 -framerate 30 -i 01-intro.jpg -t 4 -vf "scale=1920:1080:force_original_aspect_ratio=decrease,pad=1920:1080:(ow-iw)/2:(oh-ih)/2,setsar=1" -r 30 -c:v libx264 -pix_fmt yuv420p clip01.mp4
The scale filter preserves the image's proportions, pad fills the canvas, and setsar=1 establishes square pixels. This command produces a silent clip without a transition, caption, or animated zoom.
Repeat the preparation for the remaining photos. For a small prototype, intermediate clips make troubleshooting easy; for production, feed the images through a shared filter graph and encode the final composition once where practical.
A plain concatenation creates hard cuts. Crossfades require an xfade filter chain with explicit offsets, and the audio must be trimmed to the resulting timeline rather than the sum of the unoverlapped clip lengths.
Play the exported file on a phone and laptop. A clean result has smooth movement, natural-looking faces, readable captions, and no unexpected black tail after the music ends.
Make a Photo Video Without Code
A phone gallery's movie feature or a desktop editor can be the quickest choice for a one-off slideshow. Choose a tool that lets you control photo order, framing, timing, and export settings. A polished template can still crop portraits awkwardly, so check the output before committing to its design.
Build a small test before finishing the album
Import a representative selection: a portrait, a wide image, a dark image, and a photo that needs a caption. Put them in a short sequence and check how the editor handles each one before adding the full collection.
- Set the destination shape first: Choose portrait for a vertical feed or a wide format for a conventional presentation.
- Inspect image fitting: Look for controls named Fit, Fill, Crop, Background, or Canvas. If a face looks wider, the editor is stretching the image instead of preserving its proportions.
- Adjust pacing manually: Change the automatic timing if a caption disappears before it is comfortable to read.
- Check export access: Confirm that your chosen resolution and watermark-free output are available before polishing the layout.
Use a blurred background when the full photo needs to remain visible. A tight crop can work better when the subject is clear and the surrounding scene adds little. In either case, check that the framing preserves the information viewers need.
Keep the finish under your control
Finish the image sequence before adding music. That makes it easier to remove weak photos rather than keeping them just to fill time.
Export a test MP4 and inspect the saved file, not only the editor preview. Check for altered crops, softened text, missing audio, and a watermark that was hard to spot while editing.
Practical rule: Check an editor's restrictions before building a design around its templates.
For repeatable processing without a local terminal workflow, RenderIO's FFmpeg API runs FFmpeg commands through a REST API. It can handle transformations such as resizing, format conversion, and watermarking, while visual choices like photo order and framing still belong in the editor.
Use manual editing when each project calls for individual creative decisions. Consider scripting when the repeated work is producing variations and exports, not choosing which images tell the story.
Timing Captions and Music for Muted and Mobile Viewers
Watch the draft with the sound off. If you can't tell what happened, why the images belong together, or what the viewer should do next, music is carrying too much of the explanation.
A basic photo-and-music editor, such as the workflow described in CapCut's guide to making a video with pictures and music, can assemble the ingredients. Publishing a usable result also requires deliberate reading time, accessible alternatives, and permission to distribute the assets.
Time the information, not just the photo
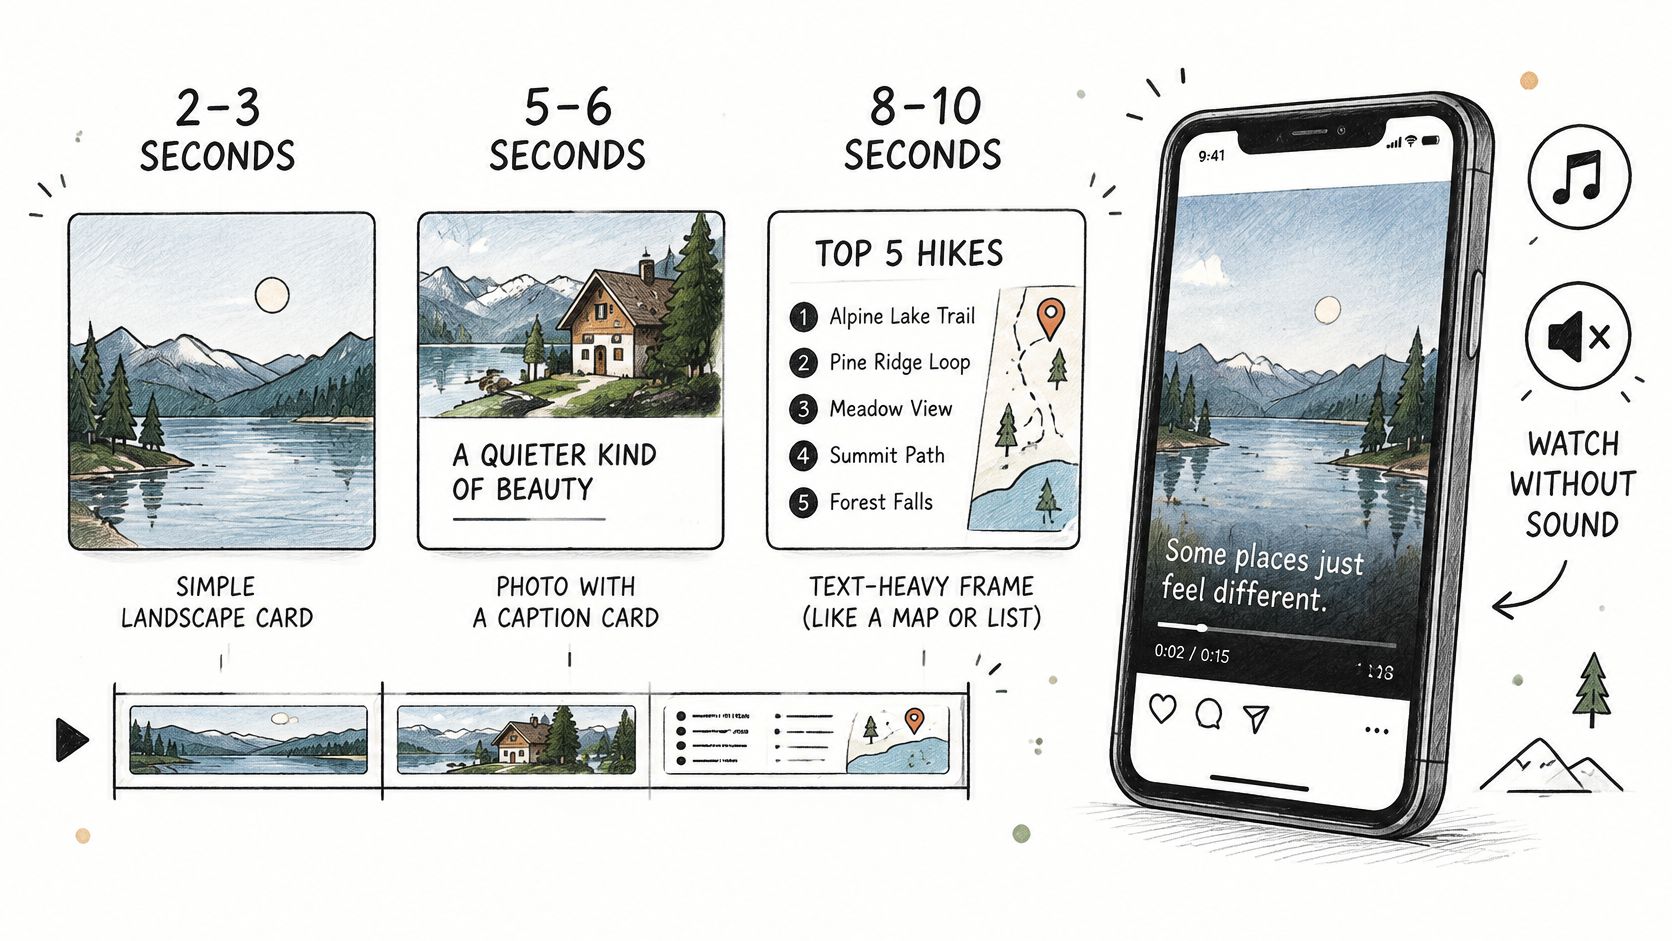
For an example pacing test, try two to three seconds for a simple image without text, five to six seconds for a short caption, and eight to ten seconds for a dense map or list. These are starting settings to test, not measured reading-time guarantees.
Read each caption aloud at a comfortable pace, then leave room to inspect the picture. If a frame needs an unusually long pause, simplify the text or divide the information rather than expecting viewers to study a crowded slide.
Use burned-in text for essential context so it remains visible without sound. Provide captions for spoken narration too, but remember that text embedded in the picture isn't itself a screen-reader-accessible alternative.
Choose a plain sans-serif typeface with a dark shadow or a solid, semi-transparent band behind light text. Check the result at phone size, especially when the photograph contains bright skies, patterned clothing, or busy backgrounds.
Make the story accessible and publishable
Write a concise description of meaningful visual information and provide it in accompanying post text or an accessible transcript. For blind or low-vision viewers, consider audio description when the sequence communicates something the narration doesn't explain.
A photo album with music workflow can help organize the soundtrack, but music availability isn't permission to publish. Use Drumloop AI's YouTube music guide as an orientation, then read the actual license for your chosen track.
Before publishing, complete these checks:
- Muted comprehension: The image order and visible text communicate the essential story without audio.
- Readable alternatives: Captions are legible, and descriptions or a transcript are available where needed.
- Asset permissions: Music and stock-photo licenses cover the intended channels and commercial use, if applicable. Obtain appropriate signed releases for identifiable people where required.
- Privacy review: Remove sensitive location metadata from upload assets and inspect visible addresses, documents, and identifying details.
Don't treat an editor's successful export as a rights or accessibility check. Those decisions remain yours.
Fixing Blurry, Stretched and Out-of-Sync Slideshows
A stretched portrait usually means the image was forced to match the canvas dimensions without preserving its proportions. Fix the fitting rule before trying sharpening, a different codec, or a larger export.
Troubleshoot the saved file rather than assuming the timeline preview matches it. Editors may use reduced-quality previews, while playback applications can introduce their own scaling or buffering issues.
Photo video symptoms, causes and fixes
| Symptom | Likely cause | Fix |
|---|---|---|
| Stretched portrait photo | Forced into a landscape frame | Crop on a focal point or use a blurred background |
| Blurry photos | Small source files upscaled | Start from larger originals and scale once at export |
| Jerky pans | Mixed frame rates in the timeline | Normalize clips to a shared constant frame rate, such as the example 30 fps preset |
| Captions cut off on phones | Text placed in the top or bottom band | Move essential text toward the middle band and inspect the platform preview |
| Video longer than audio | Transition handling omitted from the duration calculation | Calculate the actual timeline, subtract crossfade overlaps, and trim audio to match |
| Upload rejected | Unsupported codec or pixel format | Re-encode as H.264 MP4 with yuv420p and compatible AAC audio |
Separate source problems from export problems
Open the original photo at the intended display size. If it already looks soft, increasing the output resolution won't recover missing detail.
Check how much the crop enlarges the subject, too. A large original can still become blurry when you extract a tiny area and stretch it across the canvas. Reduce the crop, remove an aggressive zoom, or choose another photo.
For jerky motion, inspect the animation itself after checking frame rate. Uneven keyframe spacing, abrupt easing, and movement across poorly scaled images can remain visible even in a correctly encoded file.
A technically valid export can still contain a bad crop, unreadable text, or an awkward motion curve.
Inspect the file with ffprobe
Use this command to inspect the output's codec, dimensions, pixel format, frame-rate fields, and duration:
ffprobe -v error -select_streams v:0 -show_entries stream=codec_name,width,height,pix_fmt,r_frame_rate,avg_frame_rate:format=duration -of default=noprint_wrappers=1 final.mp4
Compare the reported values with your intended preset. Frame-rate fields are useful clues, but they don't prove that every frame arrived at regular intervals; investigate frame timestamps if motion still looks wrong.
If the soundtrack finishes early, check whether the editor appended transitions, extended the final still, or included an empty timeline tail. Overlapping crossfades shorten a sequence; a longer result points to different timeline behavior, not overlap alone.
Moving a caption or replacing a soft image is a quick timeline edit, although you'll still need to render the deliverable again. Changing the canvas, frame rate, or image-fitting policy across the entire sequence requires a full re-export and another playback check.
Choose Manual Editing or Scripted FFmpeg
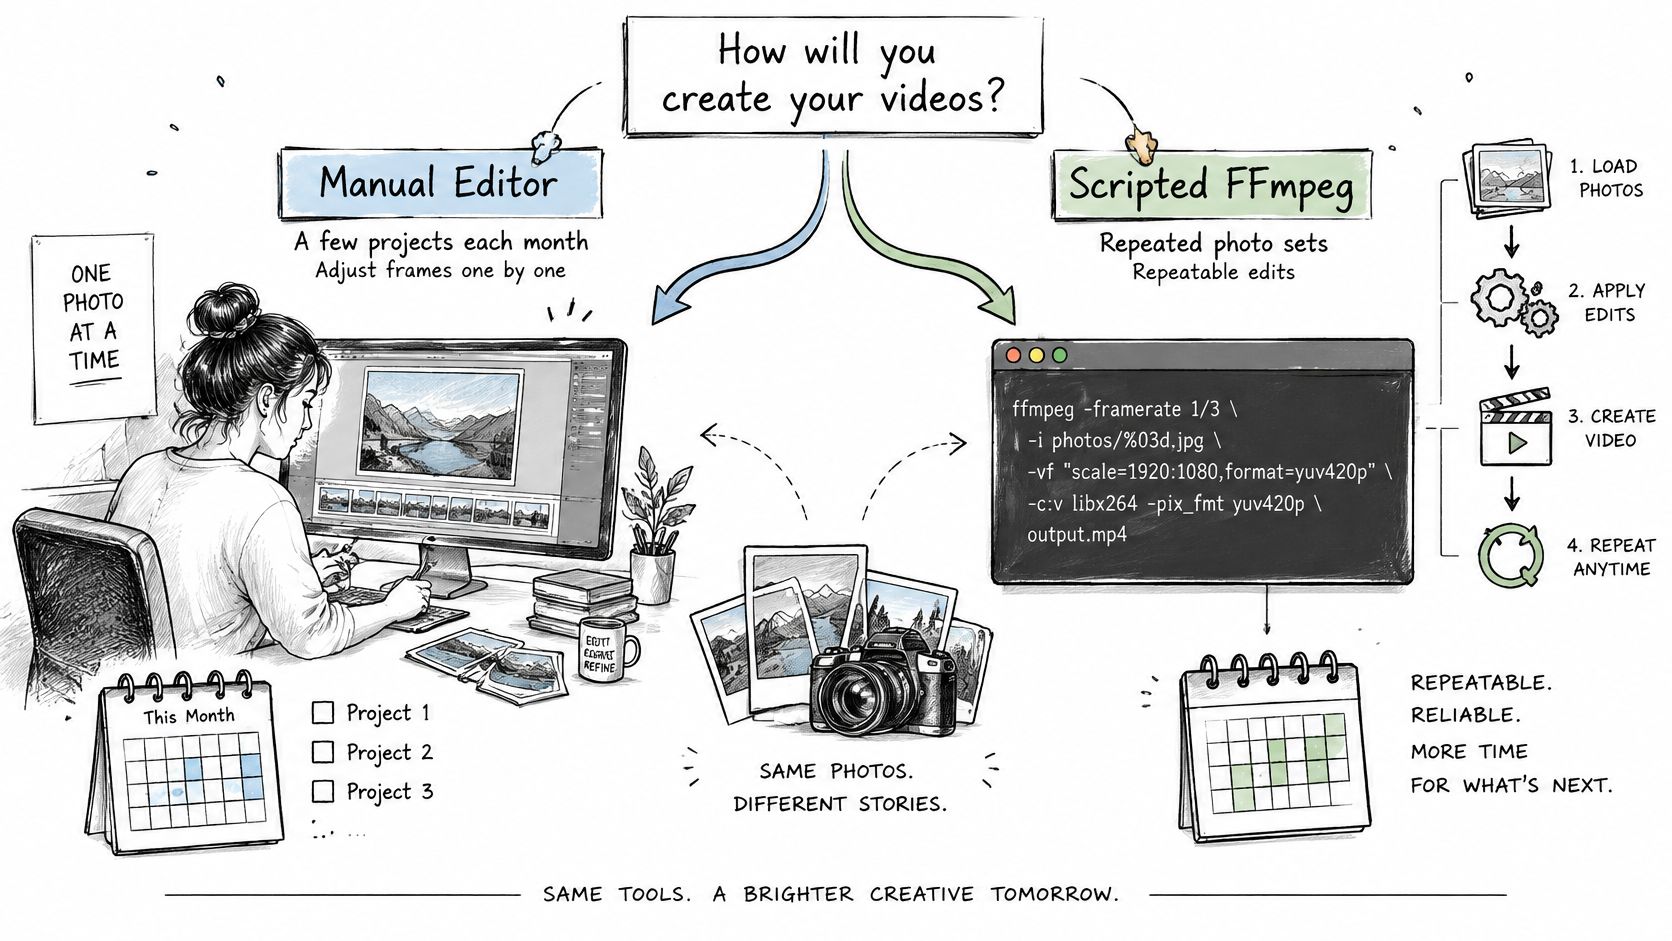
Manual editing gives you direct control over expression: which face to emphasize, where to pause, and whether a transition suits the story. Scripted FFmpeg gives you repeatability: the same rules, applied consistently to new photos and output variants.
Neither approach removes the need for review. Automation is most useful after you've decided what a good output looks like.
Choose according to repeated work
| Decision | Manual editing fits when | Scripted FFmpeg fits when |
|---|---|---|
| Creative variation | Every story needs different pacing and composition | The layout and editorial rules are stable |
| Output versions | You need a small set of individually adjusted files | You repeatedly produce channel or account variants |
| Incoming assets | Photos arrive irregularly and need interpretation | New folders follow a predictable structure |
| Review | Most frames need personal attention | Review can focus on exceptions and final approval |
Before automating, assess monthly volume, variations per photo set, and required manual review. Low volume with few variants usually doesn't justify building a pipeline. Heavy review requirements favor a hybrid workflow, even when rendering is automated.
For a hypothetical campaign, a single approved photo sequence might need ten account-specific versions. Store account names, captions, focal points, and output paths as structured inputs rather than editing separate copies of the command.
Automate the rules you can describe
Keep a manifest containing each image's path, duration, crop position, caption, and rights status. The script can validate missing files, generate the FFmpeg filter graph, render previews, and stop for approval before final delivery.
Separate creative decisions from technical delivery. A person can approve photo order and focal points while a scheduled job handles encoding, thumbnails, and destination-specific outputs.
RenderIO is an FFmpeg-as-a-Service REST API: you send an FFmpeg command over HTTP, and we run it in a secure cloud sandbox, store the output files, and return metadata. That makes it possible to move a tested slideshow command from a laptop into repeatable cloud processing without redesigning the edit.
Don't start by automating every possible layout. Approve a representative project, turn its stable settings into a template, and route unusual photos back for manual attention.
The useful dividing line is simple: edit manually when judgement changes; script when the same judgement becomes a repeatable rule.
RenderIO can resize videos for TikTok, batch-process slideshow variations, and convert formats using your FFmpeg commands. Visit RenderIO, sign up, generate an API key, and test your actual slideshow command against the API before scaling it to a full photo collection.