You've finished a wide-format video, and now you need a vertical version for social, a portrait feed export, and a square cut. The first conversion fills the screen but clips the speaker's hands and half the product. The next keeps everything visible but adds bars you didn't expect.
Knowing how to change aspect ratio means deciding what can change: the encoded frame, the visible composition, or the instructions a player uses to display the pixels. FFmpeg can handle each, but the safest workflow starts by measuring what a crop would remove before you encode anything.
Table of Contents
- Target Ratios for Every Platform at a Glance
- Choosing Between Scale, Pad, Crop and setsar
- How to Change Aspect Ratio in FFmpeg Step by Step
- Cropping or Padding Vertical Social Videos
- Measuring Crop Loss and Fixing Output
- Build a Batch Ratio Pipeline With RenderIO
Target Ratios for Every Platform at a Glance
Start with the destination canvas, not a filter. A vertical social export and a horizontal master need different compositions, even when their output resolutions contain the same number of pixels.
The ITU's HDTV overview identifies 16:9 as the HDTV picture ratio and 1,920 × 1,080 as a common image format containing 2,073,600 pixels. Reversing those dimensions creates a portrait canvas with the same pixel count, not the same framing.
Target Frame Sizes by Platform
Treat these as practical delivery presets, not a claim that each platform accepts only one shape. Pixel totals are calculated by multiplying the listed width and height.
| Target | Ratio | Dimensions (W x H) | Pixels per frame |
|---|---|---|---|
| TikTok, Instagram Reels, YouTube Shorts | 9:16 | 1080 x 1920 | 2,073,600 |
| Instagram portrait feed | 4:5 | 1080 x 1350 | 1,458,000 |
| Square feed posts | 1:1 | 1080 x 1080 | 1,166,400 |
| YouTube and landscape masters | 16:9 | 1920 x 1080 | 2,073,600 |
Pick a row and use its width and height as the output contract. Those dimensions belong in your filter configuration, output filename, and validation check. Make sure separate workflow branches don't use different presets for the same placement.
Equal pixel counts don't guarantee equal file sizes. Encoding settings, duration, frame rate, and picture complexity also affect the result. A portrait export isn't automatically lighter because it looks narrower on your desktop.
Practical rule: Choose the delivery canvas first, then decide whether the source should fit inside it or fill it.
Decide Whether Conversion Is Necessary
If your source already has the destination's shape and suitable resolution, you may not need a geometry conversion at all. Re-encoding a horizontal master just to give it another horizontal filename adds work without improving the composition.
Our guide to 16:9 aspect ratios helps distinguish frame shape from resolution when you're setting up a widescreen master.
Keep that master intact whenever possible. Derive social variants from the original, rather than deriving a square export from an already cropped vertical export. Otherwise, each conversion starts with content the previous conversion has already discarded.
Choosing Between Scale, Pad, Crop and setsar
Can anything at the edges be lost? That question separates padding from cropping more reliably than a platform preset does. A product demonstration with labels near the corners needs a different treatment from a stationary, centered speaker.
Also distinguish the file from its presentation. The MDN guide to CSS aspect ratios explains the browser-side distinction: a responsive container and object-fit control how media appears inside a page. They don't create a newly framed video file.
FFmpeg Operations for Changing Aspect Ratio
| Method | What It Changes | Content Lost | Best For |
|---|---|---|---|
scale with force_original_aspect_ratio |
Frame size, with proportional fitting | None from framing, though downscaling reduces detail | Resizing before padding or cropping |
pad |
Adds borders to reach the target frame | None, but borders appear | Keeping the full composition in a new shape |
crop |
Selects a smaller rectangle from the frame | Pixels outside that rectangle | Filled frames with a safely positioned subject |
setsar or setdar |
Pixel-shape or display-ratio signaling | None | Correcting display interpretation when geometry is already right |
scale resamples the picture. With force_original_aspect_ratio=decrease, it fits the image within the requested bounds. With increase, it covers those bounds so a later crop can remove the overflow.
Forcing unrelated width and height values can produce distortion, particularly when you then force square pixels. Don't assume that an output with the correct dimensions also has correctly proportioned faces.
pad creates canvas around the scaled image. crop removes part of the composition. Among these operations, cropping is the one that discards an entire spatial region, although downscaling can still lose fine detail.
Metadata Isn't Reframing
Sample aspect ratio, or SAR, describes pixel shape. Display aspect ratio, or DAR, describes the intended displayed frame shape; it depends on both stored dimensions and SAR.
setsar and setdar change those instructions without moving picture content. They can fix incorrectly signaled material, but they can also distort correctly signaled material if you apply them blindly.
A metadata correction can fix a wrongly displayed picture. It can't bring a cropped face back.
For square-pixel delivery, put setsar=1 after the geometry filters. First confirm that the source is square-pixel material, or normalize anamorphic material to its intended display geometry. Resetting its SAR would change how it looks.
Use pad when the entire composition matters, crop when filling the frame matters more than the edges, and metadata correction only when the pixels are already right.
How to Change Aspect Ratio in FFmpeg Step by Step
These commands assume an ordinary square-pixel widescreen source. Run them in a shell that supports single-quoted filter expressions, and use separate output filenames so you can compare treatments.
The process is probe, choose, render, and validate.
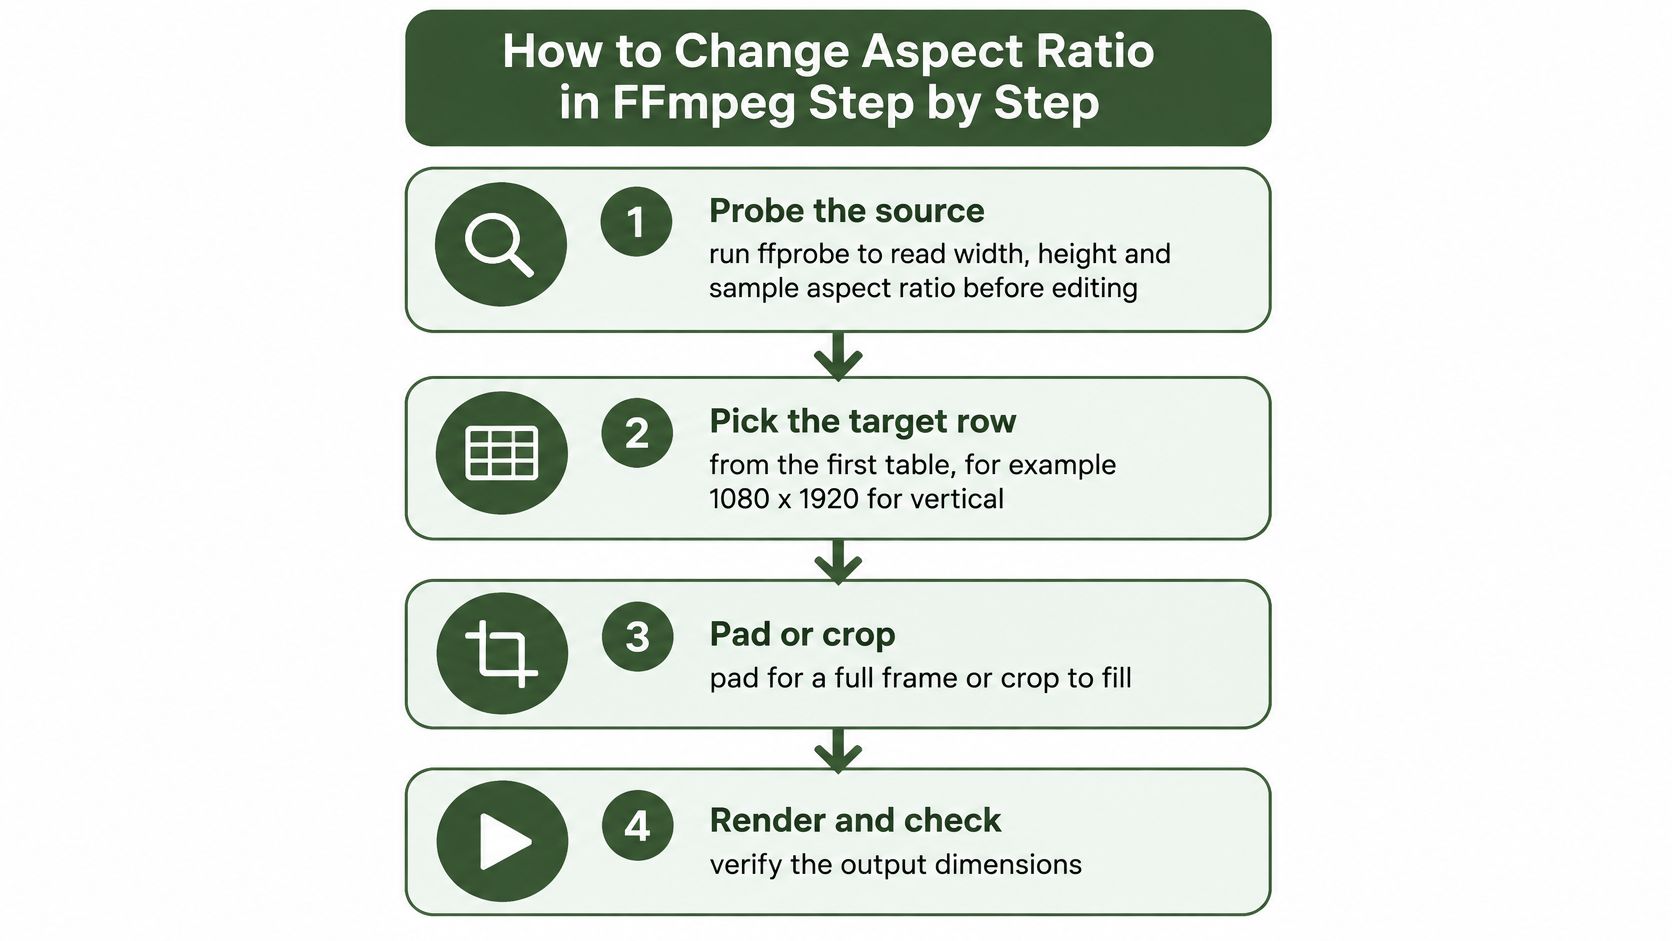
Inspect and Choose the Geometry
Probe the source before changing it. Run
ffprobe -v error -select_streams v:0 -show_entries stream=width,height,sample_aspect_ratio,display_aspect_ratio -of default=noprint_wrappers=1 input.mp4. Read both the stored dimensions and the aspect-ratio fields; width and height alone don't tell you whether the pixels are intended to display as squares.Pick the target canvas and treatment. For a vertical delivery example, use
1080:1920as the output dimensions. Decide whether to preserve the entire composition or fill the canvas before writing the command, because those are different edits.Pad when the full image must survive. Run
ffmpeg -i input.mp4 -vf 'scale=1080:1920:force_original_aspect_ratio=decrease,pad=1080:1920:(ow-iw)/2:(oh-ih)/2,setsar=1' -c:a copy vertical_pad.mp4. The scale filter fits the picture inside the canvas, and the pad expressions center it without stretching.
Render a Crop Only After Approval
Crop to fill a vertical canvas. Run
ffmpeg -i input.mp4 -vf 'crop=ih*9/16:ih,scale=1080:1920,setsar=1' -c:a copy vertical_crop.mp4. This selects a centered portrait window from a sufficiently wide source, then scales that window to delivery size; usecrop=trunc(ih*9/16/2)*2:ihwhen you need an explicitly even crop width.Move the window for an off-center subject. The crop syntax is
crop=width:height:x:y; for example,crop=trunc(ih*9/16/2)*2:ih:0:0anchors the window at the left edge. Set a measured horizontal offset for your subject and keep it inside the valid range from the left edge toiw-ow.Create a portrait-feed alternative. Run
ffmpeg -i input.mp4 -vf 'crop=ih*4/5:ih,scale=1080:1350,setsar=1' -c:a copy portrait_feed.mp4. For a full-height crop, the general rule is crop width = source height × target width ÷ target height; if that width exceeds the source width, crop height instead or use a fit-and-pad treatment.Probe and watch the output. Run
ffprobe -v error -select_streams v:0 -show_entries stream=width,height,sample_aspect_ratio,display_aspect_ratio -of default=noprint_wrappers=1 vertical_crop.mp4. Confirm the target dimensions and square-pixel SAR, then inspect faces, captions, and crop boundaries during playback.
All these filter commands re-encode video. -c:a copy leaves compatible audio untouched, so it doesn't undergo another encode; if the source audio codec can't be stored in the output container, choose a compatible audio encoder instead.
A successful FFmpeg exit only confirms that the command completed. It doesn't confirm that your framing is usable.
Cropping or Padding Vertical Social Videos
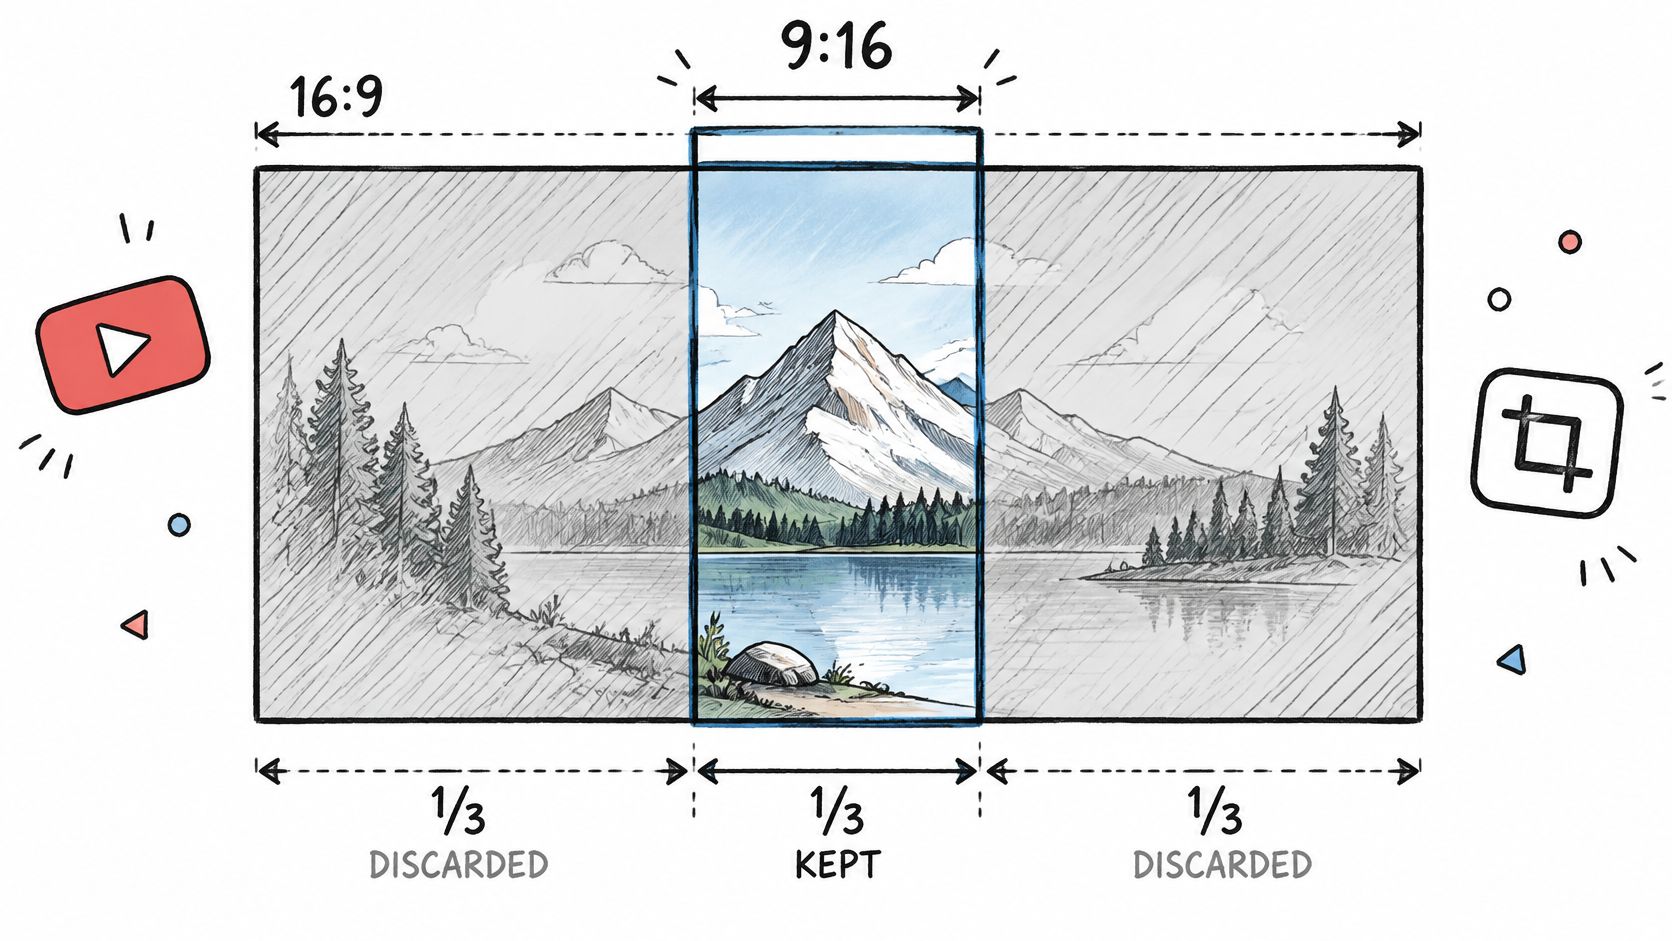
A full-height crop to portrait keeps roughly a third of the original width, which explains why a valid export can lose a speaker standing near the side. Shotstack's platform-size guide identifies 9:16 at 1,080 × 1,920 as a common vertical target and describes cropping, subject-aware reframing, and padding as practical conversion approaches.
Use the crop boundary as an editorial decision, not just a shape change.
Match the Treatment to the Shot
- Centered talking head: Use a fixed center crop when the speaker and meaningful gestures remain inside the window. Check the entire shot, not just the thumbnail.
- Screen recording or wide product shot: Preserve the sharp foreground and fill the surrounding canvas with a blurred duplicate. This retains edge details, but makes the useful picture smaller.
- Moving subject: Use subject-aware reframing in an editor, or create a time-varying crop path. A fixed offset won't follow someone walking across the original frame.
For the blurred-background treatment, run:
ffmpeg -i input.mp4 -filter_complex '[0:v]scale=1080:1920:force_original_aspect_ratio=increase,crop=1080:1920,boxblur=20[bg];[0:v]scale=1080:1920:force_original_aspect_ratio=decrease[fg];[bg][fg]overlay=(W-w)/2:(H-h)/2,setsar=1' -c:a copy vertical_blur.mp4
The background branch covers the canvas and blurs the overflow crop. The foreground branch fits the original picture inside it, and overlay centers the sharp image above the background.
The blur isn't recovered picture information. It's decoration, and busy movement behind the foreground can distract from small text or a product interface.
Protect the Commercial Content
A portrait-feed crop can be a useful middle option when the narrowest vertical window hides too much. For moving footage, inspect transitions between subjects as carefully as the tracking itself, because an abrupt reframing move can be more distracting than a static padded shot.
Use playback to judge whether the composition remains readable during motion.
Keep captions and logos away from the top and bottom interface regions. Add destination-specific captions after reframing when possible, rather than trying to preserve captions already burned across the source.
Measuring Crop Loss and Fixing Output
Measure the proposed crop before the batch runs. For a full-height crop, calculate width_loss = 1 - crop_width/source_width; because height stays unchanged, this also describes the fraction of source image area removed.
Calculate Against the Actual Crop Window
Take a hypothetical square-pixel source measuring 1920 × 1080. The calculations below come directly from that example's dimensions, before chroma-alignment rounding.
| Proposed crop | Full-height crop width | Calculated source width removed |
|---|---|---|
| Vertical portrait | 1080 × 9 ÷ 16 = 607.5 |
About 68.4% |
| Portrait feed | 1080 × 4 ÷ 5 = 864 |
55% |
Record the actual integer crop width FFmpeg uses, not just the ideal fractional width. For crops that remove both width and height, use area_loss = 1 - (crop_width × crop_height)/(source_width × source_height) instead.
Your rejection threshold is an editorial policy, not a platform requirement. Define it per content type, then route excessive-loss candidates to padding or manual reframing.
Approve geometry with arithmetic, then approve meaning with a preview. A small crop can still remove the only visible product label.
Protect faces, captions, logos, and product details with bounding boxes. Require those regions to remain inside the crop, and review contact sheets across the clip to catch movement or scene changes.
Diagnose the Remaining Failures
- Stretched faces: Check source SAR and proportional scaling. Don't repair a geometry mistake by repeatedly changing display metadata.
- Unexpected bars: Confirm that the workflow selected the intended fill treatment rather than the preservation treatment.
- Wrong player shape: Compare SAR and DAR with the encoded dimensions before changing signaling.
- Cut-off faces: Adjust the crop offset or reject the fixed window.
- Soft detail: Resize from the master once, rather than scaling an already resized derivative.
Use the FFmpeg crop guide when implementing crop coordinates and expressions. Re-probe every repaired output, but keep visual approval separate: metadata can't tell you whether the logo survived.
Build a Batch Ratio Pipeline With RenderIO
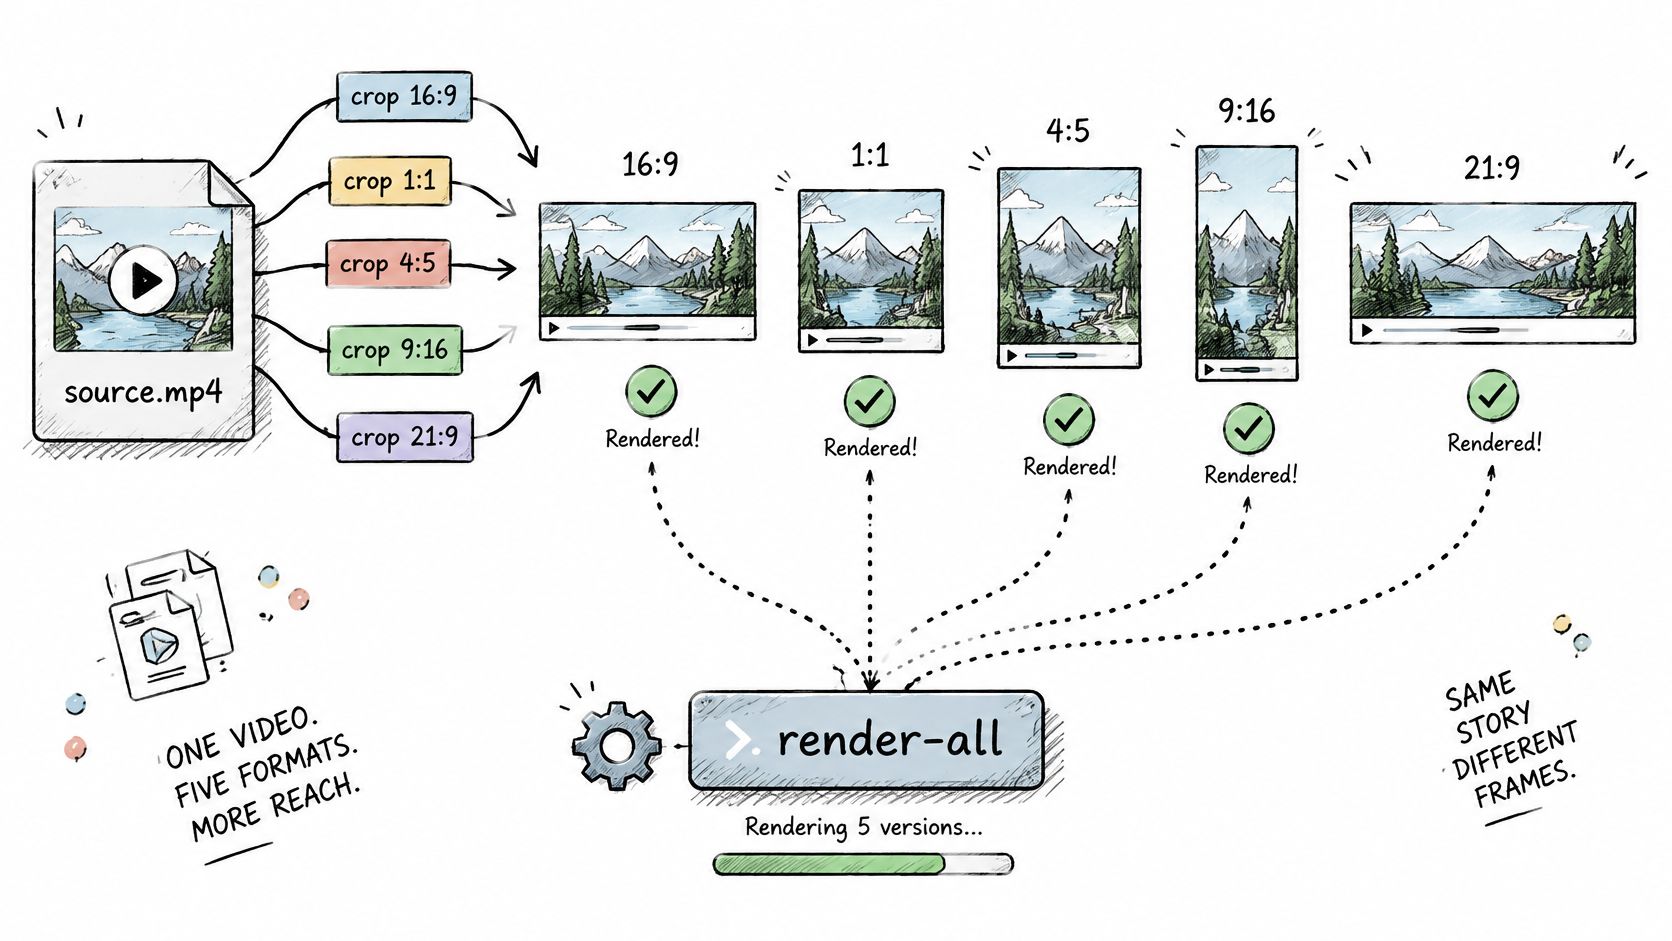
A source file becomes a pipeline when each destination needs its own treatment, filename, and approval result. Store a target manifest containing output dimensions, filter text, crop coordinates, and protected-region requirements rather than maintaining unrelated commands by hand.
We run FFmpeg commands through our API for resizing, format conversion, and batch video variations. Moving a working self-hosted command into this workflow is mostly mechanical: keep the tested filters and adapt input and output handling to the request format.
The branching structure should keep every rendition traceable to its source and target.
Submit and Validate Each Target Separately
Send a POST for each target using the endpoint, authentication, and field schema in our documentation. Keep these job values together:
- Input: The accessible source-file URL.
- FFmpeg filter:
scale=1080:1920:force_original_aspect_ratio=decrease,pad=1080:1920:(ow-iw)/2:(oh-ih)/2,setsar=1 - Output name:
vertical_9x16.mp4
Treat those as logical request values, not an undocumented API schema. If the endpoint expects a full command rather than a filter expression, place the filter after -vf in that command.
Each result includes duration, codec, resolution, and file size metadata. Compare returned resolution with the manifest, check duration against the source, and flag unexpected codec or size results. Calculate crop loss from the submitted geometry before encoding, then retain that decision alongside the returned metadata.
Automate Without Removing the Approval Gate
In n8n or Zapier, trigger on a new upload, branch into an HTTP request per destination, and collect completed results before sending approved outputs to storage or a scheduler. Keep failed validations out of the publishing branch.
Use our batch-processing best practices to organize repeatable jobs and output handling. Start with a vertical crop and a square pad from the same source, inspect both, and only then expand the manifest to the full batch.
RenderIO lets you run FFmpeg conversions through an API, resize for TikTok, and batch-process video variations without moving your framing decisions into a different editing system. Visit RenderIO to test your approved crop and pad commands on one source video before automating the rest.