A 90-minute webinar lands in the shared folder at 11:40. The afternoon call is at 2. Someone still expects eight vertical clips, captions on, ready to post, and the edit queue is already full. Automated video highlights only help if selection is a ranked, constrained decision, not a single clip button. Cheap signals miss the point. One universal “best moment” ignores the audience. Bad captions then ship that mistake to every platform.
Table of Contents
- Map the Stages and Pick a Detection Method
- FFmpeg Commands for Detection and Cutting
- Score Moments and Set Clip Boundaries
- Automate Batches with Webhooks and n8n
- Caption and Deliver Clips for Shorts and Reels
- Debug Failures and Measure Clip Quality
- Run One Video End to End Before You Scale
Map the Stages and Pick a Detection Method
Say that webinar is the source. By the call you want eight 9:16 clips, each under a minute, with the speaker's claim intact. A manual timeline won't get there once this is a daily job. In 2024, one industry compilation reported that 10.2 million highlight clips were produced through an AI-based sports video platform, about one clip every 3.1 seconds, and more than 4 million of those were vertical, up 81% year over year, according to BotMemo's AI sports stats roundup. A human queue cannot match that pace, which is why teams that streamline short-form video workflows treat clipping as infrastructure, not a one-off export.
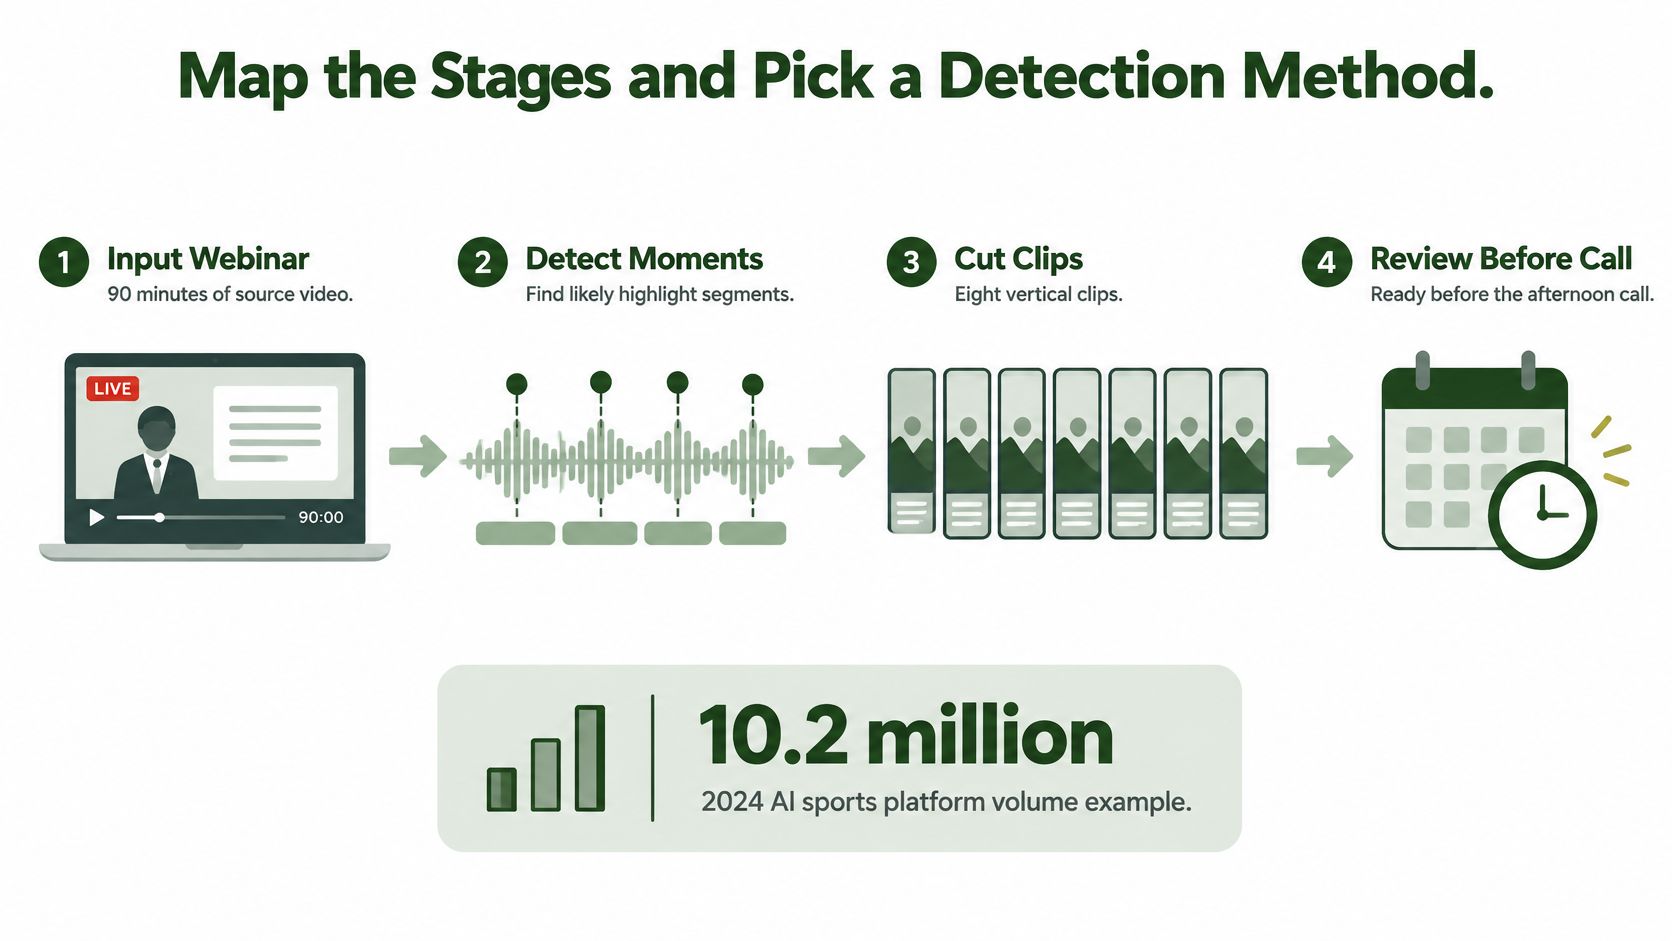
Five stages, in order
- Ingest. Receive or download the file, then probe duration, frame rate, audio tracks, and codec. Later thresholds are meaningless if the probe is wrong.
- Analyze. Detect scene cuts, measure loudness over time, and transcribe when speech carries the story.
- Score and select. Turn those signals into ranked windows that fit a duration budget. This is the decision, not the cut.
- Render. Cut, reframe to 9:16, burn captions, and encode.
- Deliver and log. Store outputs behind signed URLs, notify by webhook, and record the score that picked each clip.
Pick the signal before you host a model
| Method | Signals used | Best for | Cost and effort | Typical failure |
|---|---|---|---|---|
| Scene-cut detection | Visual cuts and shot changes | Multi-camera events, news, action sports | Low, fast on FFmpeg | Fires on graphics and camera motion |
| Audio energy peaks | Loudness, crowd noise, applause | Live sports, events, podcasts | Low, runs on FFmpeg | Inflated by music and cheering with no payoff |
| Transcript keywords | Speech, speaker turns | Webinars, interviews, tutorials | Moderate, needs speech-to-text | Misses visual-only moments |
| Multimodal scoring | Vision, audio and speech combined | Large mixed libraries | High, needs model hosting and labeled examples | Needs tuning before it beats cheap signals |
| Query-driven retrieval | Text query matched to moments | Creator-defined highlights and search | High, needs model and index | Quality depends on query specificity |
Live sports should start with audio energy plus scene cuts. Talk-based material needs transcript signals, or you'll clip the laugh and drop the sentence. Bring in multimodal scoring only after the cheap pair keeps missing moments you'd have kept by hand.
Practical rule: Combine at least two signals, then test that pair on ten videos from your own library before you change weights.
FFmpeg Commands for Detection and Cutting
Run these against a short test file, in pipeline order. Each command writes something the next step reads. If you skip the probe, every threshold after it is a guess.
| Task | Command | What to check |
|---|---|---|
| Detect scene cuts | ffmpeg -i input.mp4 -filter:v "select='gt(scene,0.4)',showinfo" -f null - |
Timestamps in the log; drop the threshold to about 0.3 on dim footage |
| Detect silence gaps | ffmpeg -i input.mp4 -af silencedetect=n=-30dB:d=1 -f null - |
Pauses to snap cut points to |
| Log loudness over time | ffmpeg -i input.mp4 -filter_complex ebur128=metadata=1 -f null - |
Momentary loudness values for audio-energy scores |
| Cut one candidate clip | ffmpeg -ss START -i input.mp4 -t DUR -c copy clip.mp4 |
Keyframe-aligned start and audio sync; put -ss after -i and re-encode when the frame must be exact |
| Reframe to 9:16 | ffmpeg -i clip.mp4 -vf "crop=ih*9/16:ih,scale=1080:1920" -c:a copy vertical.mp4 |
Subject stays in frame; switch from a centered crop to subject tracking when the speaker moves |
| Join selected segments | ffmpeg -f concat -safe 0 -i files.txt -c copy joined.mp4 |
Works only when codec and resolution match; otherwise re-encode with the concat filter |
Walk the file once
- Probe first.
ffprobe -show_format -show_streams input.mp4confirms duration, frame rate, audio track count, and codec. Scene and silence thresholds assume you know which stream is speech. - Log scene cuts. A threshold near 0.4 suits most footage. Dim or low-contrast material needs about 0.3, or you'll under-cut.
- Find pauses.
silencedetectat -30 dB for 1 second marks gaps that cut points can snap to, so you don't slice a word. - Log loudness.
ebur128gives momentary values you can rank. Don't treat a music sting as a highlight just because it is loud. - Cut each candidate.
-ssbefore-iwith-c copyis fast and keyframe-aligned. When the in-point must be an exact frame, put-ssafter-iand re-encode. The FFmpeg trim guide covers that speed versus accuracy trade. - Reframe. A centered
cropto 9:16 is fine while the speaker stays mid-frame. Switch to subject tracking, or a per-clip crop offset, when they walk off center. - Join only matching segments. The concat demuxer with
-c copyglitches when codec or resolution differs. Re-encode with the concat filter in that case.
Finish each output with ffprobe before the next stage. Confirm duration, one video stream, and one audio stream. A silent clip that “succeeded” is still a failed job.
Score Moments and Set Clip Boundaries
Selection is temporal ranking plus a duration budget, not scene detection with a fancy name. The TVSum project formulates summary creation as choosing shots that maximize total importance under a duration limit, then scores overlap with human references using precision, recall, and F1. TVSum holds 50 videos across news, how-to, documentary, vlog, and egocentric categories, with 20 crowd annotations per video, so one library-wide score hides the genre that is failing.
Take a 25-minute match that yields 14 candidate windows. The budget is six clips of about 30 seconds. If you keep the six highest scores, they often sit inside one attacking spell and you publish the same story six times.
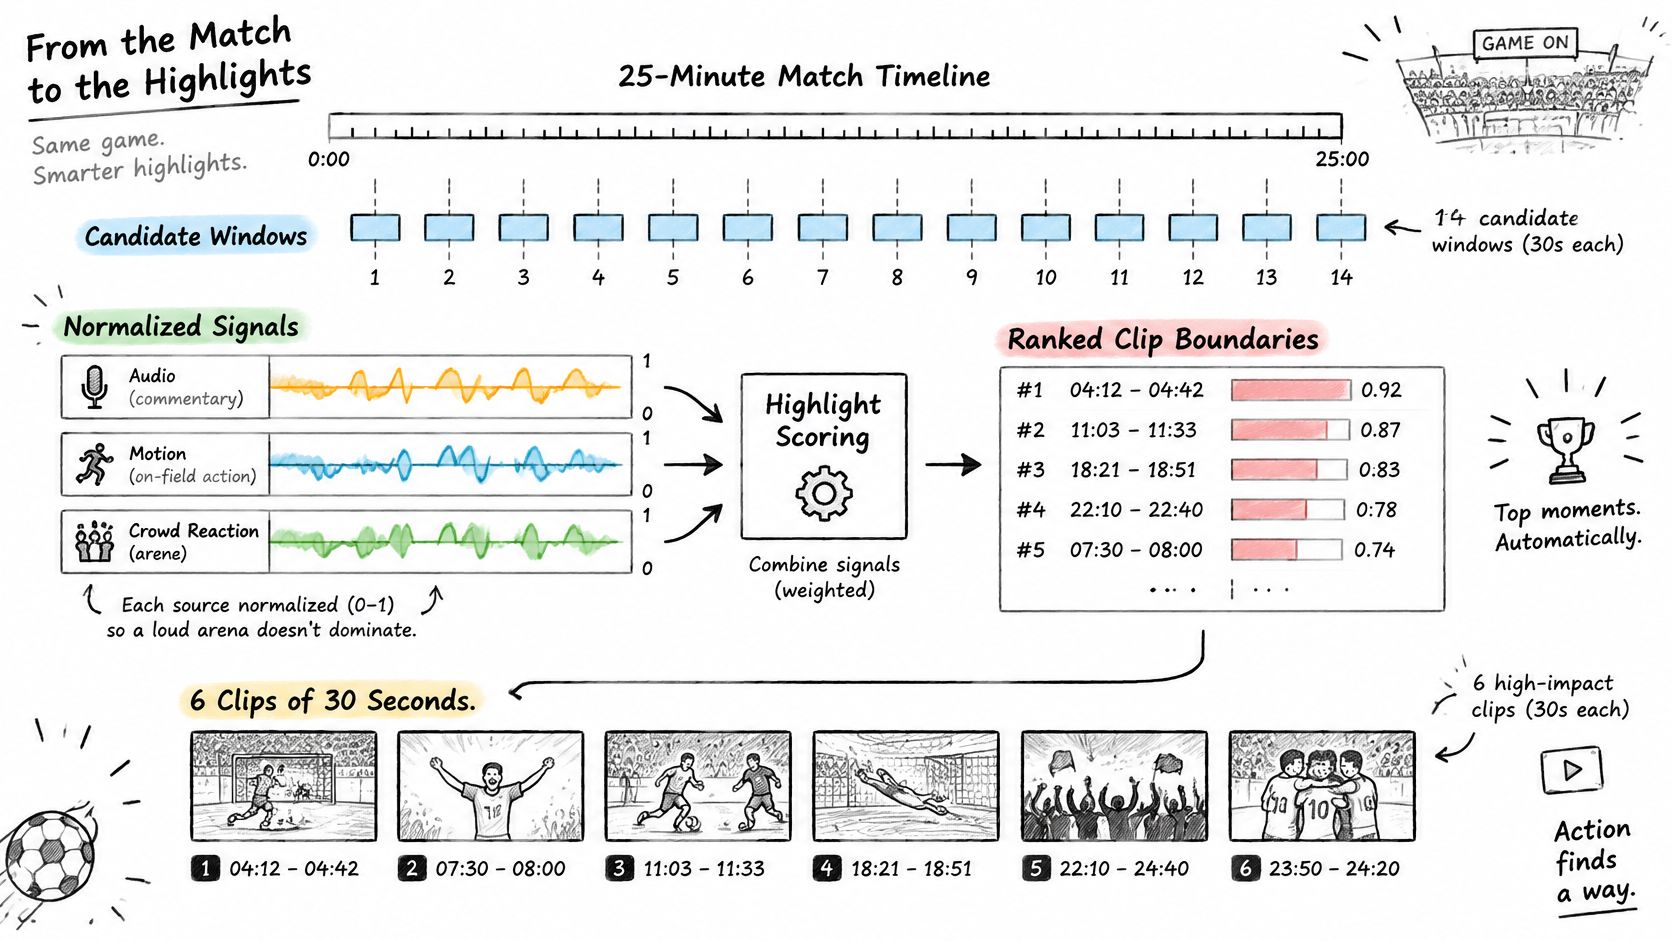
From raw signals to one score
Normalize each signal inside that source. A loud arena must not outrank a quiet studio just because the absolute decibels are higher. Weight the normalized signals into one score per window. Smooth across neighboring windows so a single spike cannot win alone. Then apply non-maximum suppression: merge overlapping windows and keep the highest-scoring version.
Pick the final set with a 0/1 knapsack or any constrained optimizer that maximizes total score under the time budget. Greedy top-k is the shortcut that clusters.
Boundaries that don't flicker
- Hysteresis: start a clip when the score rises above 0.7 and end it when it falls below 0.5. A single threshold chatters on and off.
- Length: minimum 8 seconds, maximum 45.
- Padding: 0.5 to 1.5 seconds on each side, both ends snapped to the nearest pause within two seconds.
Applause, loud music, camera motion, and rapid cuts inflate a visual-only score and skip the payoff.
Add transcript coverage, speaker turns, and audio-event gating. Once a week, audit false positives by genre. Tune these numbers on your footage. They are starting points, not a universal model.
Automate Batches with Webhooks and n8n
One clean file is not a pipeline. A batch is a chain: a trigger, one detection pass, then several editorial policies. Build it in n8n or Zapier, or call the same endpoints from any HTTP node.
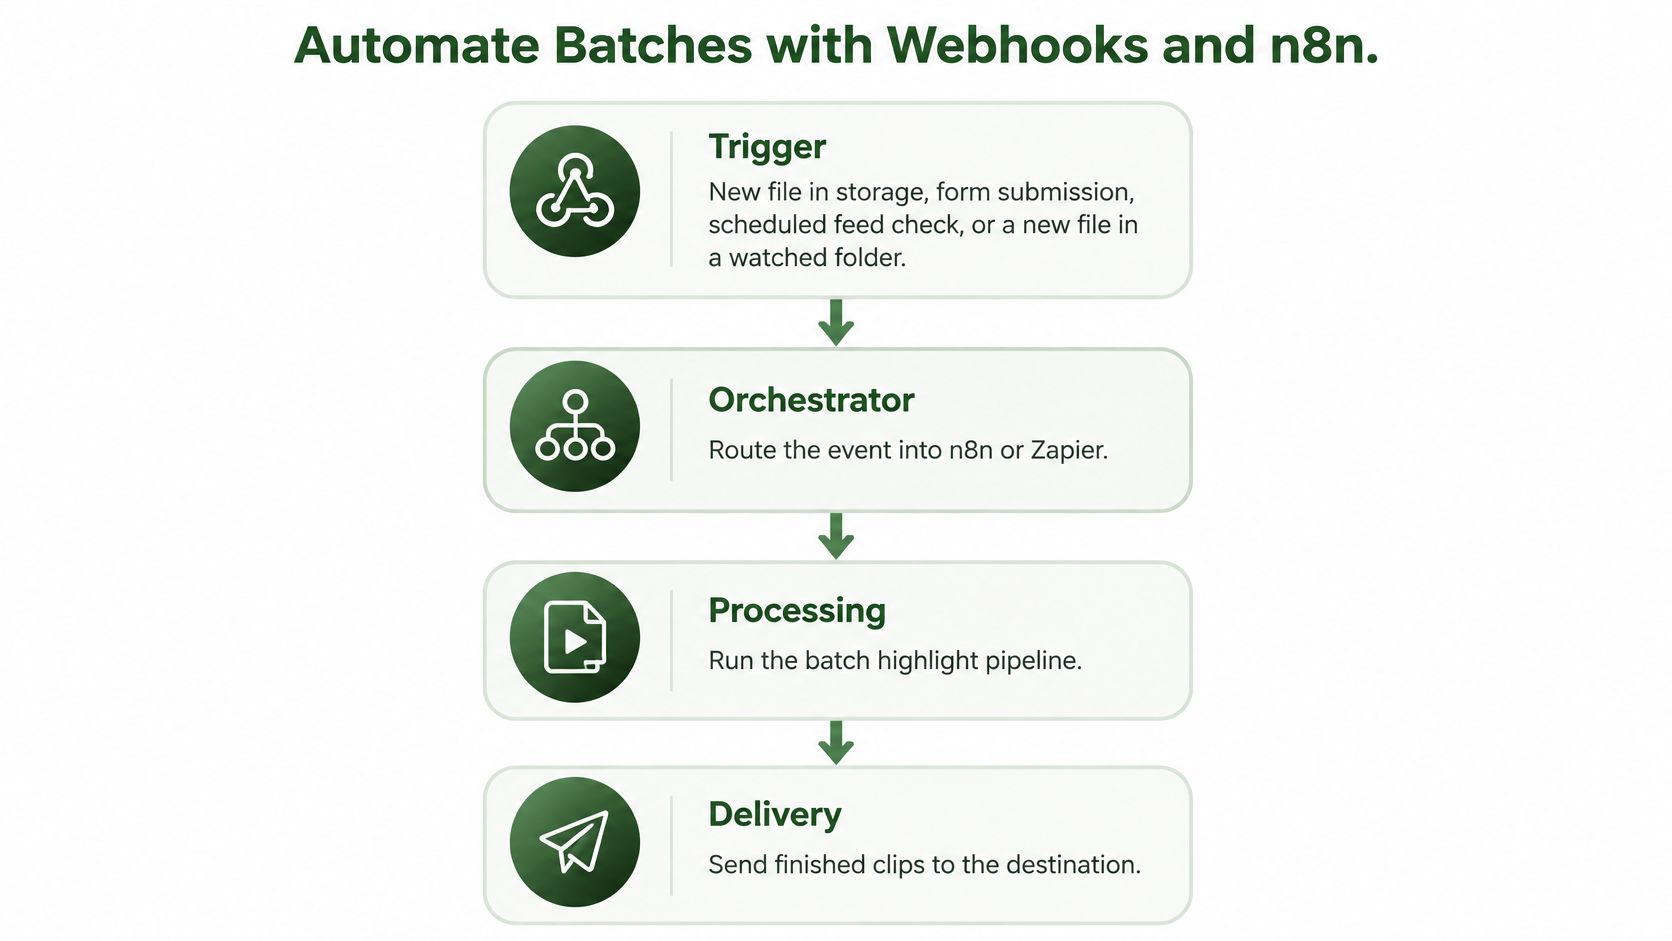
From trigger to delivery
Trigger on a new file in storage, a form submission, a scheduled feed check, or a file dropped in a watched folder. Download only public sources. The download step uses yt-dlp to fetch publicly accessible video and rejects private, DRM-protected, or paywalled URLs before the job starts, so a bad source fails closed. Upload is the stage demos skip. A 2 GB raw file over a 100 Mbps connection takes about 2.5 minutes before processing starts, so ingest next to the files or pass a source URL.
Every video in a batch is its own API call, so a 100-video batch is 100 commands. Submit one job per video and build an idempotency key from the source ID plus the variant name, so a retried trigger does not render the same clip twice. Fan out from that single detection pass: a vertical cut for TikTok, a 16:9 cut for YouTube, and a second language track. The n8n batch processing walkthrough shows how an HTTP node calls a managed FFmpeg API such as RenderIO from n8n, Zapier, or any tool with an HTTP Request node.
Treat audience as a policy input
From the same windows, emit an engagement cut that keeps peaks and a viewer-value cut that keeps explanations, tactics, or the creator's query. When audience labels are reliable, rank windows per policy instead of tuning one universal scorer; a generic scorer is cheaper to maintain but blurs the cut. Keep the policy name in the idempotency key so a retry cannot mix variants.
Fire a webhook on completion and on failure. The payload should include the full FFmpeg error output, not just a status code. Retry with backoff, send exhausted jobs to a dead-letter queue, and keep credentials out of logs.
Caption and Deliver Clips for Shorts and Reels
Export settings are the easy half. Caption validation is where scaled automated video highlights become an accessibility defect.
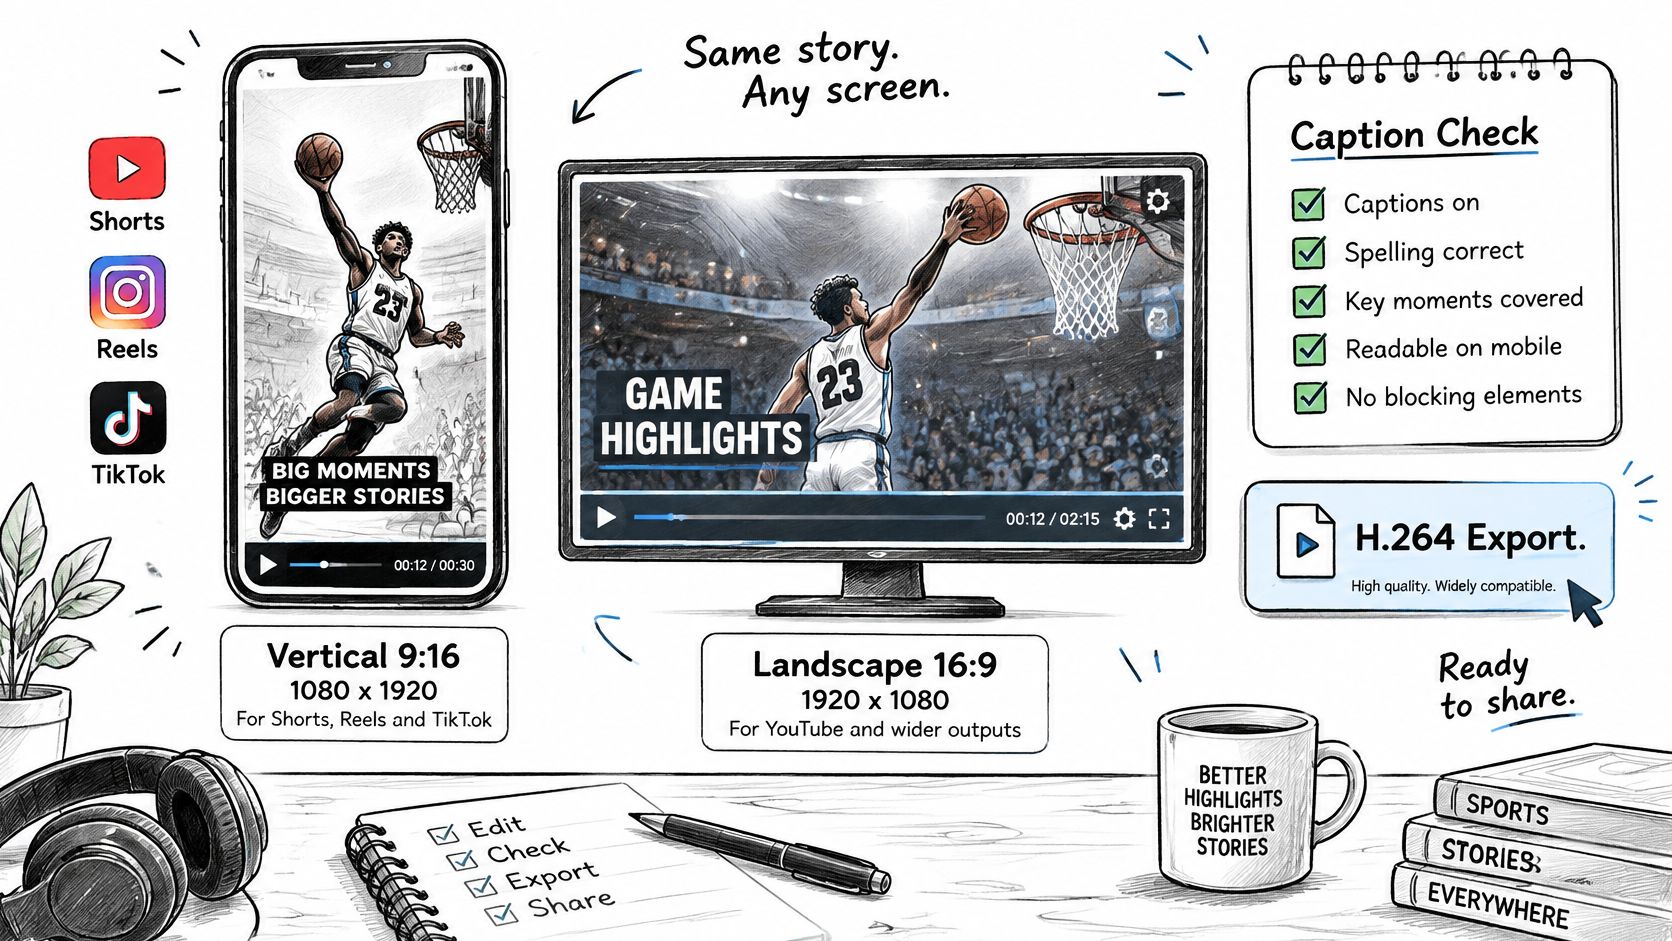
Picture and audio
- Vertical: 9:16 at 1080x1920 for Shorts, Reels, and TikTok.
- 16:9: 1920x1080.
- Codec: H.264, pixel format yuv420p, so phones decode it.
- Audio: AAC at 128 kbps.
- Safe area: keep captions and key text out of the top and bottom 15%, where the app chrome covers them.
Fail a caption before you multiply it
Start from the transcript and attach a confidence score to each line. Anything under 0.85 goes to a human. Correct names and product terms from a glossary. Each line should start and end within 0.3 seconds of the speech. Export an SRT sidecar for platforms that accept uploads and a burned-in version for Reels, then confirm which file that platform displays. Our captions primer is the place to settle sidecar versus burn-in before you template it.
Eight participants in recent accessibility research considered automatically generated captions worse than no captions when timing errors made them distracting, and a 2015–2025 review found that Deaf and hard-of-hearing, neurodivergent, and multilingual viewers expect a way to give caption feedback while creators still lack the tooling, per the ACM caption study. Faster clipping makes that worse if one bad line is copied into every aspect ratio.
A 40-second clip with a misspelled brand and two captions that appear before the speaker talks should fail the job, not get “fixed in the caption style.”
Store outputs under expiring signed URLs, keep originals separate, and record file size and duration. The short walkthrough below shows the same idea on a timeline: validate timing, then publish.
Debug Failures and Measure Clip Quality
Match the bad export to a cause before you touch weights. Most “the model is dumb” tickets are a flag, a crop, or a missing merge.
| Symptom | Likely cause | Fix |
|---|---|---|
| Clips start or end mid-sentence | Cut points not snapped to pauses | Snap to silencedetect gaps and add 0.5 seconds of padding |
| Same moment selected again and again | No non-maximum suppression | Merge windows that overlap or sit within 10 seconds of each other |
| Output has no sound | Audio stream dropped or -an left in the command |
Add -c:a aac and confirm the audio stream with ffprobe |
| Joined clip glitches at seams | Segments differ in codec or resolution | Re-encode with the concat filter instead of the demuxer |
| Highlights full of applause and music | Audio energy weighted too heavily | Add transcript coverage and speaker-turn gating |
| Vertical crop cuts off the speaker | Static centered crop | Use subject tracking or shift the crop offset per clip |
Judge the policy with overlap
For query-driven or creator-defined highlights, skip a vague accuracy number. The QVHighlights paper compares each prediction with annotated intervals and reports mAP at IoU 0.5 and 0.75, plus average mAP across thresholds. It also reports Recall@1, counting a hit only when IoU with the ground-truth moment is at least 0.7. A clip can hold the right event and still start late. A duration budget hides that.
Define the highlight rule, generate candidates, rank them, then score overlap. Annotators disagree: SumMe uses summaries from 15–18 people, so report per-genre scores and a spread, not one headline. Log the predicted interval, score, model version, source duration, and accept or reject. After about 200 of those decisions, recalibrate thresholds. View counts don't replace offline overlap.
Run One Video End to End Before You Scale
Prove the pipeline on one file from the library, three to ten minutes, in the genre you publish. Run probe, detect, score, render, and log with the commands and thresholds you already chose. I would not add a second source until this file is clean.
Accept the pass only when three checks hold.
- Captions. Speech matches, names match the glossary, and each line starts and ends within 0.3 seconds of the words.
- Edges. Both ends land on a pause or inside the 0.5 to 1.5 second pad. No mid-sentence cut.
- Log. Every clip stores an accept or reject reason, the window score, and the duration.
Before you touch a threshold, write down three numbers: clips produced, clips rejected, and overlap or F1 against the moments you would have picked by hand. If a check fails, fix that stage and rerun the same file. Webhooks, idempotency keys, and platform variants come after this pass.
During a free trial, video downloads are fully available so you can test the whole workflow, including fetch and render. Webhooks notify when a job completes or fails and include the full FFmpeg error output, which is what you want on this single file. Switching from self-hosted FFmpeg to the API is mostly mechanical. The test is still the ranking and the cuts, whichever machine runs the binary.
RenderIO runs the FFmpeg and yt-dlp steps in this pipeline as HTTP calls, so you can probe, cut, reframe, and deliver short-form variants without standing up queues. If you want signed outputs, webhook errors, and idempotent batch jobs for automated video highlights, start with a single test file on RenderIO.