That diagram says everything: a 31.7 MB WAV becomes a 2.9 MB MP3 with a quality most listeners won't question.
Table of Contents
- Why Convert WAV to MP3 Files
- WAV vs MP3 at Common Bitrates
- Keep the Master Safe
- Match the Tool to the Actual Work
- Choose a Conversion Method That Fits
- Preserve Tags During Conversion
- Bash For Linux and macOS
- PowerShell For Windows
- Parallel Runs and When to Push Back
- Hooking It Into Your Workflow
- Build Reliable Batch Jobs
- Handling Sample-Rate Mismatches
- Protect Quality and Metadata
- What Bitrate Works Best
- Can You Convert MP3 Back to WAV
- How Do You Keep Tags and Album Art
- Are Cloud Tools Safe for Sensitive Audio
Why Convert WAV to MP3 Files
WAV stores raw PCM audio — every sample preserved at full fidelity. That's great for editing, not great for sharing. MP3 throws away information your ears probably wouldn't catch anyway, and the file shrinks by roughly 90%.
The rule is simple: keep your WAV as the source master, and make MP3 copies for distribution. Publishing, streaming, uploading, emailing — any time you need the file to move quickly.
For podcasters managing hundreds of episodes or SaaS platforms handling user-generated clips, smaller files mean faster uploads and noticeably lower storage bills. If you're researching the competitive landscape, some teams also archive competitor episodes as MP3 as part of a broader analysis workflow.
WAV vs MP3 at Common Bitrates
Bitrate choice is the single most important decision you'll make during conversion. Too low, and your audio sounds like it's coming through a wall. Too high, and you've wasted space for no audible benefit. This table covers a typical 3-minute stereo track:
| Format and Bitrate | Approx. File Size (3 min) | Compression Ratio | Best Use Case |
|---|---|---|---|
| WAV (uncompressed) | 31.7 MB | 1:1 | Master editing, archival |
| MP3 320 kbps | 7.2 MB | 4.4:1 | Music archives, audiophile content |
| MP3 192 kbps | 4.3 MB | 7.4:1 | General music, balanced quality |
| MP3 128 kbps | 2.9 MB | 10.9:1 | Podcasts, interviews, narration |
| MP3 96 kbps | 2.2 MB | 14.4:1 | Voice-only, low-bandwidth playback |
As a practical starting point: 192 kbps works well for music where you want to preserve some richness, while 128 kbps handles speech and podcast drafts without drawing attention to itself. Drop to 96 kbps only when bandwidth is the overriding concern.
Keep the Master Safe
Here's something that trips people up repeatedly. Once you've encoded a WAV to MP3, you can't go back and get those lost frequencies by converting to WAV again. The container swaps back to WAV, sure — but the audio data that got discarded during MP3 encoding? It's gone.
Treat WAV as the production master and MP3 as the distribution copy. Never encode MP3s from MP3s.
The good news is that a 128 kbps MP3 of a quiet podcast is hard to distinguish from the original WAV in blind tests. Pick the right bitrate for your content, keep that WAV safe, and you're set up for whatever comes next — whether that's desktop tools, FFmpeg commands, or batch automation at scale.
The best approach to convert WAV to MP3 really comes down to volume, how often you do it, and whether you need things to run automatically. A freelancer exporting three voice memos after a client call has very different needs from a studio churning through hundreds of podcast clips every week.
Match the Tool to the Actual Work
For the occasional one-off conversion, desktop apps like Audacity or fre:ac get the job done with minimal fuss. Drop in a WAV, pick your quality, and export. But once you're doing that same dance for the tenth file in a row, the manual clicks start to grate.
FFmpeg is the natural next step for repeatable local work. It runs on Windows, macOS, and Linux, plays nicely with scripts, and gives you granular control over bitrate and sample rate. The catch? There's a learning curve, and your own hardware bears the processing load for every single file.
Cloud APIs make sense when conversions need to happen as part of an upload-triggered or scheduled pipeline. With RenderIO, you send an FFmpeg command through REST, get back the processed file, and skip the hassle of managing local CPU, servers, queues, or storage. Its workflows plug into n8n, Zapier, Make, and Pipedream through native nodes, webhooks, or plain HTTP requests.
Pick desktop software for dead-simple one-offs, FFmpeg for local control and scripting, and a cloud API when conversions need to run without anyone watching.
Choose a Conversion Method That Fits
| Method | Typical Volume | Learning Curve | Best For |
|---|---|---|---|
| Desktop app | A few files | Low | One-off exports |
| FFmpeg | Dozens to hundreds | Medium | Scripts and repeatable folders |
| Cloud API | Hundreds or more | Medium | Automated pipelines and team workflows |
The pattern is straightforward in practice. Reach for Audacity when you're prepping a single client memo. Use FFmpeg when a weekly folder of recordings needs processing. Wire up RenderIO when every uploaded file should convert automatically. Getting this distinction right from the start saves you from over-engineering something simple while keeping the door open to scale when volume climbs.
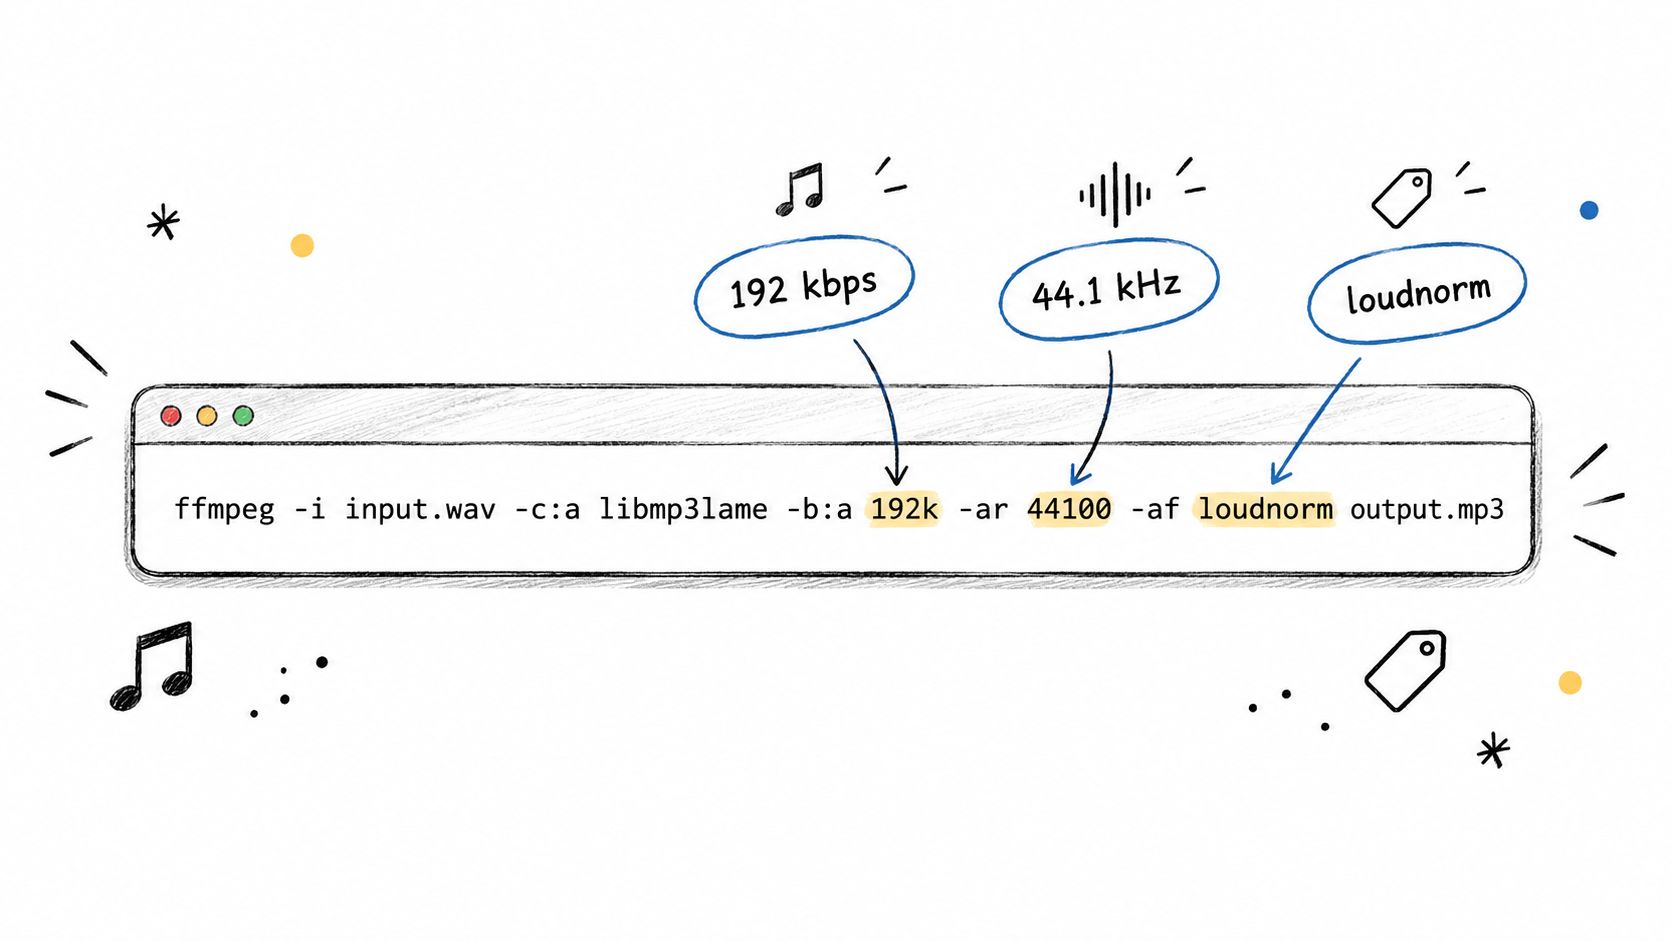
For a single WAV file, the conversion is one repeatable command:
ffmpeg -i recording.wav -c:a libmp3lame -b:a 192k recording.mp3
The -i flag points to your input, -c:a libmp3lame selects the MP3 encoder, and -b:a 192k sets a constant 192 kbps bitrate. That's a solid default for music — good detail without bloating the file. For spoken-word content like interviews, narration, or podcast drafts, 128 kbps does the job just fine.
FFmpeg 7.x is the current release line, and libmp3lame remains rock-solid across builds. If you're dealing with a studio recording at 48 kHz but the delivery system expects CD-quality 44.1 kHz, throw in resampling and loudness normalization:
ffmpeg -i studio.wav -c:a libmp3lame -b:a 192k -ar 44100 -af loudnorm delivery.mp3
The -ar 44100 flag resamples to the target rate, and -af loudnorm normalizes the perceived loudness. Without it, you'll get that jarring volume jump between files — one's whisper-quiet, the next one blows out the speakers.
Preserve Tags During Conversion
WAV files often carry metadata like title, artist, and album. To carry those over to the MP3, use -map_metadata 0:
ffmpeg -i recording.wav -map_metadata 0 -c:a libmp3lame -b:a 192k recording.mp3
Always keep the original WAV intact. The MP3 is a delivery copy, not a replacement for your master file.
For a deeper dive into FFmpeg flags, filters, and syntax, read the FFmpeg command-line tutorial. Once you've got one file converting cleanly, that same command can slot into a batch script or an automated API workflow.
Once you've nailed a single-file conversion, the real challenge is handling a whole folder without messing up your originals. Here's how to batch convert WAV to MP3 while keeping your masters safe and your outputs organized.
Bash For Linux and macOS
A clean recursive loop looks like this:
mkdir -p mp3
find . -type f -iname '.wav' -print0 | while IFS= read -r -d '' file; do
out="mp3/$(basename "${file%.}").mp3"
ffmpeg -y -i "$file" -c:a libmp3lame -b:a 192k "$out"
done
The -y flag skips those pesky overwrite prompts, which matters when a script runs overnight and you don't want it stalling on a duplicate name. Using basename keeps filenames tidy by stripping the directory path, and dumping everything into a separate mp3 folder prevents accidental overwrites of your source files.
PowerShell For Windows
New-Item -ItemType Directory -Force mp3 | Out-Null
Get-ChildItem -Path . -Filter *.wav -File | ForEach-Object {
$out = Join-Path mp3 ($.BaseName + ".mp3")
ffmpeg -y -i $.FullName -c:a libmp3lame -b:a 192k $out
}
This approach uses full paths via $_.FullName, so spaces in folder names or filenames are far less likely to break the job. If you need metadata preserved across the conversion, add -map_metadata 0 to either the bash or PowerShell command.
Batch jobs feel trivial until they aren't. Once you're processing a few hundred files, runtime matters more than the elegance of your syntax.
Parallel Runs and When to Push Back
On a modern multi-core CPU, running 4 to 8 conversions simultaneously can significantly beat a sequential loop. But speed only helps until thermal throttling kicks in or your disk becomes the bottleneck.
A rough guide based on what I've seen work:
- Small folders (under 50 files): stick with a single sequential loop. Keep it simple.
- Medium batches (50–500 files): parallelize carefully and keep an eye on CPU temperature. You can throw
-threads 2into your FFmpeg command to limit per-process usage. - Large queues (500+ files): offload the same FFmpeg command to a remote API rather than hammering your own machine.
Here's a practical example. Say you've got a podcast archive with hundreds of WAV episodes sitting on your laptop. A local batch job might take hours, and at that point the bottleneck isn't encoding quality — it's pure throughput. That's where something like RenderIO starts making sense, especially if you'll need to run that same batch again tomorrow when new episodes drop.
A cloud FFmpeg API takes the same command you'd run on your laptop and runs it inside an automated pipeline. You send a request to RenderIO, which executes FFmpeg 7.x and hands back the processed file. No servers to manage, no queues to monitor, no egress fees eating into your budget.
The request body can be nothing more than an FFmpeg command string. That means the exact command you tested locally drops in unchanged:
ffmpeg -i input.wav -c:a libmp3lame -b:a 192k output.mp3
Picture a content studio that gets new WAV recordings every morning. A webhook fires off the conversion automatically. Progress gets tracked through polling or a callback. Transient failures retry on their own, and anything that genuinely needs a human look gets parked in a dead-letter queue.
Hooking It Into Your Workflow
The pipeline connects through n8n, Zapier, Make, or Pipedream using a simple HTTP node or webhook:
- Send the source file and command.
- Store the signed output URL that comes back.
- Poll for completion or wait for a callback.
- Pass the finished MP3 to publishing, storage, or whatever comes next.
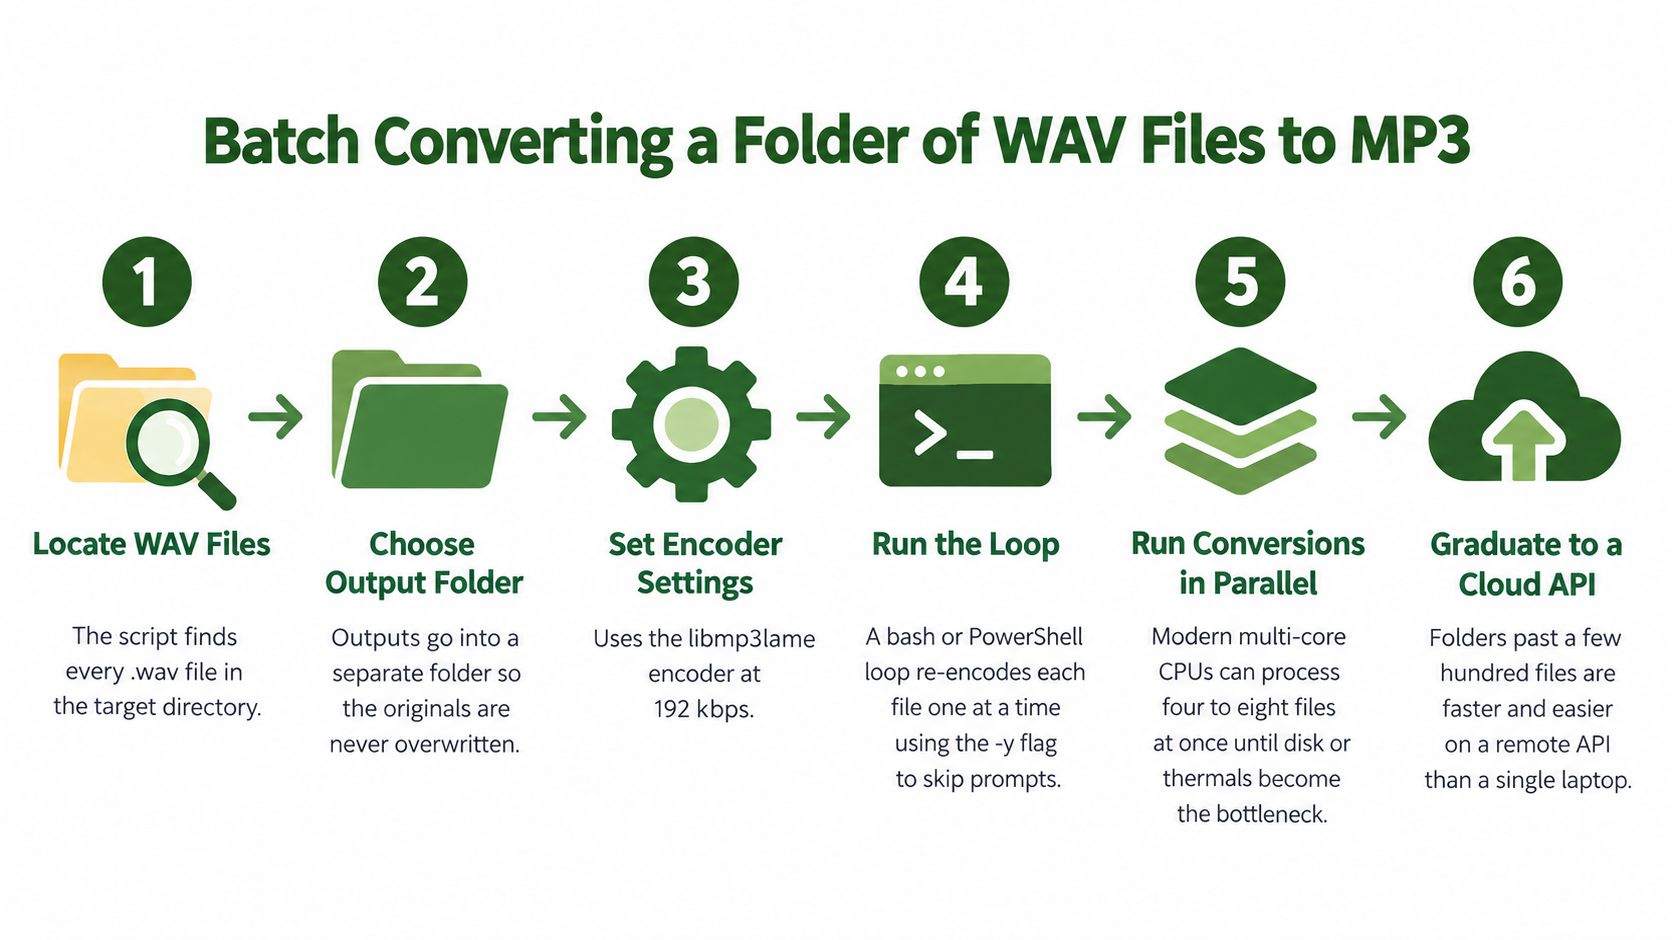
The visualization above traces a batch path from locating WAV files through local loops and parallel processing, then migrating to a cloud API once volume outgrows a single machine.
Build Reliable Batch Jobs
In production, reliability matters just as much as encoding speed. Idempotent requests keep a retry from encoding the same file twice. Signed URLs expire automatically after delivery, so there's nothing lingering.
When something fails, RenderIO returns the full FFmpeg stderr output. You can spot missing codecs, broken paths, or unsupported inputs right away rather than guessing from a generic error message.
Keep the command simple, preserve the WAV master, and let the pipeline handle repetition, retries, and delivery.
There are no servers to patch, no queues babysitting, no cold starts, no local CPU ceiling. Learn more about the RenderIO cloud FFmpeg API when your folder holds hundreds of files or conversions need to fire whenever new audio lands.
Running into a missing encoder is probably the most common FFmpeg headache. If you see Unknown encoder 'libmp3lame', your FFmpeg build simply doesn't have LAME support compiled in. Here's how to fix it on each platform:
- macOS:
brew install ffmpeg - Ubuntu or Debian:
sudo apt install ffmpeg libmp3lame0 - Windows: Reinstall FFmpeg from a trusted build that includes
libmp3lame, then reopen your terminal.
You can verify the encoder exists by running ffmpeg -encoders | grep mp3 on macOS or Linux. Windows users should use ffmpeg -encoders | findstr mp3.
Handling Sample-Rate Mismatches
Sample-rate issues tend to fly under the radar but can break things downstream. Say you've got a 48 kHz studio recording that needs to land in a 44.1 kHz delivery pipeline — you'll want to resample during conversion:
ffmpeg -i studio.wav -ar 44100 -c:a libmp3lame -b:a 192k delivery.mp3
The -ar 44100 flag handles the resampling in one pass. If your source files have inconsistent volume levels, adding -af loudnorm will even them out. Learn more about FFmpeg loudness normalization before applying it across a big batch — getting the parameters wrong there can do more harm than good.
Protect Quality and Metadata
Don't go below 96 kbps for music. That's roughly where the metallic artifacts and watery highs start becoming noticeable. Speech can handle lower bitrates, but always test a representative sample before converting an entire archive.
And this one's worth repeating: never re-encode an MP3 to create another MP3. Each lossy pass strips away more data, and the degradation compounds fast. Always go back to the original WAV master when you need a new encode.
Keep this checklist handy:
- Keep the master WAV unchanged.
- Select
libmp3lameexplicitly. - Add
-map_metadata 0to preserve tags. - Use
-af loudnormwhen levels vary. - Add
-vnif a video container is hiding an unwanted audio stream.
Stick with these habits and your delivery files will come out cleaner and more predictable every time. Once you've got your local workflow locked in, RenderIO's batch API (free trial available) lets you automate recurring conversions without hogging your machine.
What Bitrate Works Best
For music, 192 kbps is where I usually land. It keeps enough texture in cymbals, reverb tails, and stereo width that things don't start sounding flat or swirly. For voice — podcasts, transcriptions, meeting recordings — 128 kbps is plenty. That's where the earlier bitrate table points speech users, and it genuinely does the job while saving noticeable space.
Match the bitrate to the content, not the file size goal. That's the one rule worth remembering.
Can You Convert MP3 Back to WAV
Technically, sure. You can wrap MP3 data inside a WAV container without any issues. But here's the thing people get tripped up on: once detail is discarded during MP3 compression, it's gone. Converting back to WAV doesn't magically recover what was thrown away. The file is bigger but not better.
If you need a fresh export for editing or delivery, go back to the original WAV master. Always.
How Do You Keep Tags and Album Art
Tell your converter to copy metadata forward. With FFmpeg, that's -map_metadata 0 — it carries title, artist, album, and the rest of the ID3 fields through the encode intact.
Album art is a bit trickier. Some tools need the embedded image stream mapped separately, so run a test file first before committing a whole batch. I've seen plenty of bulk conversions come through with everything right except a missing cover image, and it's always worth that one-minute sanity check.
Are Cloud Tools Safe for Sensitive Audio
Depends on the setup, but the good ones use isolated jobs — meaning your audio isn't sitting on a shared server alongside someone else's. Look for signed URLs, automatic expiry, and actual retention controls you can configure. That matters a lot when you're handling client-owned recordings.
And if your pipeline is wired through n8n, Zapier, Make, or Pipedream, you're probably processing files automatically, which makes security architecture even more important. Convenience is nice, but not at the expense of a client's private audio floating around someone else's infrastructure.
FFmpeg, the cloud FFmpeg API, and the integrations mentioned above are all solid, current options in 2026. None of this is legacy tooling — it's what people are actually running in production right now.
RenderIO handles WAV to MP3 conversion at scale, with FFmpeg commands, batch jobs, and automation that fits real production work. Try it at renderio.dev.