Most FFmpeg compression tutorials start with the same instruction: use -crf 23, choose a preset, and call the job finished. That advice is convenient, but it confuses a quality-control method with a universal compression policy. CRF 23 cannot guarantee a maximum file size, a delivery bitrate, or compatibility with the platform that receives the output.
To compress video with FFmpeg reliably, define the constraint before choosing the flag. A creator preparing an upload with a strict byte limit needs a different workflow from a video-on-demand service protecting playback bitrate, and both differ from an archive workflow focused on visible quality. The codec, resolution, frame rate, pixel format, audio settings, and rate-control mode all shape the result.
FFmpeg is valuable because it exposes those decisions through a scriptable command line. It can inspect a source, resize it, change its frame rate, select H.264, HEVC, VP9, or AV1, and package the result in formats such as MP4, Matroska, or WebM. The right command is therefore a small encoding policy, not a magic spell.
Table of Contents
- Stop Using CRF 23 as a Universal Answer
- The Four Variables That Decide Your Output Size
- Core Compression Commands and When to Use Each
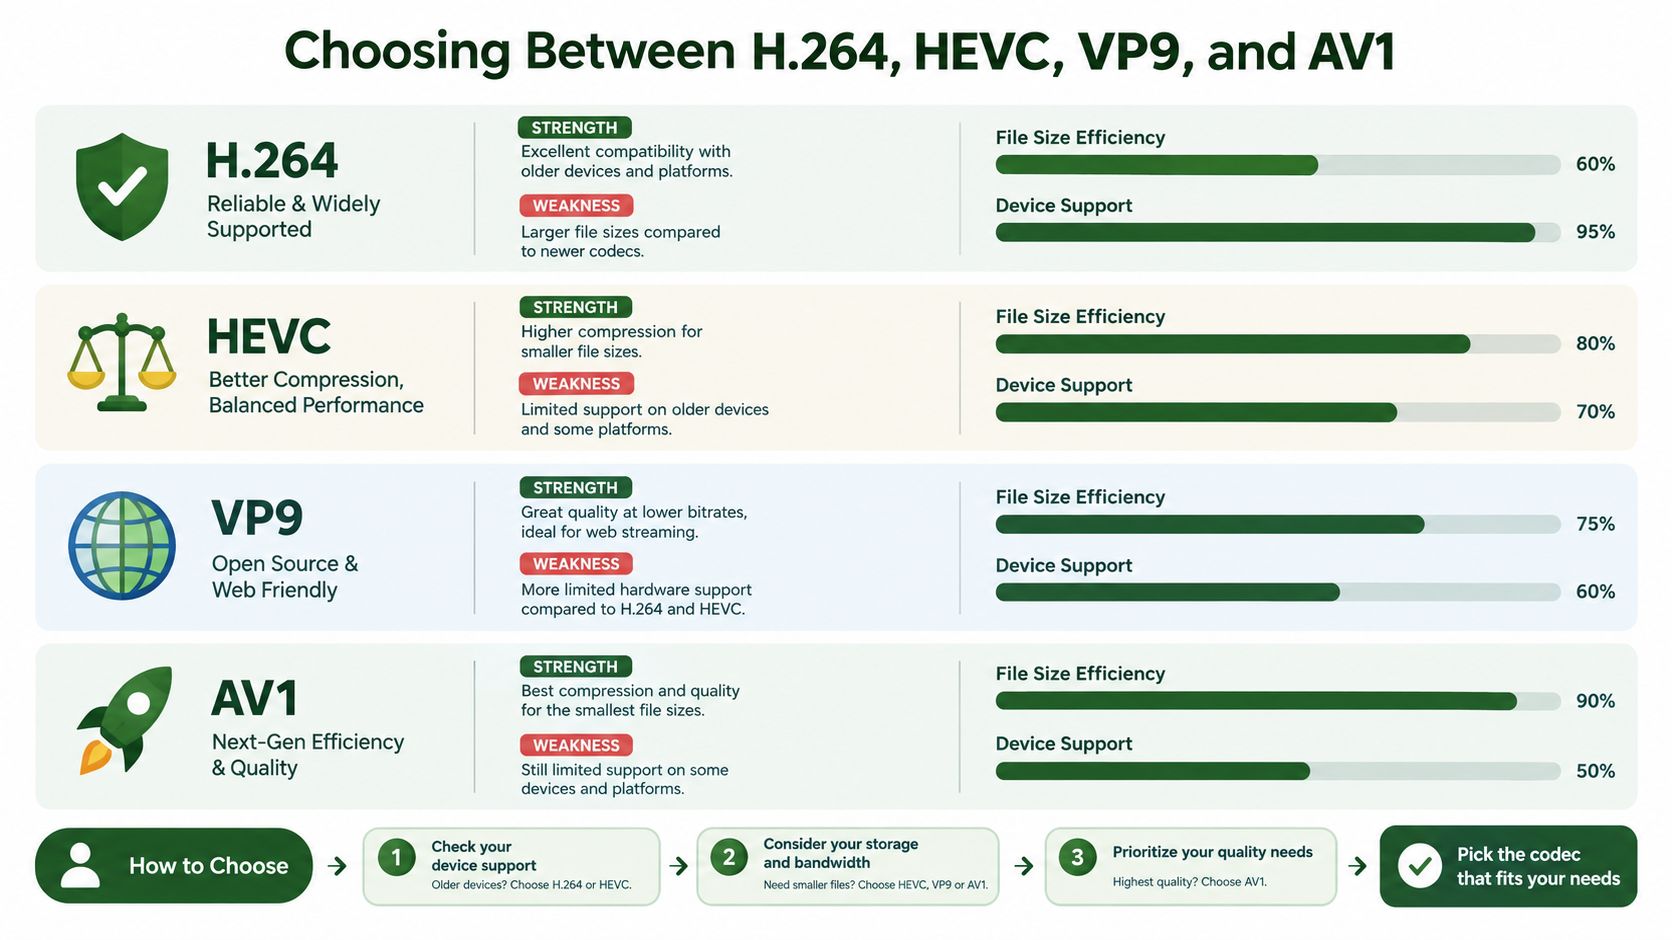
- Choosing Between H.264, HEVC, VP9, and AV1
- Building a Compression Pipeline You Can Trust
- Verifying Output Instead of Trusting File Size
- Your Compression Workflow Checklist
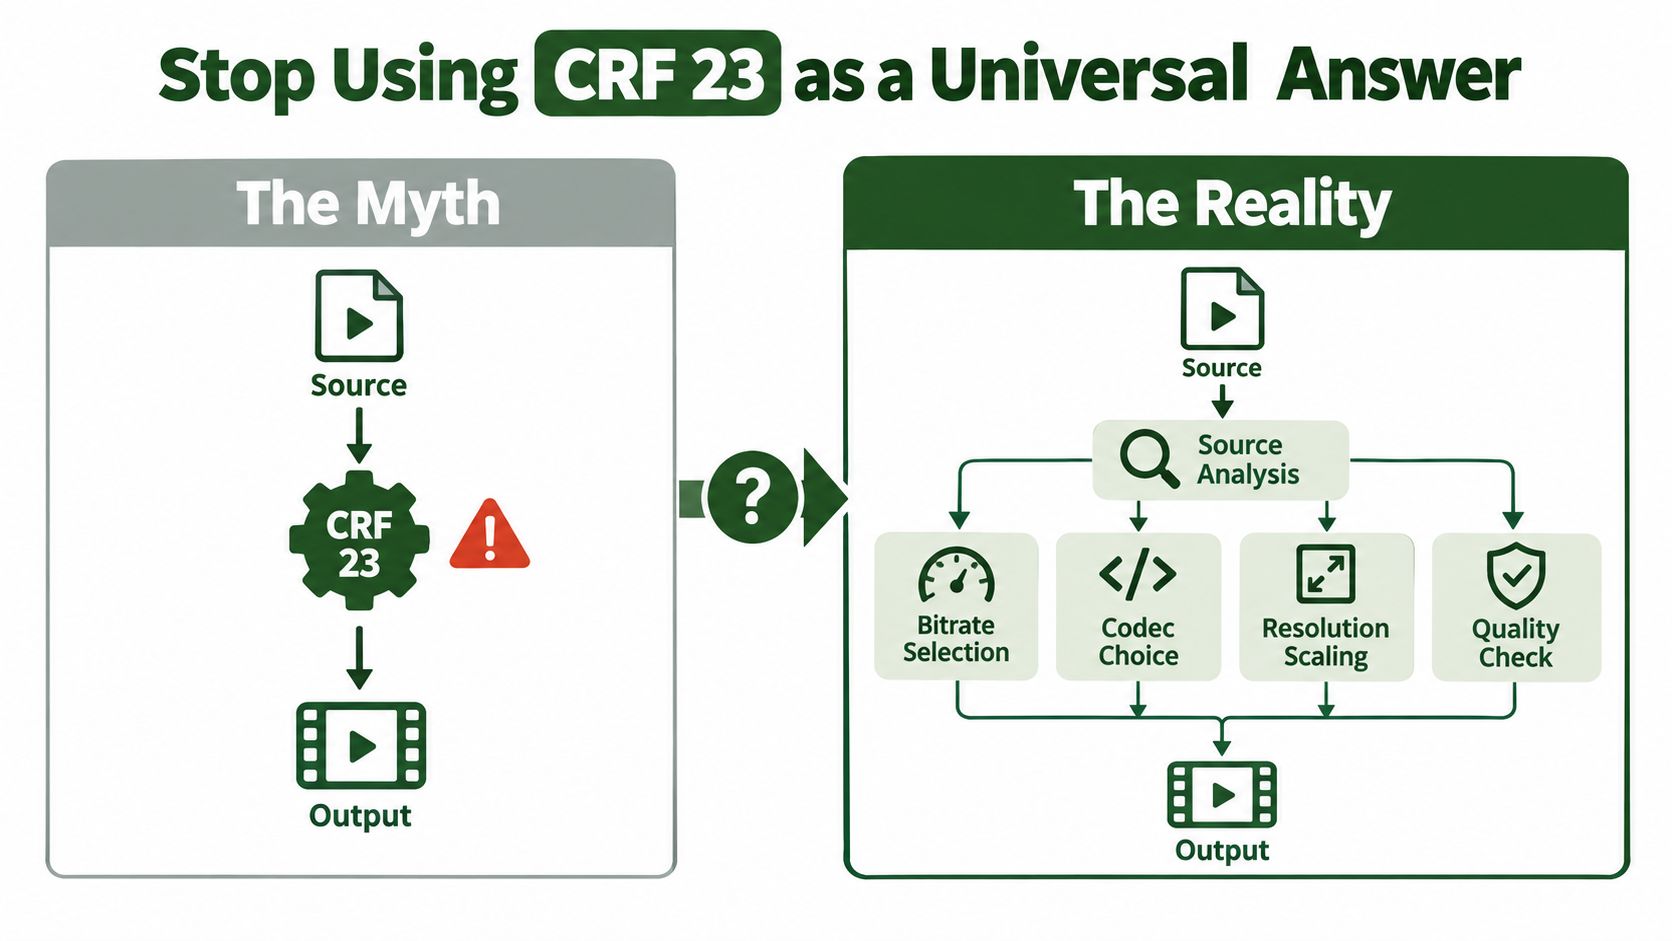
Stop Using CRF 23 as a Universal Answer
CRF, or Constant Rate Factor, works when perceptual quality matters more than predictable file size. The encoder allocates more bits to complex scenes and fewer to simple ones. That is often the right trade-off, but two videos with the same duration and CRF value can still produce very different files.
Grainy camera footage, animation, fast sports action, and static screen recordings have different compression needs. Resolution, motion, texture, frame rate, and the source codec all affect the result. A fixed -crf 23 command conceals those variables instead of addressing them.
Define the constraint first
Identify what failure means for the job:
- Maximum file size: The output must remain below a byte or upload limit.
- Target quality: The output should retain visual detail with practical data use.
- Delivery bitrate: Playback must fit a defined bandwidth budget.
- Processing time: The encode must finish quickly enough for the workflow.
- Compatibility: The file must play reliably in a specified browser, device, or social platform.
Choose rate control from that requirement. CRF suits quality-driven local files. Fixed bitrate fits delivery bandwidth or approximate size targets. Two-pass encoding gives tighter control when the final bitrate matters more than single-pass simplicity. Capped CRF combines quality-oriented behavior with a ceiling on bitrate spikes.
Practical rule: Ask what the output must guarantee, not which CRF number looks standard.
A smaller file is not automatically a successful encode. Published testing shows that substantial byte savings can coexist with high VMAF, so both file size and perceptual quality belong in the acceptance record. The test context is documented in technical guidance on video encoding and streaming quality.
For a broader workflow covering how to shrink an MP4 file, treat FFmpeg settings as an encoding policy rather than a magic command. Set the constraint, select the matching rate-control mode, then validate the result against the quality and delivery requirements.
The Four Variables That Decide Your Output Size
A video file's size is largely the result of four decisions: codec, bitrate or quality target, resolution, and frame rate. Audio settings and container overhead matter too, but these four variables determine most of the video payload.
Codec changes the efficiency baseline
H.264 remains a practical default because playback support is broad. HEVC can deliver comparable perceptual quality at a lower bitrate in many situations. The HEVC standardization effort targeted roughly a 50% bitrate reduction versus H.264 at equivalent perceptual quality, while research evaluations commonly report savings in the 37% to 52% range, depending on content, encoder settings, and quality metric, as discussed in research on improved video coding.
That range isn't a promise. A static talking-head clip may respond differently from noisy handheld footage. HEVC also demands more encoding work and may create compatibility problems, so the smallest encoded file isn't always the cheapest file to deliver.
Resolution controls the amount of detail
Scaling from a large source to a smaller delivery frame removes picture information before compression. That can produce a larger practical reduction than changing a quality value by a small amount, especially when the source is oversized for its destination.
Use an explicit scale filter when the destination has a known frame size:
-vf "scale=-2:720"
The -2 keeps the width divisible by a codec-friendly value while preserving the aspect ratio. Don't upscale a small source to a larger frame and expect compression to recover detail that the camera never captured.
Frame rate controls temporal information
Reducing frame rate removes motion samples. That may be appropriate for a presentation, screen recording, or destination with a lower frame-rate requirement, but it can make camera movement feel less fluid. Preserve the source frame rate unless the destination or production brief gives you a reason to change it.
Rate control decides how bits are distributed
CRF varies bitrate to pursue a quality target. Fixed or average bitrate makes the output more predictable but can waste bits on easy scenes and starve complex ones. Two-pass encoding uses a first analysis pass to distribute a chosen bitrate more deliberately. Capped CRF combines a quality target with a bitrate ceiling, which is often a useful compromise for on-demand delivery.
The correct order is destination first, constraint second, codec third, and quality settings last. Choosing a CRF value before answering those questions is how otherwise competent pipelines end up with unpredictable files.
Core Compression Commands and When to Use Each
CRF is a quality-oriented control, not a file-size guarantee. Choose the command from the constraint first: visual quality, delivery bitrate, precise bitrate allocation, a bitrate ceiling, or no re-encoding at all. Replace the filenames, then adjust video and audio settings for the destination.
Quality-driven CRF encoding
Use CRF when the output should preserve a consistent visual standard and the final size can vary:
ffmpeg -i input.mp4 -c:v libx264 -preset slow -crf 23 -c:a aac -b:a 128k -movflags +faststart output.mp4
libx264 selects H.264. -preset slow gives the encoder more time to evaluate compression decisions, usually at the cost of longer encoding. -crf 23 sets the quality target, while -c:a aac -b:a 128k produces MP4-compatible audio. -movflags +faststart moves the MP4 index toward the beginning, which helps progressive playback start sooner.
CRF is a poor fit for a strict maximum file size. Detailed footage, grain, rapid motion, and noisy screen captures can require far more data than a simple clip at the same CRF value.
Fixed bitrate for a predictable delivery budget
Set a target bitrate when the playback system or upload specification requires a defined delivery rate:
ffmpeg -i input.mp4 -c:v libx264 -b:v 6M -maxrate 6M -bufsize 12M -c:a aac -b:a 128k -movflags +faststart output.mp4
-b:v establishes the target video rate. -maxrate and -bufsize control short-term variation, which matters when the receiving system expects a constrained stream. This mode suits a known streaming ladder or restricted network. Its trade-off is uneven visual quality. Easy scenes may receive more data than they need, while complex scenes can show blocking or softened detail.
Two-pass encoding for a bitrate target
Use two-pass encoding when the bitrate target matters and the extra analysis pass is acceptable:
ffmpeg -y -i input.mp4 -c:v libx264 -b:v 6M -pass 1 -an -f mp4 /dev/null
ffmpeg -i input.mp4 -c:v libx264 -b:v 6M -pass 2 -c:a aac -b:a 128k -movflags +faststart output.mp4
The first pass analyzes complexity without creating the final useful file. The second pass uses that analysis to distribute the selected bitrate more effectively across simple and difficult scenes. Log-file behavior can differ by operating system and FFmpeg setup, so test the command in the environment that will run it. Two-pass adds encoding time, making it unsuitable for quick previews where speed matters more than bitrate allocation.
Capped CRF for on-demand video
Capped CRF combines a quality target with a ceiling on bitrate spikes:
ffmpeg -i input.mp4 -c:v libx264 -preset slow -crf 23 -maxrate 6M -bufsize 12M -c:a aac -b:a 128k -movflags +faststart output.mp4
CRF guides the overall quality decision, while -maxrate and -bufsize constrain short-term bitrate behavior. This works well for on-demand delivery with variable scene complexity, but it does not guarantee a particular byte count. Use two-pass or fixed bitrate when the file or delivery budget is the controlling requirement.
Stream copying when transcoding is unnecessary
If the source already matches the required codec, dimensions, frame rate, and container, copy the streams:
ffmpeg -i input.mp4 -c copy output.mp4
This remuxes the existing streams rather than compressing them. It preserves the encoded video without another generation loss, but it will not reduce the payload or repair an incompatible source.
| Mode | Guarantees | Best For |
|---|---|---|
| CRF | A quality-oriented target, not a fixed size | Quality-driven files |
| Fixed bitrate | A controlled video bitrate | Delivery budgets and predictable rate |
| Two-pass | More deliberate allocation around a target bitrate | Bitrate-constrained output |
| Capped CRF | Quality-oriented encoding with a bitrate ceiling | On-demand delivery with variable complexity |
| Stream copy | No generation loss from re-encoding | Compatible sources that only need remuxing |
Choosing Between H.264, HEVC, VP9, and AV1
Codec choice should follow the delivery constraint, not a compression-efficiency leaderboard. H.264 with libx264 is usually the compatibility-first option, especially when a social platform will inspect, ingest, or re-encode the upload. HEVC with libx265 can reduce bitrate where playback support is known. VP9 and AV1 suit web delivery when you control the container, player, and browser requirements.
Match the encoder to the route
For H.264 in MP4:
ffmpeg -i input.mp4 -c:v libx264 -preset slow -crf 23 -c:a aac -b:a 128k output.mp4
For HEVC in MP4:
ffmpeg -i input.mp4 -c:v libx265 -preset medium -crf 28 -c:a aac -b:a 128k output.mp4
CRF is not a universal quality scale. Its result depends on the codec, source content, encoder settings, and playback conditions, so do not copy an H.264 value unchanged into HEVC, VP9, or AV1.
For VP9 in WebM:
ffmpeg -i input.mp4 -c:v libvpx-vp9 -b:v 0 -crf 31 -c:a libopus output.webm
The -b:v 0 and CRF combination enables quality-based VP9 encoding. VP9 uses a different practical CRF range from H.264, so validate the result rather than comparing the numbers directly. Check playback in the browsers and players that serve your audience.
For AV1, a common software path is:
ffmpeg -i input.mp4 -c:v libaom-av1 -crf 30 -b:v 0 -c:a libopus output.webm
AV1 can require substantially more encoding time, particularly with libaom-av1. Some FFmpeg builds also include libsvtav1, which is useful when throughput matters. Test the actual build, preset behavior, and playback support before making AV1 the default.
Social uploads need a delivery-specific check. Published-style YouTube recommendations cite roughly 8 Mbps for standard-frame-rate 1080p SDR and 12 Mbps for high-frame-rate 1080p SDR uploads. Compressing far below a platform's likely ingest target can damage quality before its own re-encode.
The smallest source file is not automatically the lowest-cost pipeline. Rejected uploads, failed validation, and poor second-generation encodes can outweigh transfer savings.
For destination-specific guidance, video compression techniques offers useful context. In production, create a compatibility-first H.264 rendition where reliability matters. Add HEVC, VP9, or AV1 only when the destination supports them and their bitrate savings justify the extra processing.
Building a Compression Pipeline You Can Trust
A local conversion can use one command. A production pipeline needs a decision layer around FFmpeg. Probe the source, choose the rate-control route, encode, validate, and retain diagnostics that make failures reproducible.
Probe before choosing settings
Collect the source properties before selecting flags:
ffprobe -v quiet -print_format json -show_format -show_streams input.mp4
Read the video codec, dimensions, frame rate, pixel format, duration, and audio streams. Then route the job according to its actual constraint:
- Broad playback support calls for H.264 in MP4.
- A hard file-size or delivery-bitrate limit calls for fixed bitrate or two-pass encoding.
- A quality-led on-demand rendition can use capped CRF, with a bitrate ceiling.
- A source that already matches the destination can use stream copy.
- An oversized source should be scaled before the encoder spends time preserving unnecessary pixels.
CRF alone does not guarantee a useful result. Record the selected mode, command, source probe, and destination rules with the job. That record lets the team reproduce an output instead of guessing which setting produced it.
Send the command through an API
A managed FFmpeg endpoint can keep worker orchestration, storage, progress reporting, and retries outside the application server. With RenderIO, a client can submit an FFmpeg command through a REST API, track the job, and receive processed output through signed URLs. The same pattern supports a single upload or a batch of destination-specific renditions.
Send the input reference, encoding options, and an idempotency key with each request. A client can retry after a timeout, and that key prevents the retry from creating a duplicate encode.
A practical chain can resize a source for a vertical destination, then encode a social-ready rendition:
ffmpeg -i input.mp4 -vf "scale=720:1280:force_original_aspect_ratio=decrease,pad=720:1280:(ow-iw)/2:(oh-ih)/2" -c:v libx264 -preset medium -crf 23 -c:a aac -b:a 128k -movflags +faststart output.mp4
Take the dimensions and crop policy from the destination specification. Do not stretch a horizontal source into a vertical frame, and test nonstandard pixel formats and audio streams against the actual platform.
Return complete FFmpeg stderr with the job result. Unsupported encoders, malformed filters, missing streams, timestamp errors, and pixel-format conversions often identify the fix quickly. For user-facing video, video background UX lessons can inform decisions about aggressive compression, muted audio, and a lighter fallback asset. After encoding, compare quality with VMAF rather than treating the output file size as proof of success.
Verifying Output Instead of Trusting File Size
A file that shrank dramatically can still be a failed output. Validation needs two layers: technical inspection with ffprobe, and perceptual comparison with a metric such as VMAF.
Start by checking the output streams:
ffprobe -v error -show_entries stream=codec_name,width,height,pix_fmt,r_frame_rate,avg_frame_rate -show_format -of json output.mp4
Confirm that the codec, dimensions, frame rate, pixel format, duration, and audio presence match the destination rules. This catches failures such as an unexpectedly removed audio stream, an incorrect scale filter, or a frame-rate conversion that introduced unwanted timing behavior.
For perceptual validation, compare the source and output with a VMAF-capable FFmpeg build. A typical filter pattern is:
ffmpeg -i output.mp4 -i input.mp4 -lavfi "[0:v][1:v]libvmaf=log_fmt=json:log_path=vmaf.json" -f null -
The exact filter options depend on the installed FFmpeg and libvmaf versions. VMAF should be treated as a gate, not a substitute for human review. Check the average score, inspect difficult segments, and review motion-heavy or text-heavy scenes where compression defects are easiest to notice.

One published example reported VMAF 93.29 alongside a reduction from 29.3 MB to 7.12 MB, which illustrates why both measurements belong in the acceptance record. See video testing automation for a broader testing workflow.
Set a quality threshold appropriate to your content, compare the worst segments as well as the average, and reject outputs that fail either the technical contract or the perceptual gate. A small file is useful only when it remains fit for its destination.
Your Compression Workflow Checklist
- Define the constraint: Choose maximum bytes, target quality, delivery bitrate, or processing time.
- Probe the source: Read codec, dimensions, frame rate, pixel format, duration, and audio streams.
- Select rate control: Use CRF for quality, fixed bitrate or two-pass for delivery targets, and capped CRF for controlled on-demand output.
- Route by destination: Choose H.264, HEVC, VP9, or AV1 according to playback support and downstream re-encoding.
- Validate technically: Run
ffprobeand confirm the output contract. - Gate perceptually: Use VMAF and inspect difficult segments, not just the file size.
- Automate the decision: Store the probe, selected command, logs, and validation result with every job.
The next practical automation step is the probe-and-decide layer. Once the pipeline knows what it received and where the output must go, the encoding command becomes a controlled decision rather than a copied preset.
RenderIO lets you submit FFmpeg 7.x commands through a REST API, track processing progress, and receive outputs through signed URLs without managing your own transcoding workers. Visit RenderIO to build probe, compression, validation, and multi-destination video workflows around the same FFmpeg command model.